Virtual Screening Workflow
1. Introduction
Rapid virtual screening using molecular docking is a common technique in small molecule drug development. The Virtual Screening Workflw module of the Hermite ® platform provides high-throughput virtual screening capabilities.
Based on the Docking engine widely recognized in academia and industry, the developers of Shenshi Technology have deeply optimized GPU parallel computing. Combined with the massive virtual compound library built into the Hermite ™️ platform, you can quickly complete virtual screening tasks in large chemical spaces.
2. How to use
2.1 Entrance
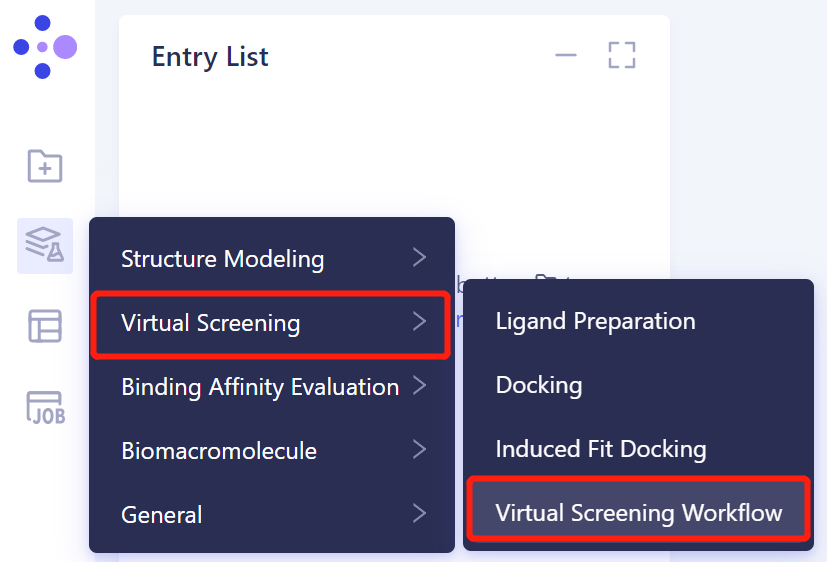
- The left general menu bar Function → Virtual Screening → Virtual Screening Workflow.
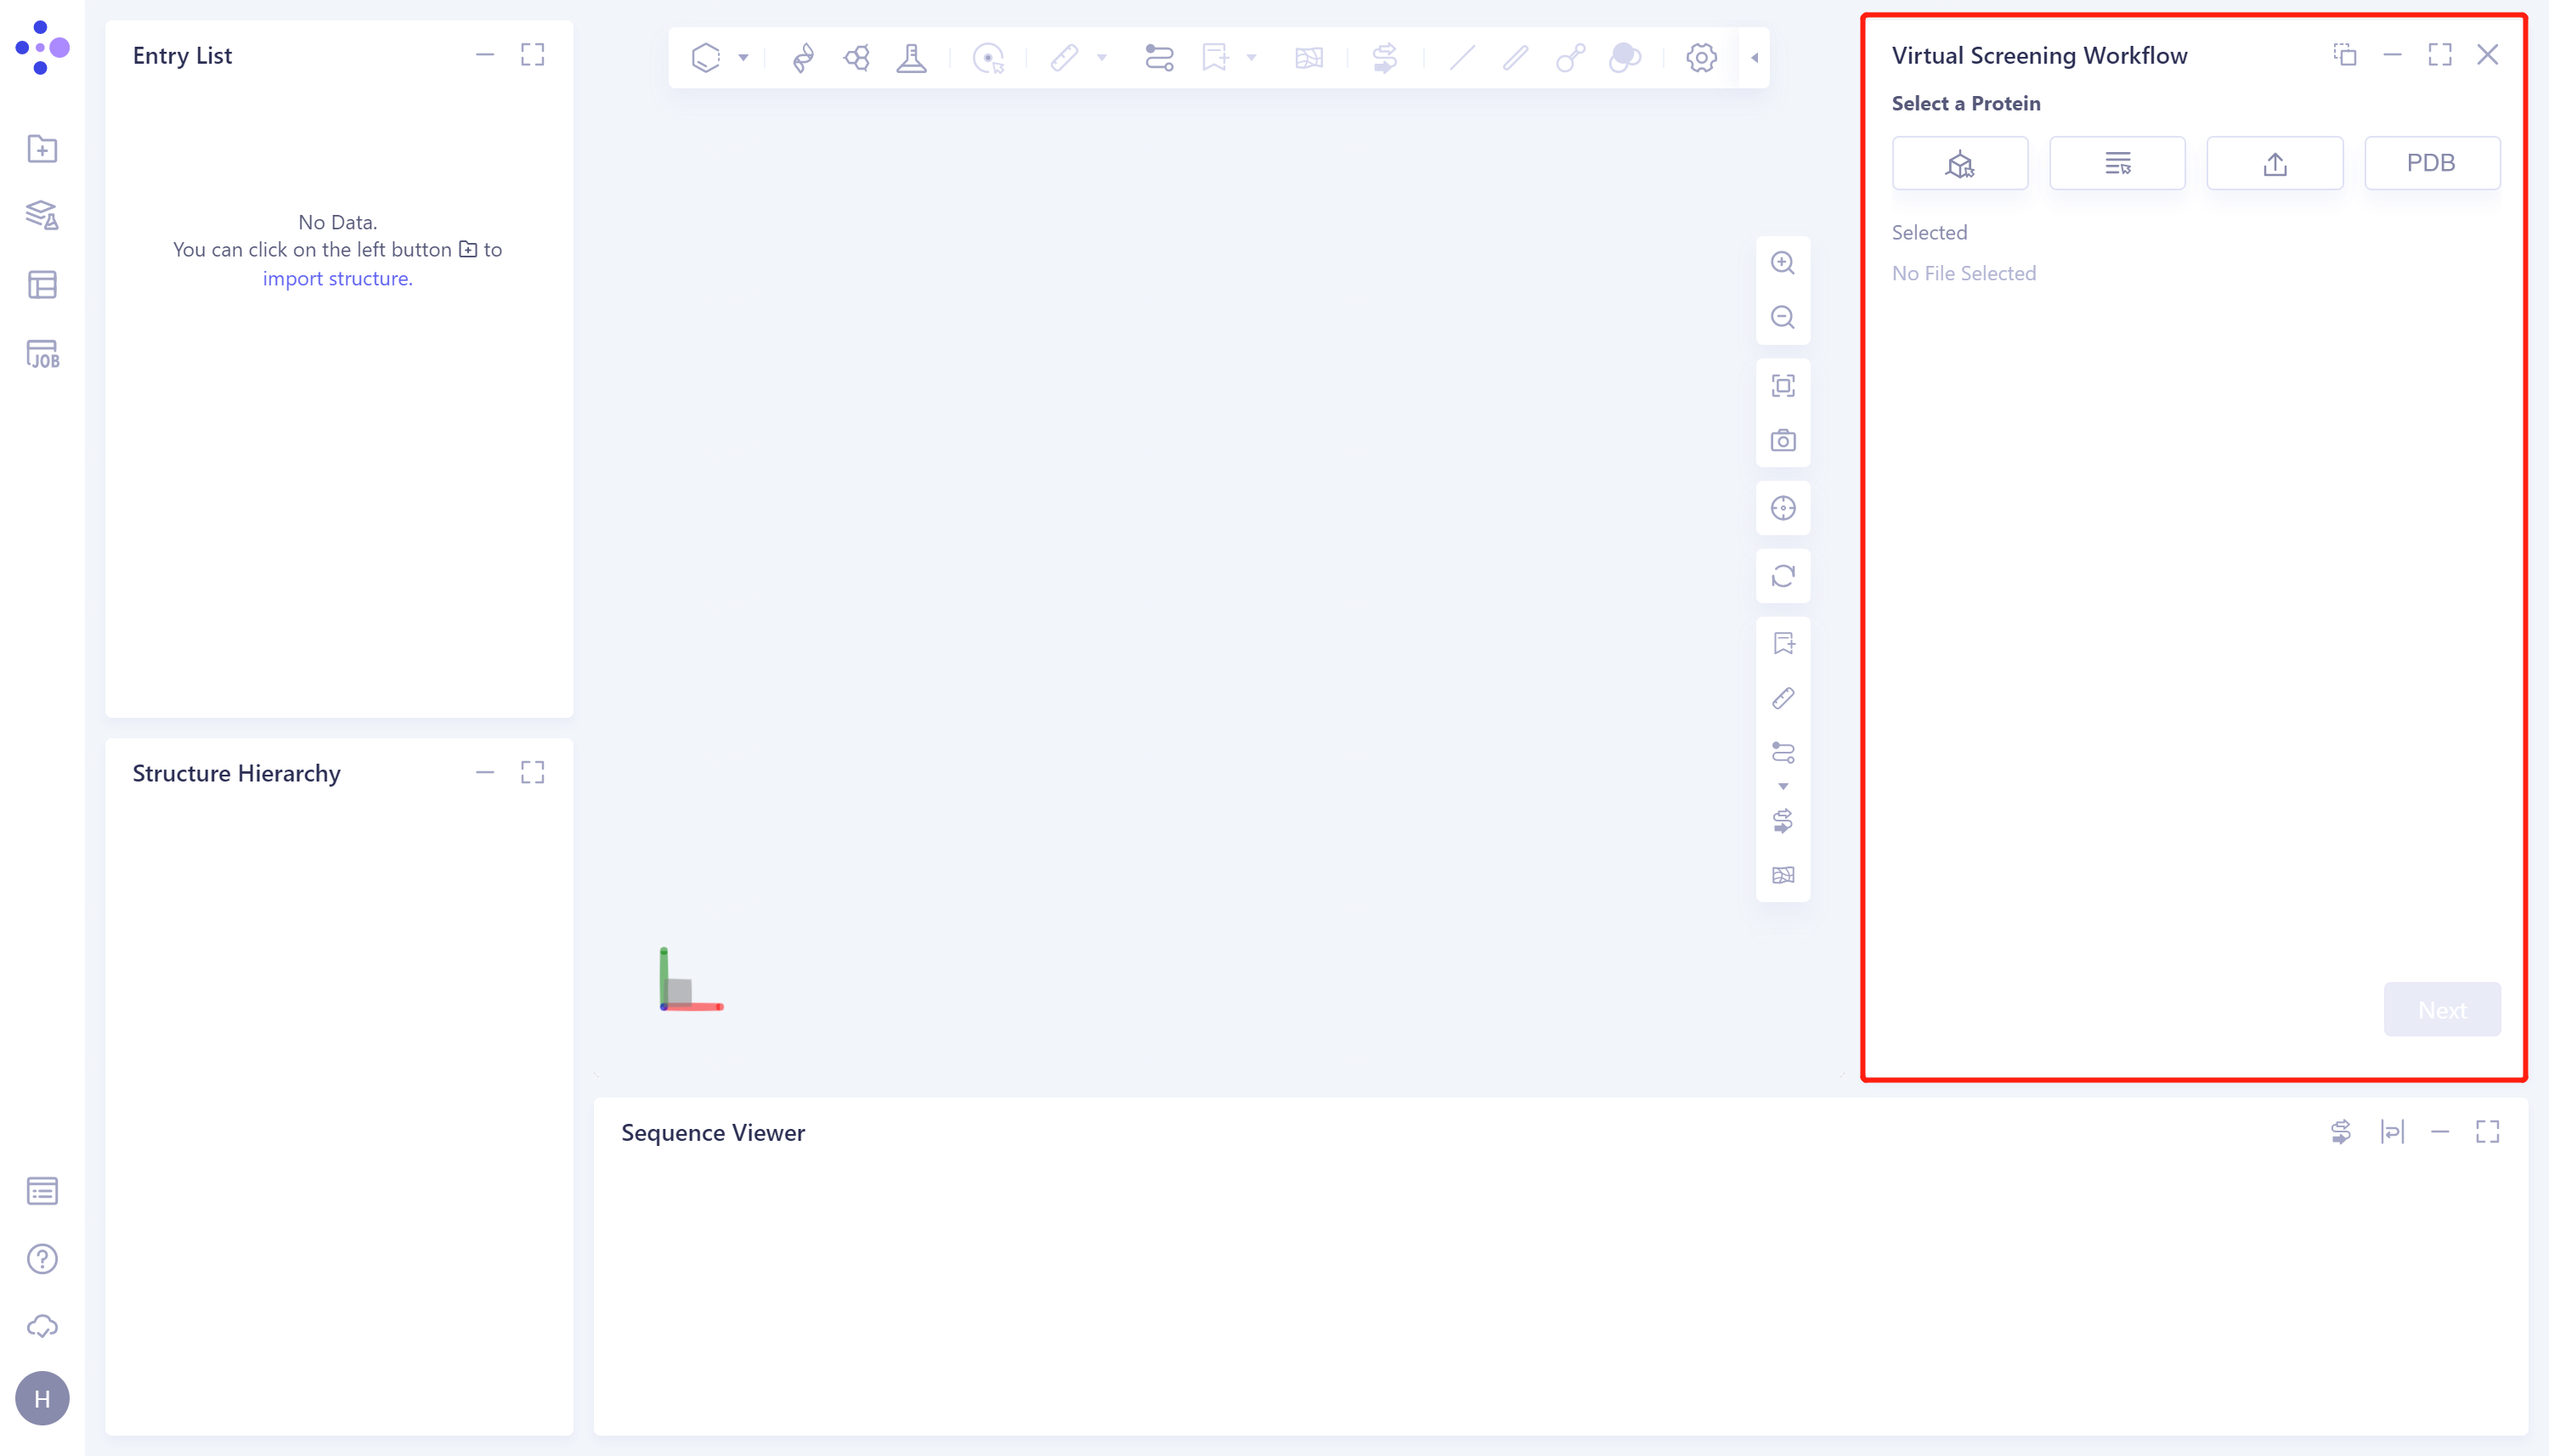
- The Virtual Screening Workflow window (shown in the red box) appears on the right. The overall interface is as follows:
2.2 Operation
2.2.1 Protein preparation
-
There are four ways of protein structure input:
-
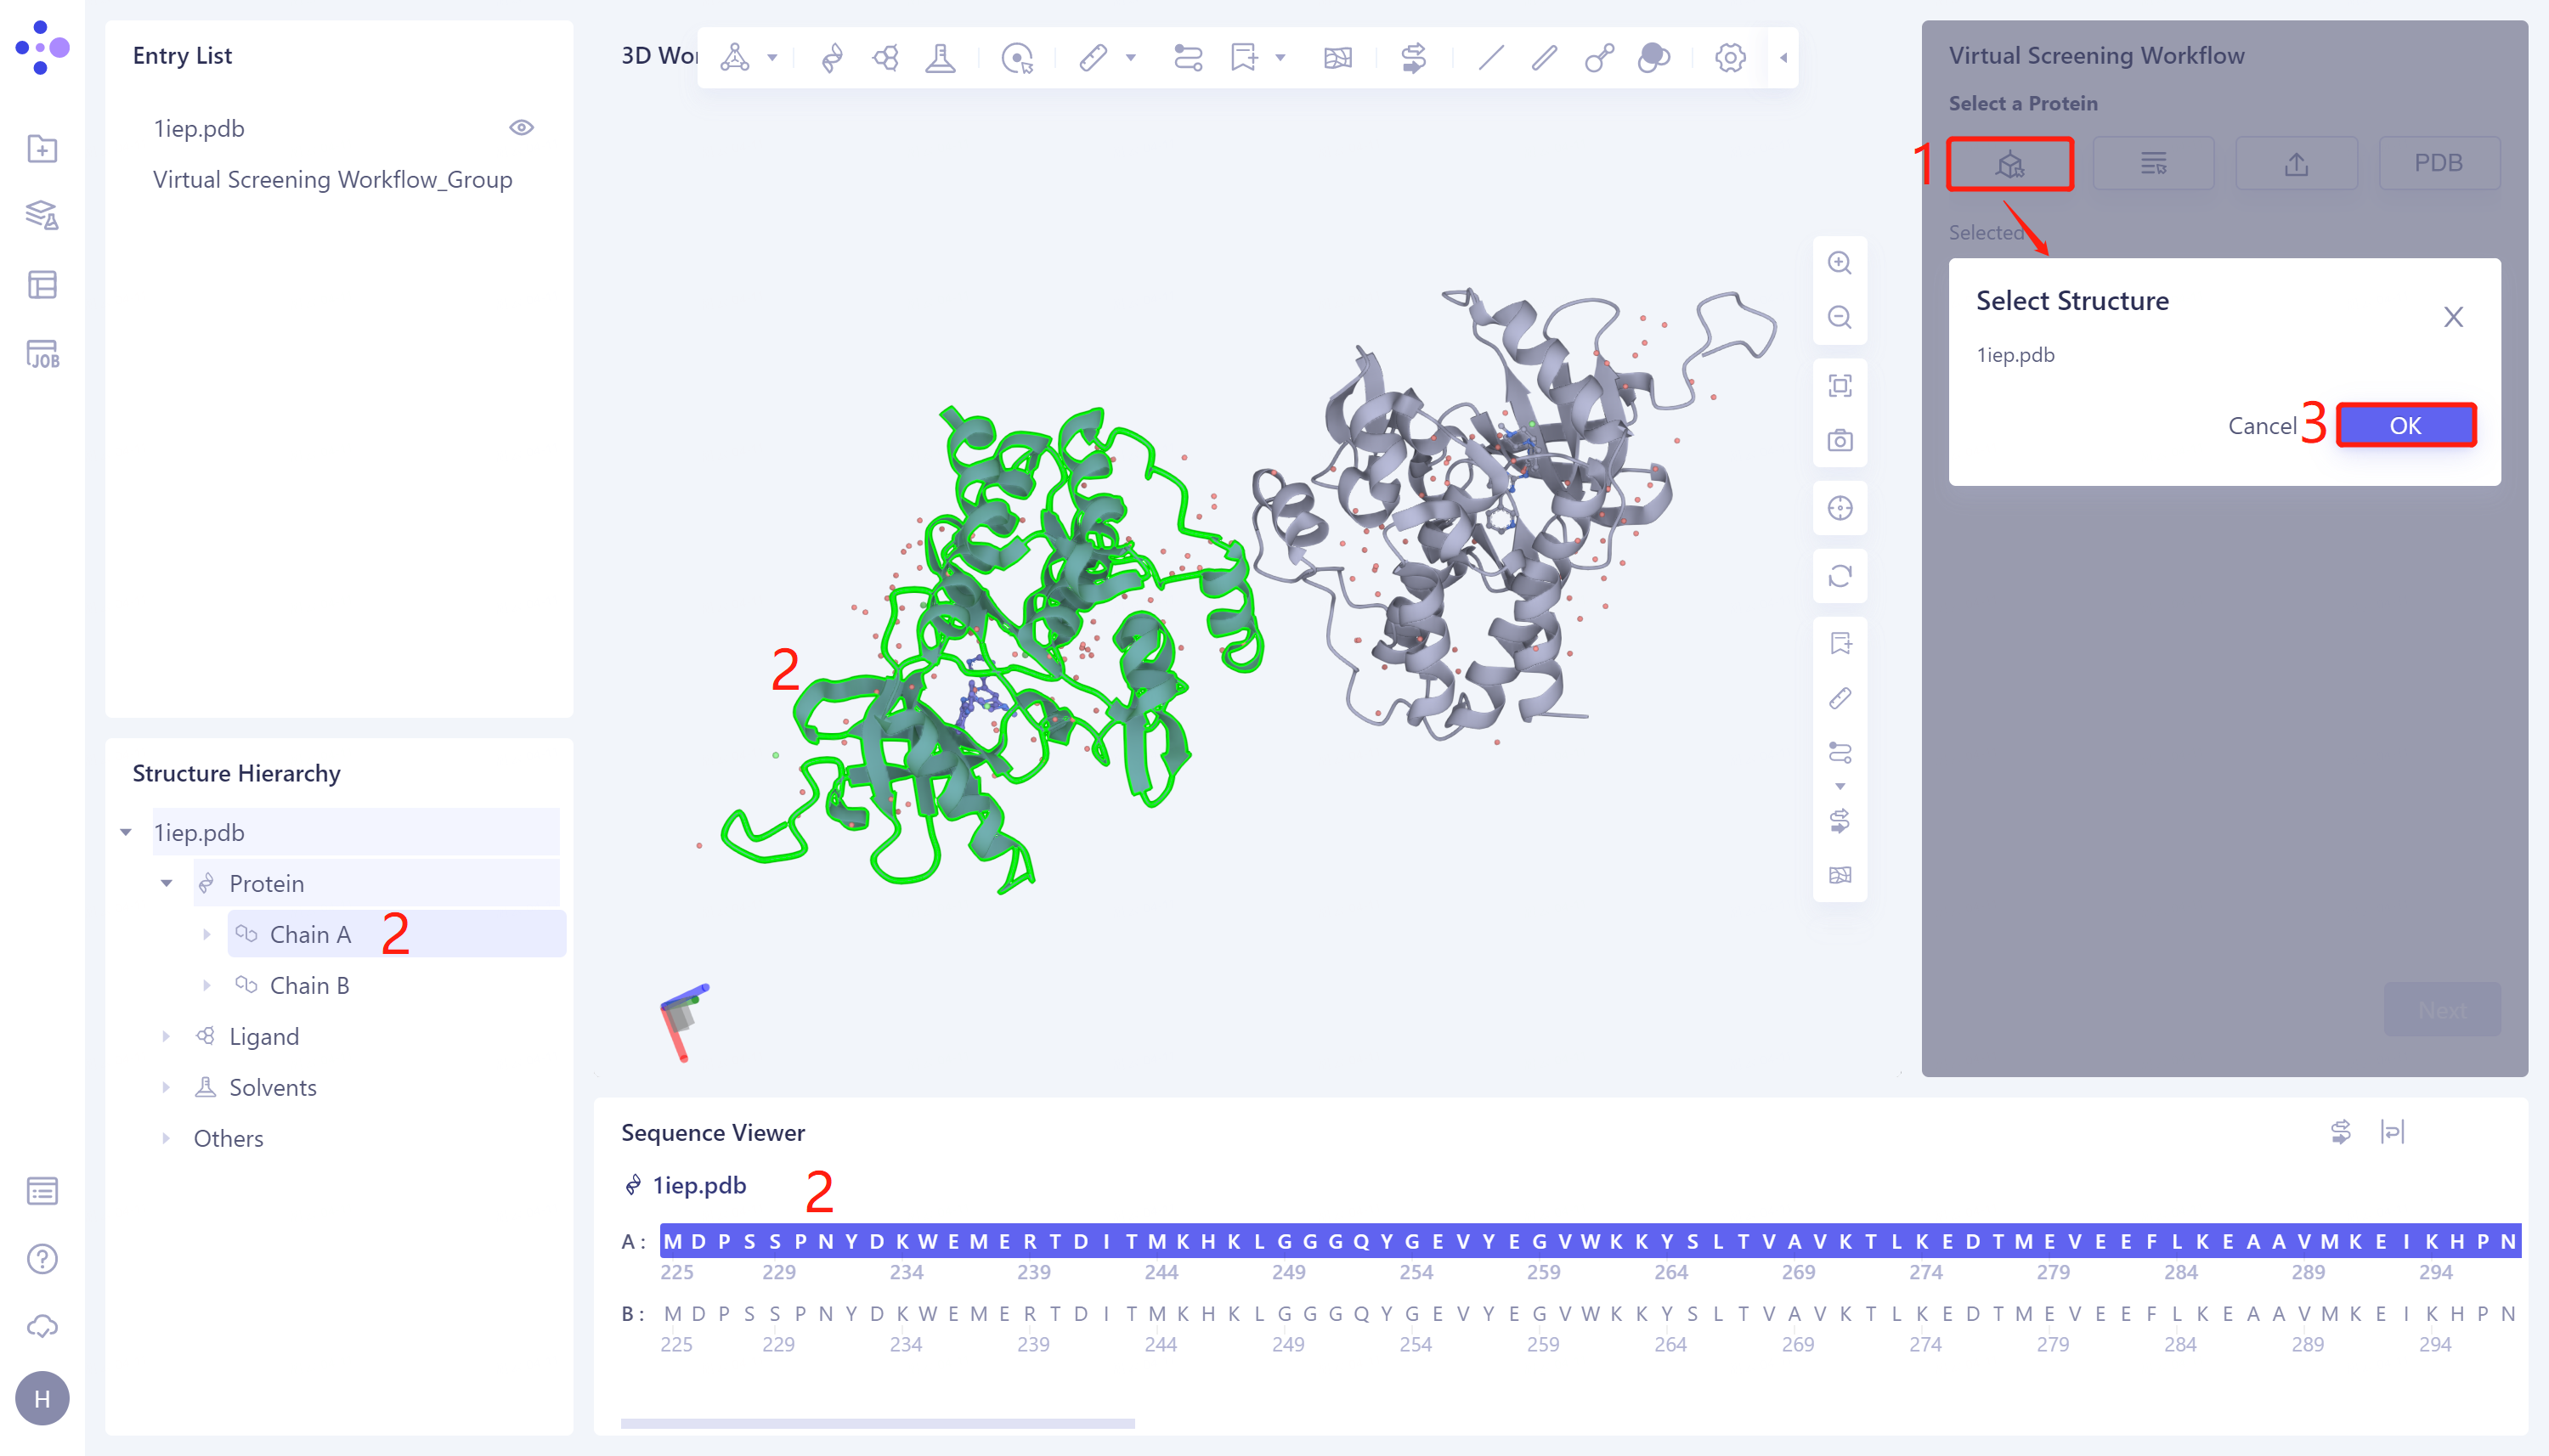
1)Select from 3D Workspace: Click the Select from 3D Workspace checkbox → pop-up Select Structure interface → Structure Hierarchy/Sequence Viewer/3D Workspace window on the left side of the interface Select the desired protein structure → Select Structure box to display the selected protein name, click OK.
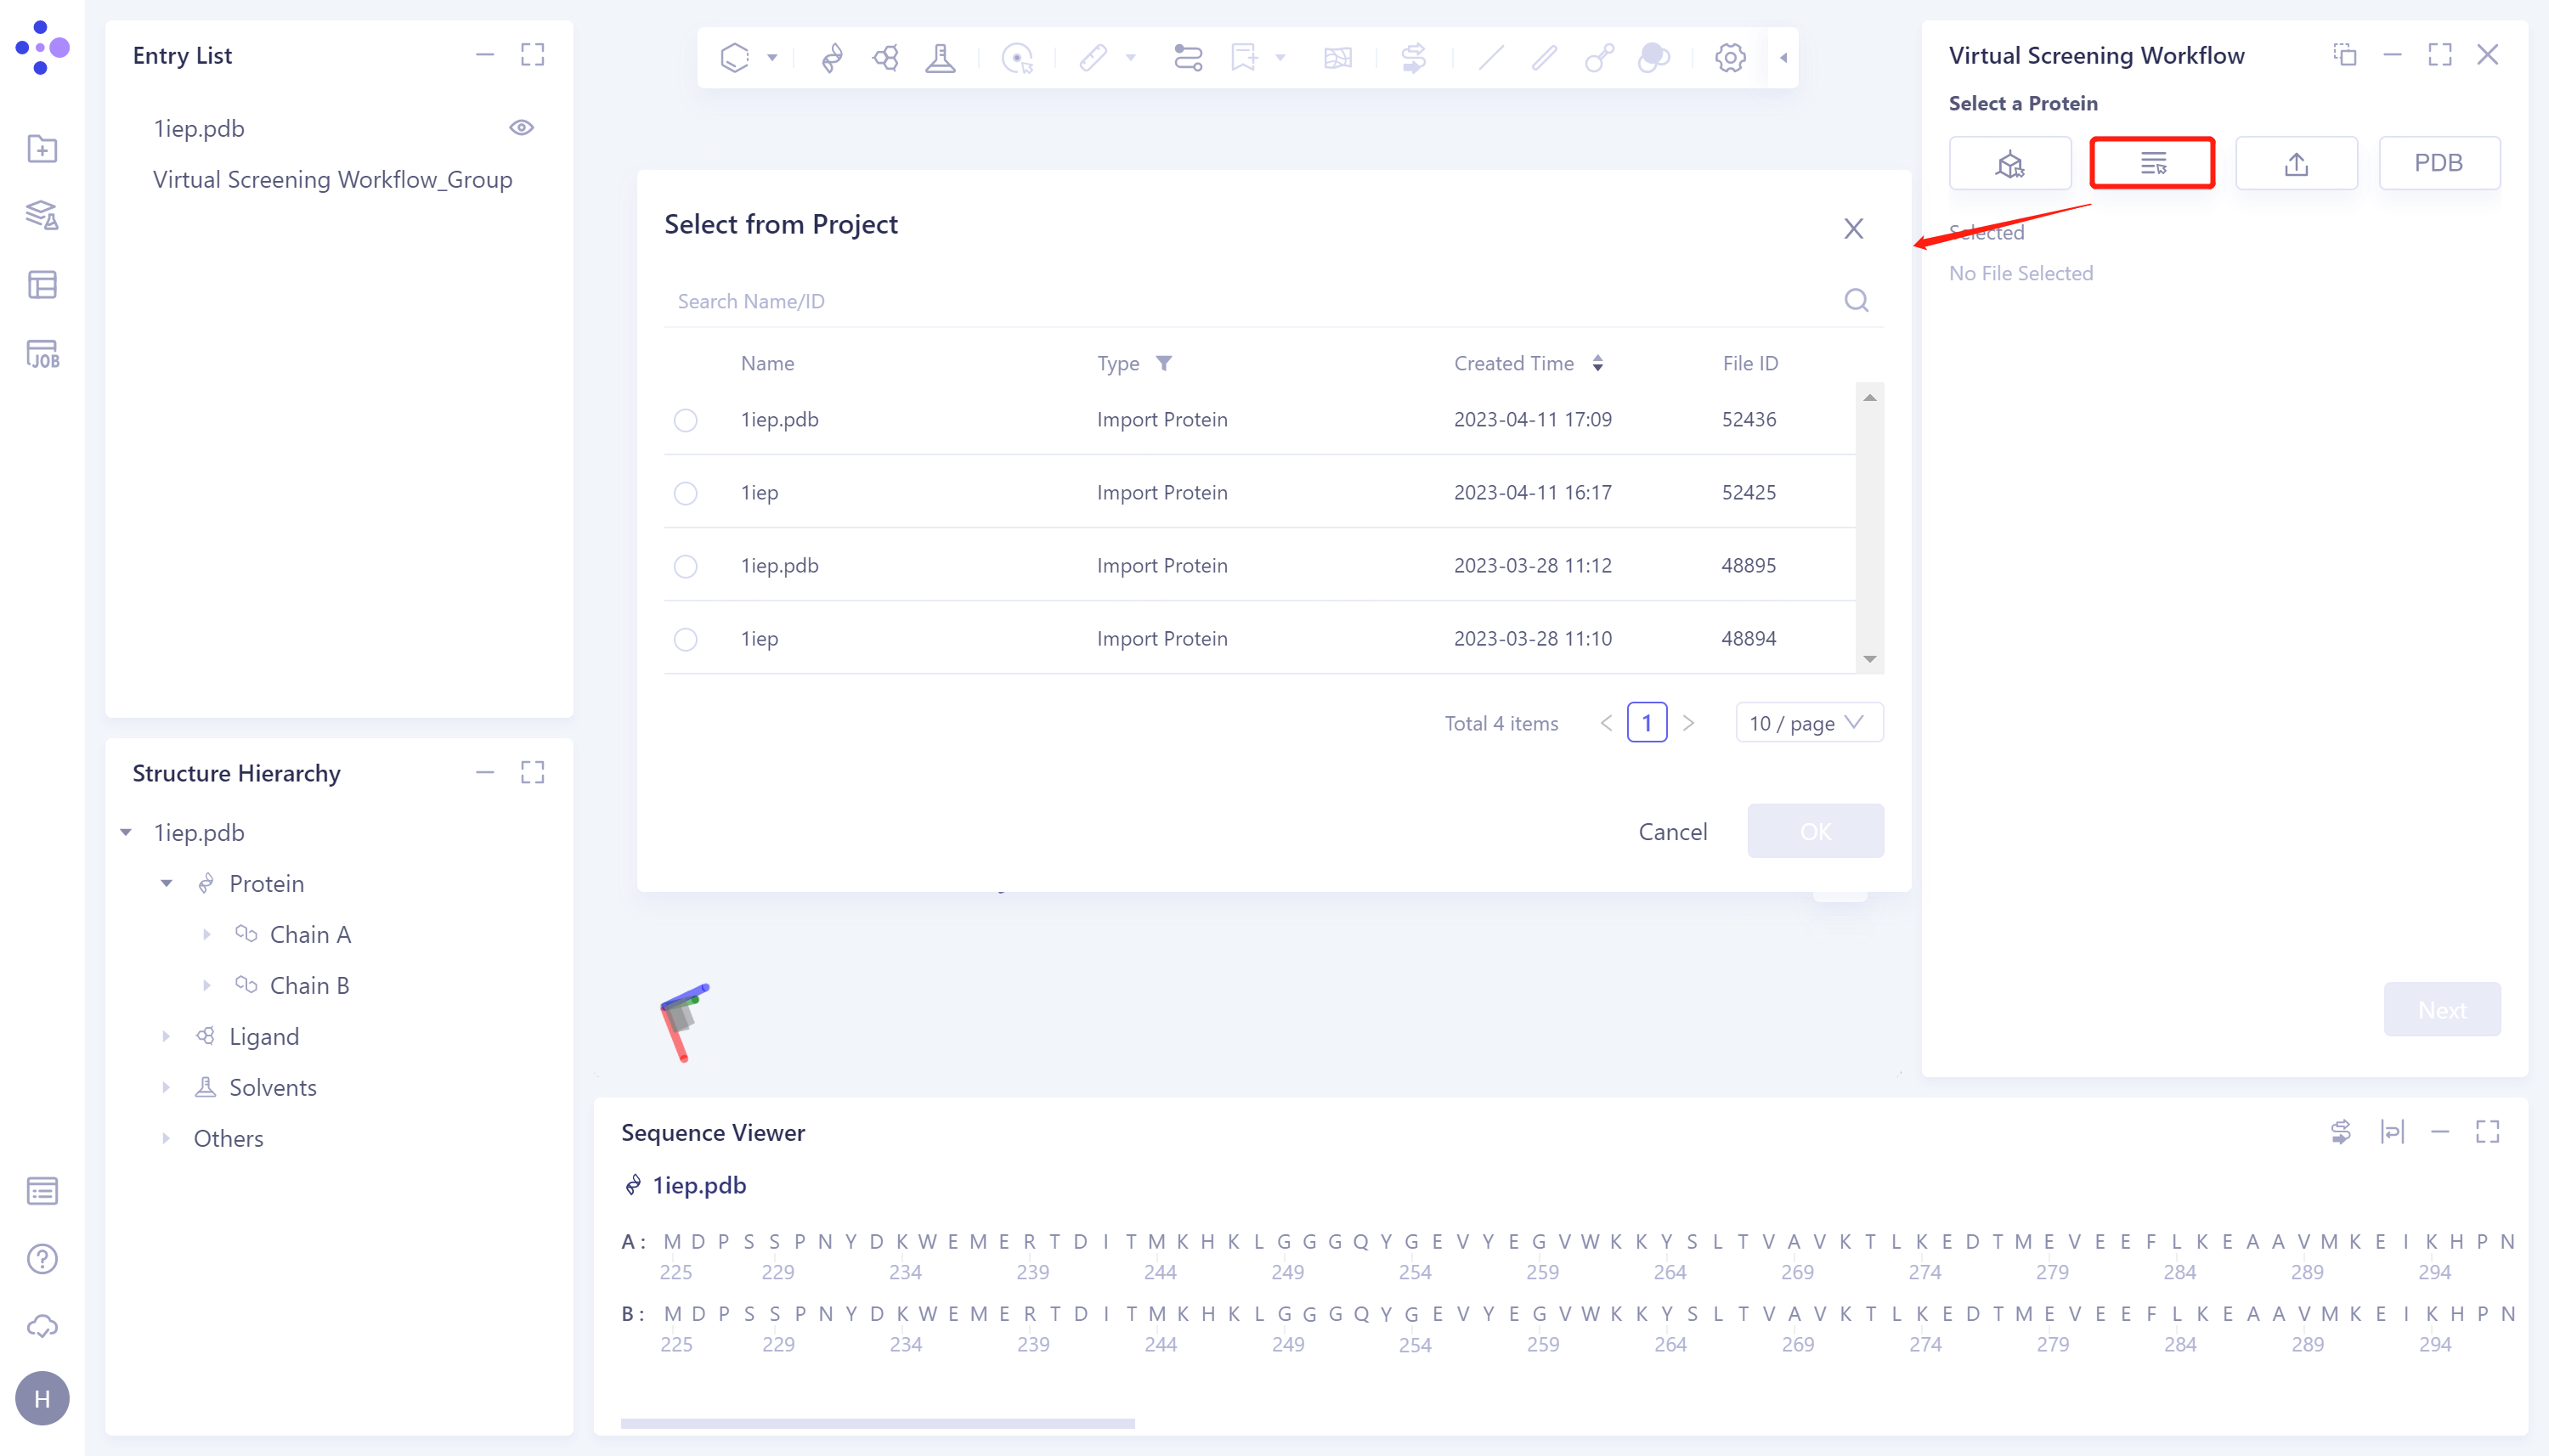
- 2)Select from Project: Click the Select from Project checkbox → The Select from Project window pops up in the middle of the interface to display the protein structures in the historical project → Select the required protein structure → Click OK.
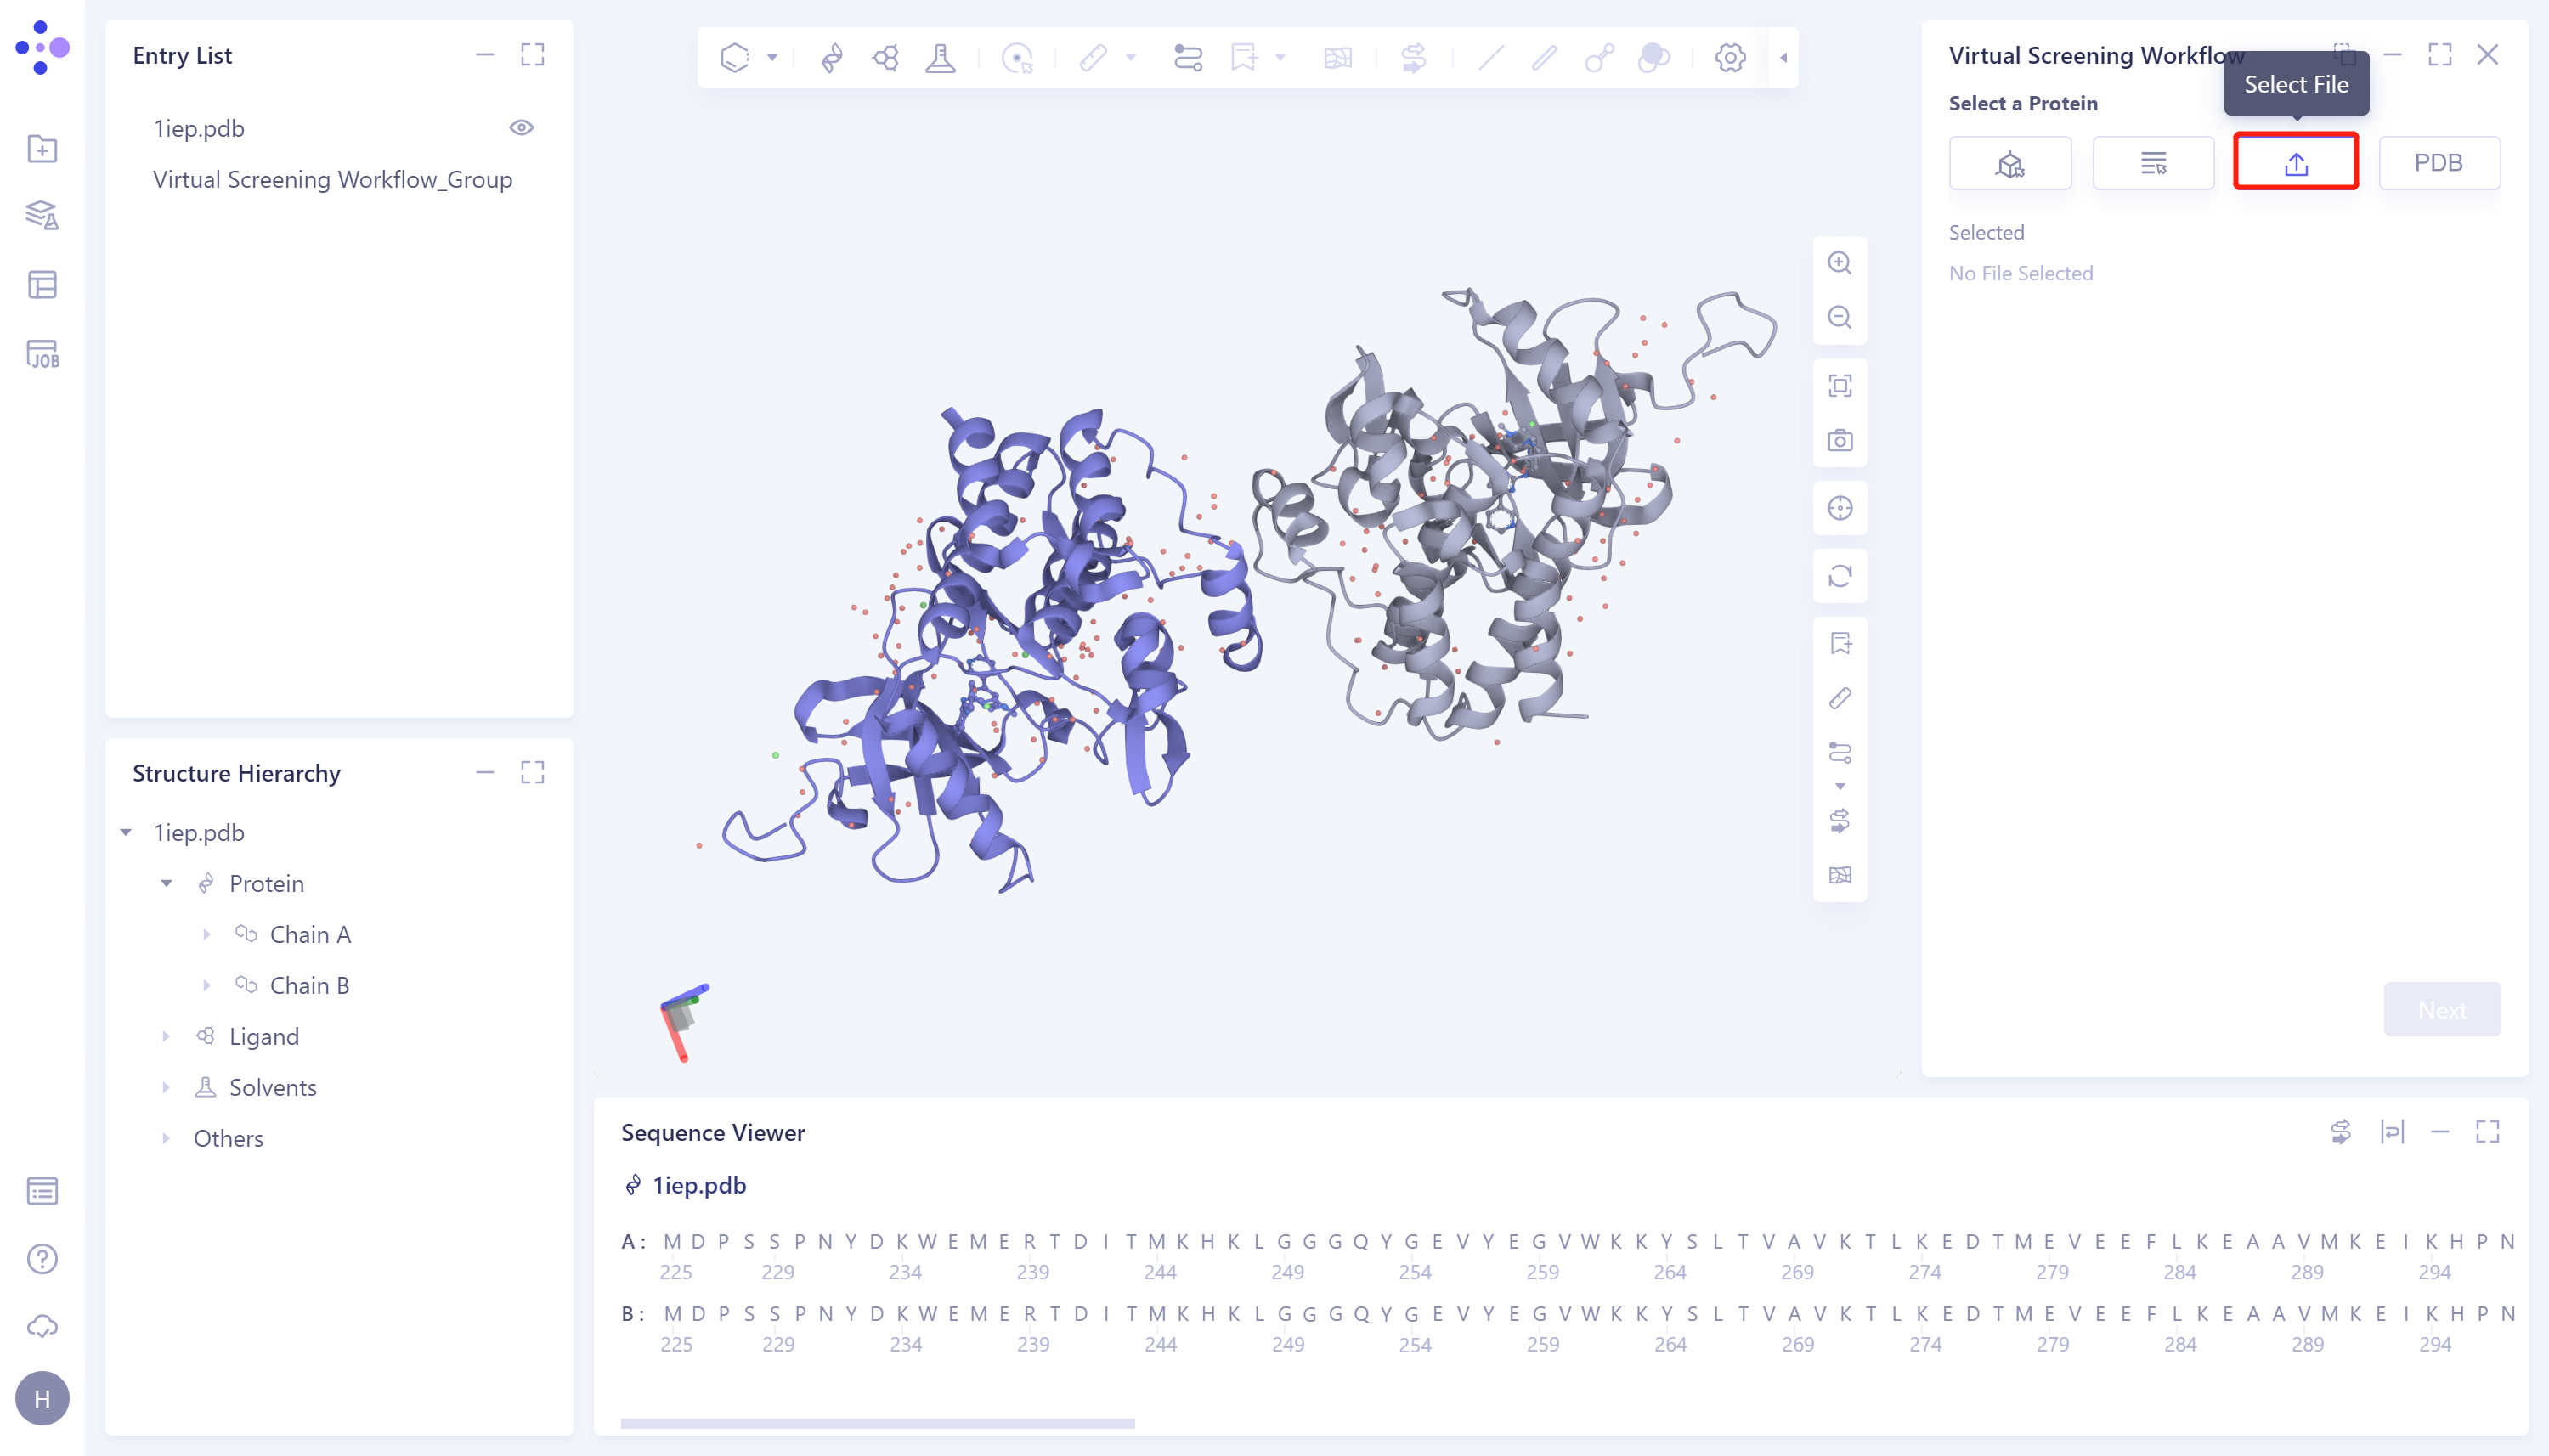
- 3)Select File: Select the desired protein structure (.pdb format) from the local folder and upload it.
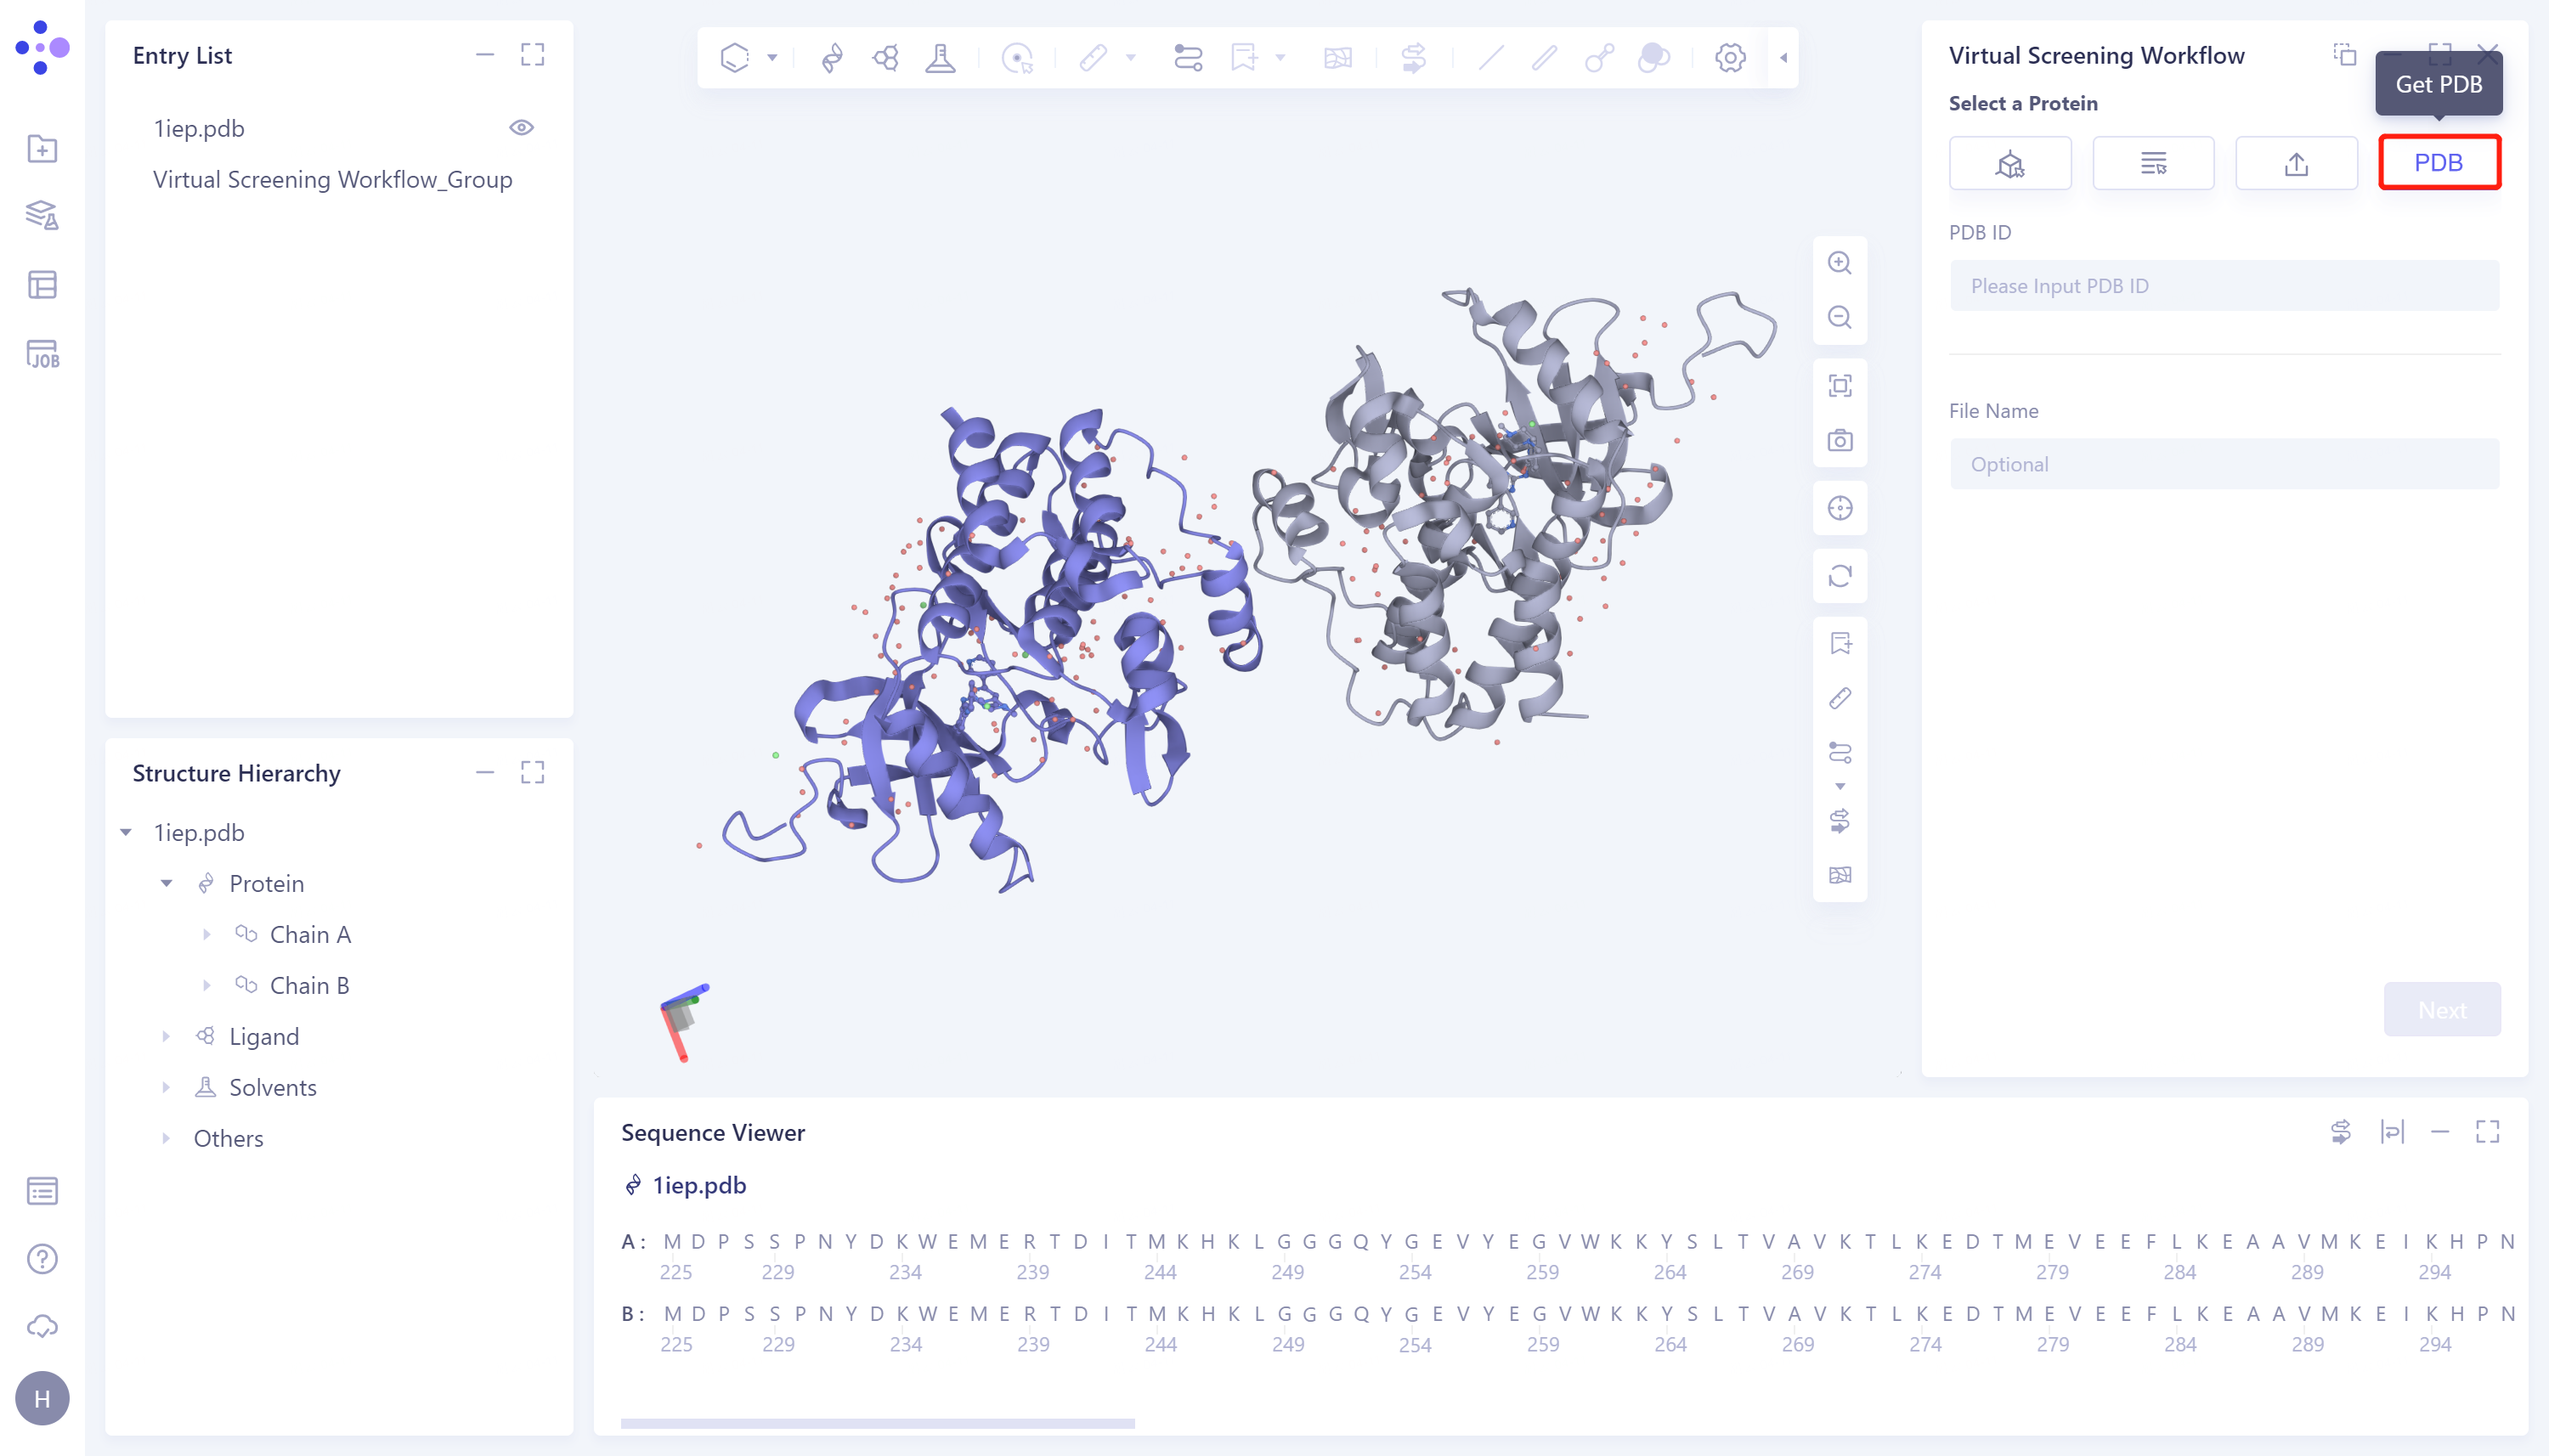
- 4)Get PDB: Retrieve and import protein structures from the PDB database according to the protein PDB ID.
-
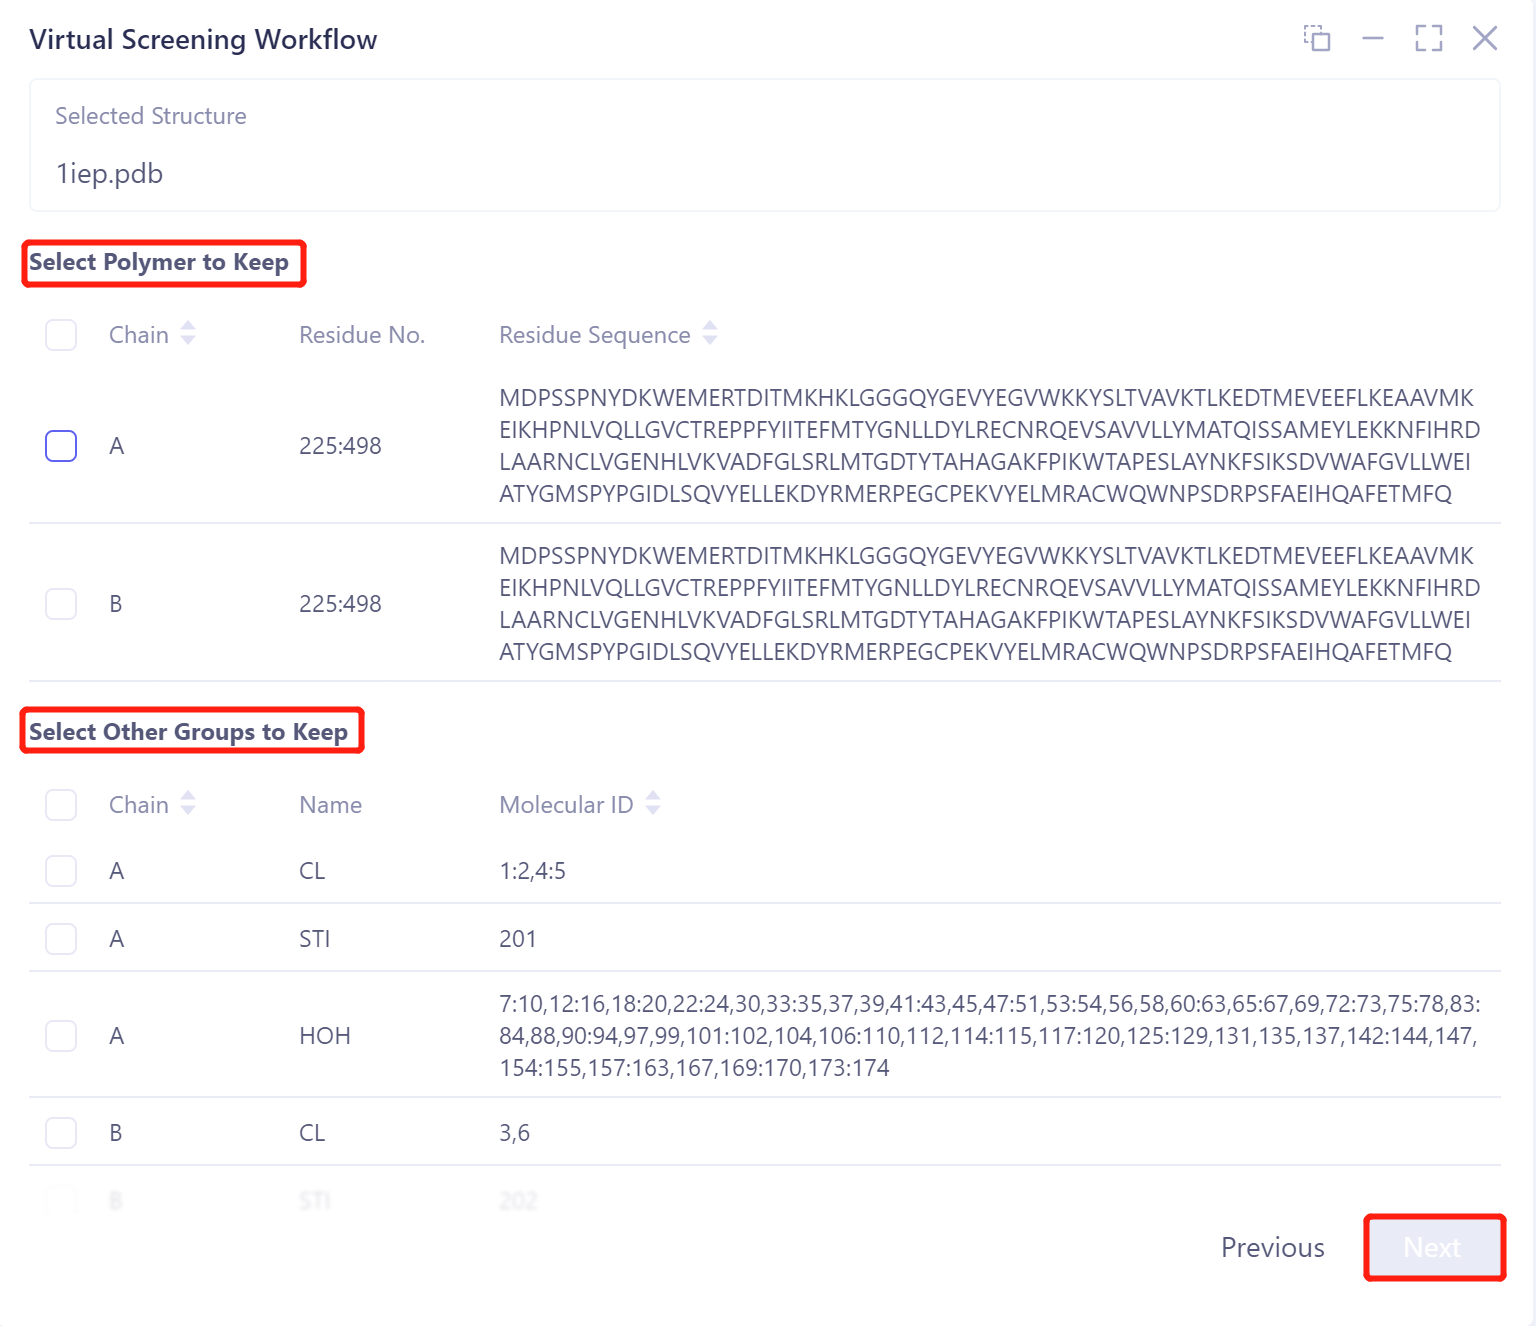
Protein treatment:
-
Select Polymer to Keep: Select the chain to keep.
-
Select Other Groups to Keep: Select other groups that need to be kept.
-
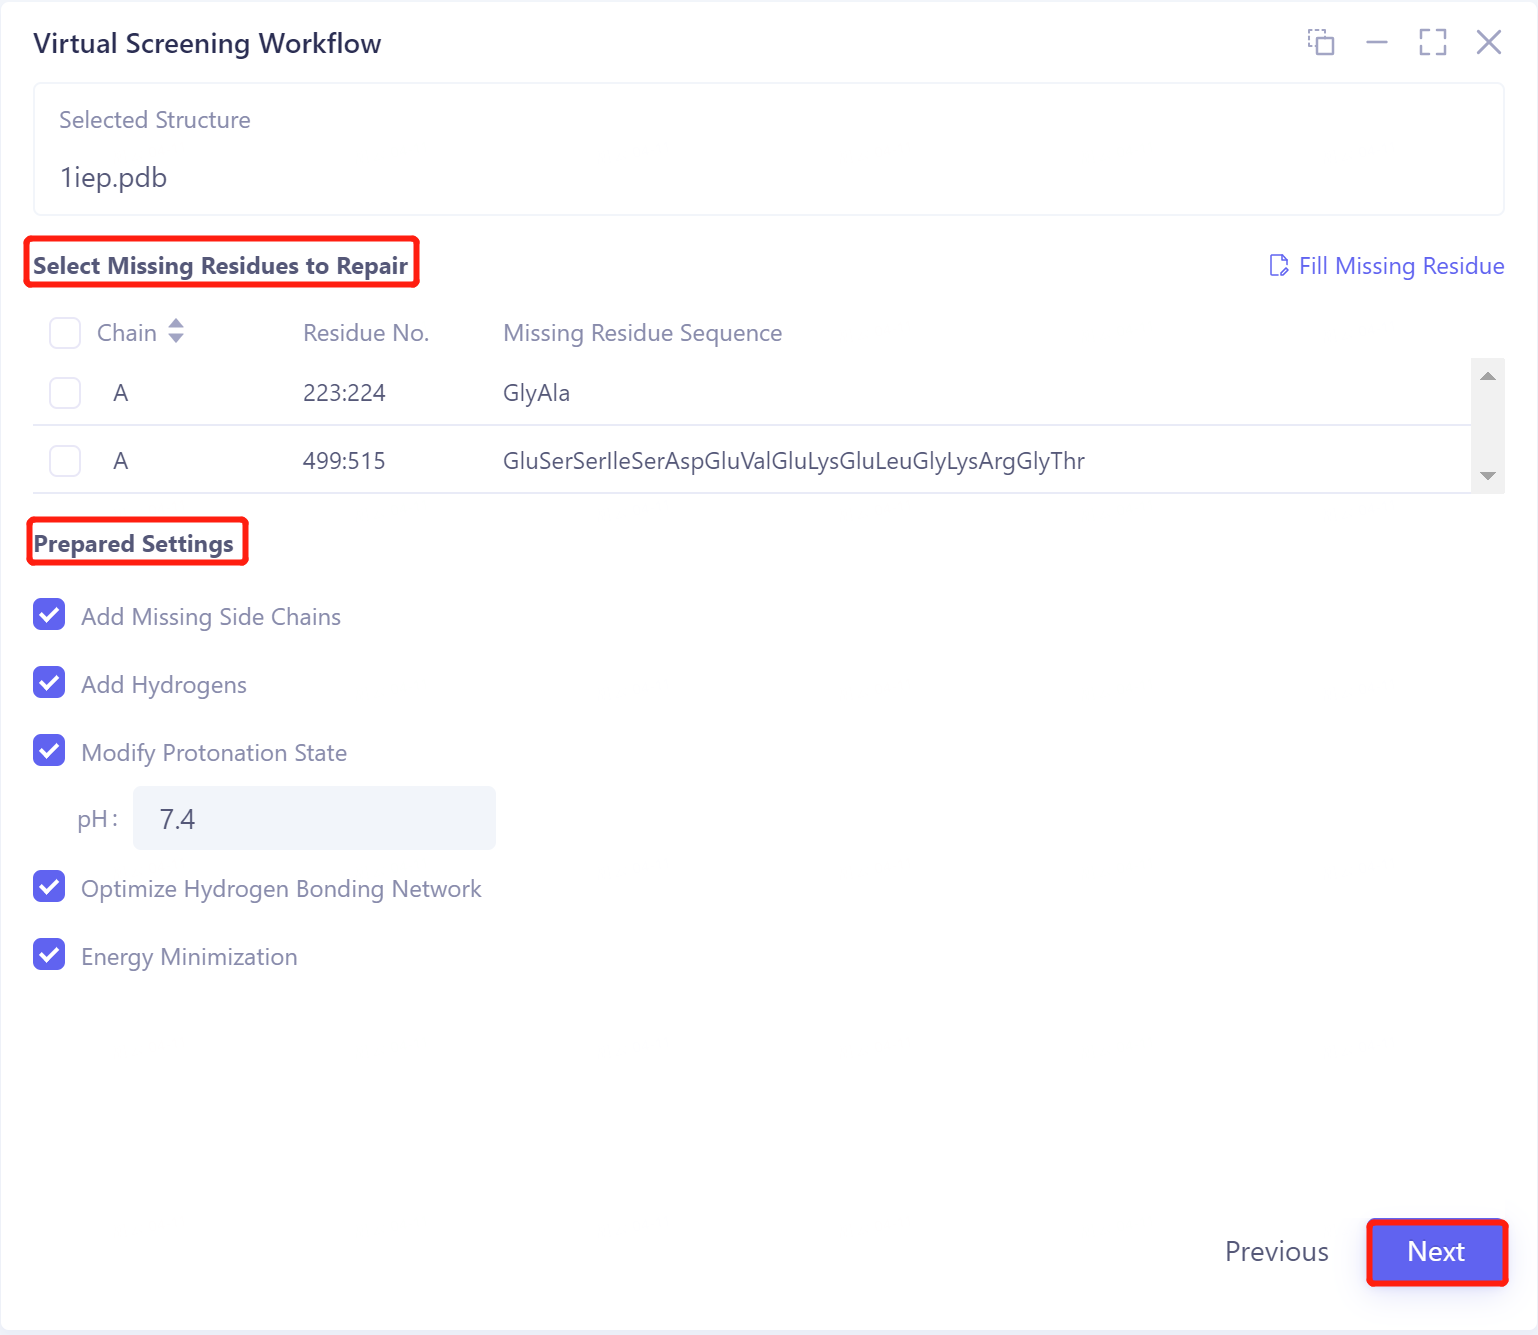
Select Missing Residues to Repair:
-
can be repaired based on sequence-related data within the .pdb file;
-
If you click "Fill Missing Residue", you can choose to upload a .fasta file to fix the missing information.
-
-
Prepared Settings
-
Add Missing Side Chains: Add Missing Side Chains;
-
Added Hydrogens: Hydrogenation;
-
Modified Protonation State: Adjust the ambient pH of the protein so that the protein reaches the protonated state at this pH;
-
Optimizing Hydrogen Bonding Networks: Optimizing Hydrogen Bonding Networks;
-
Energy Minimization: Energy minimization.
-
2.2.2 Ligand preparation
-
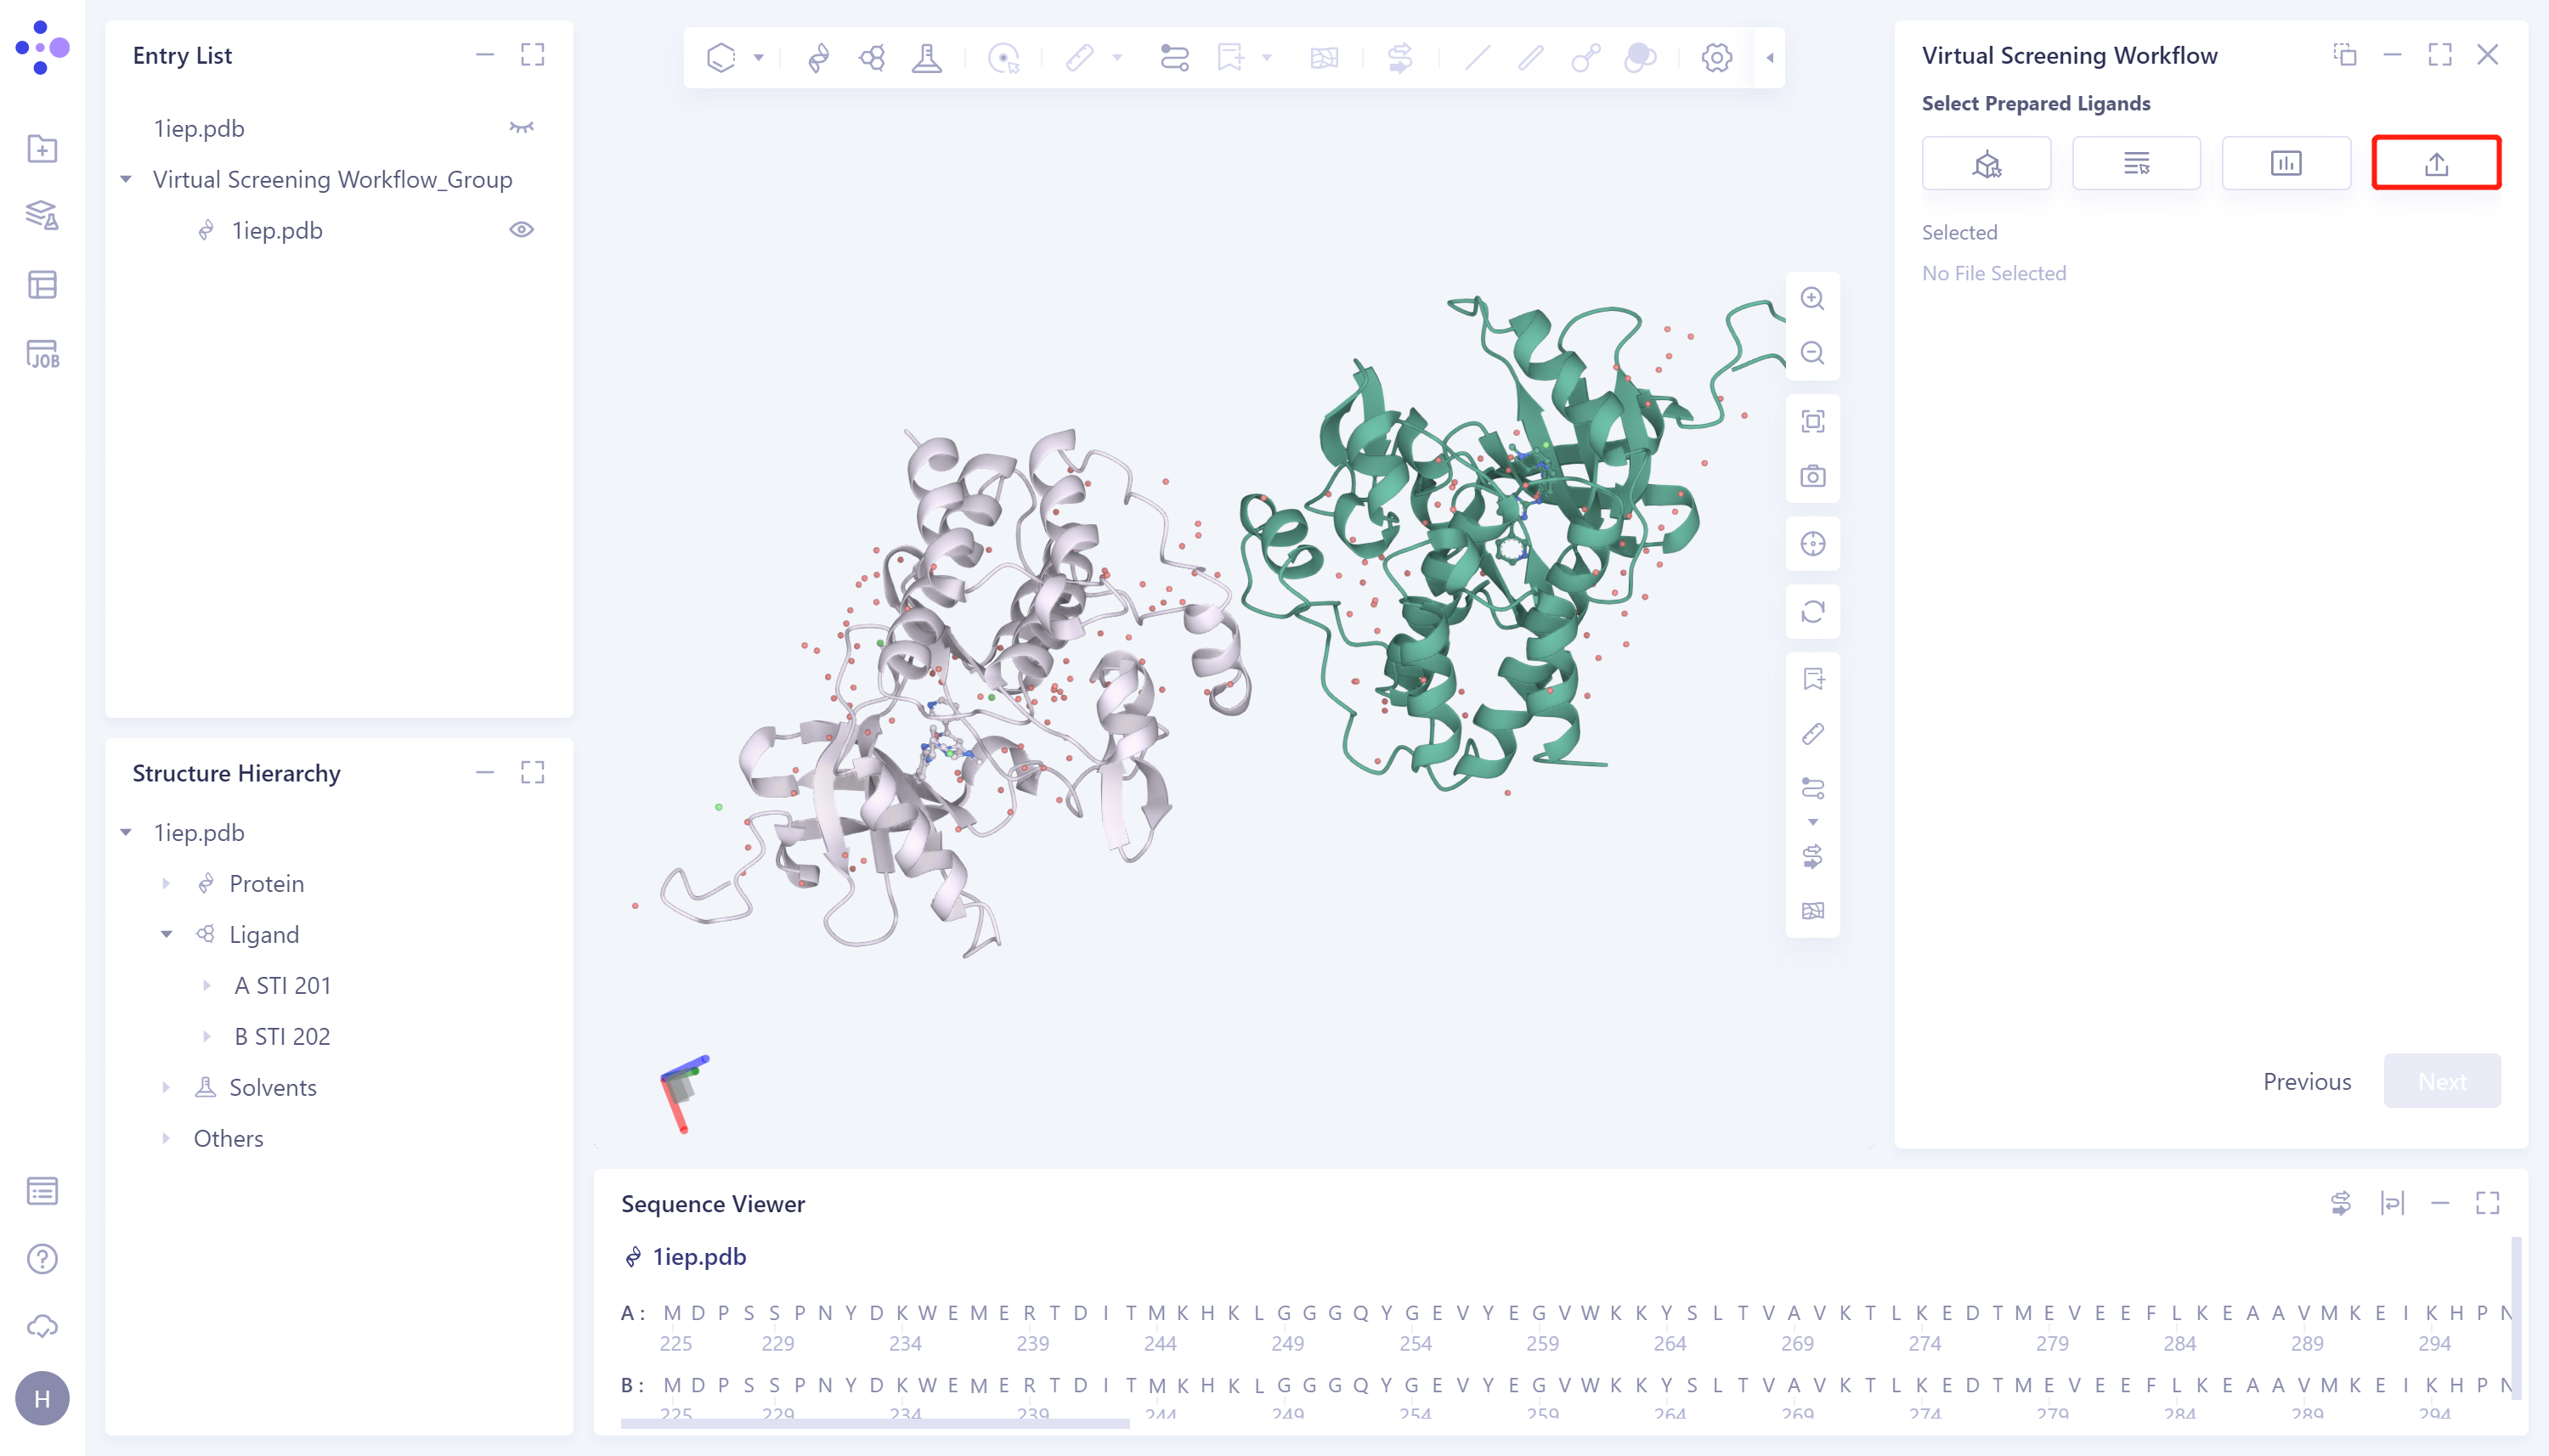
Ligand file input, there are four ways:
-
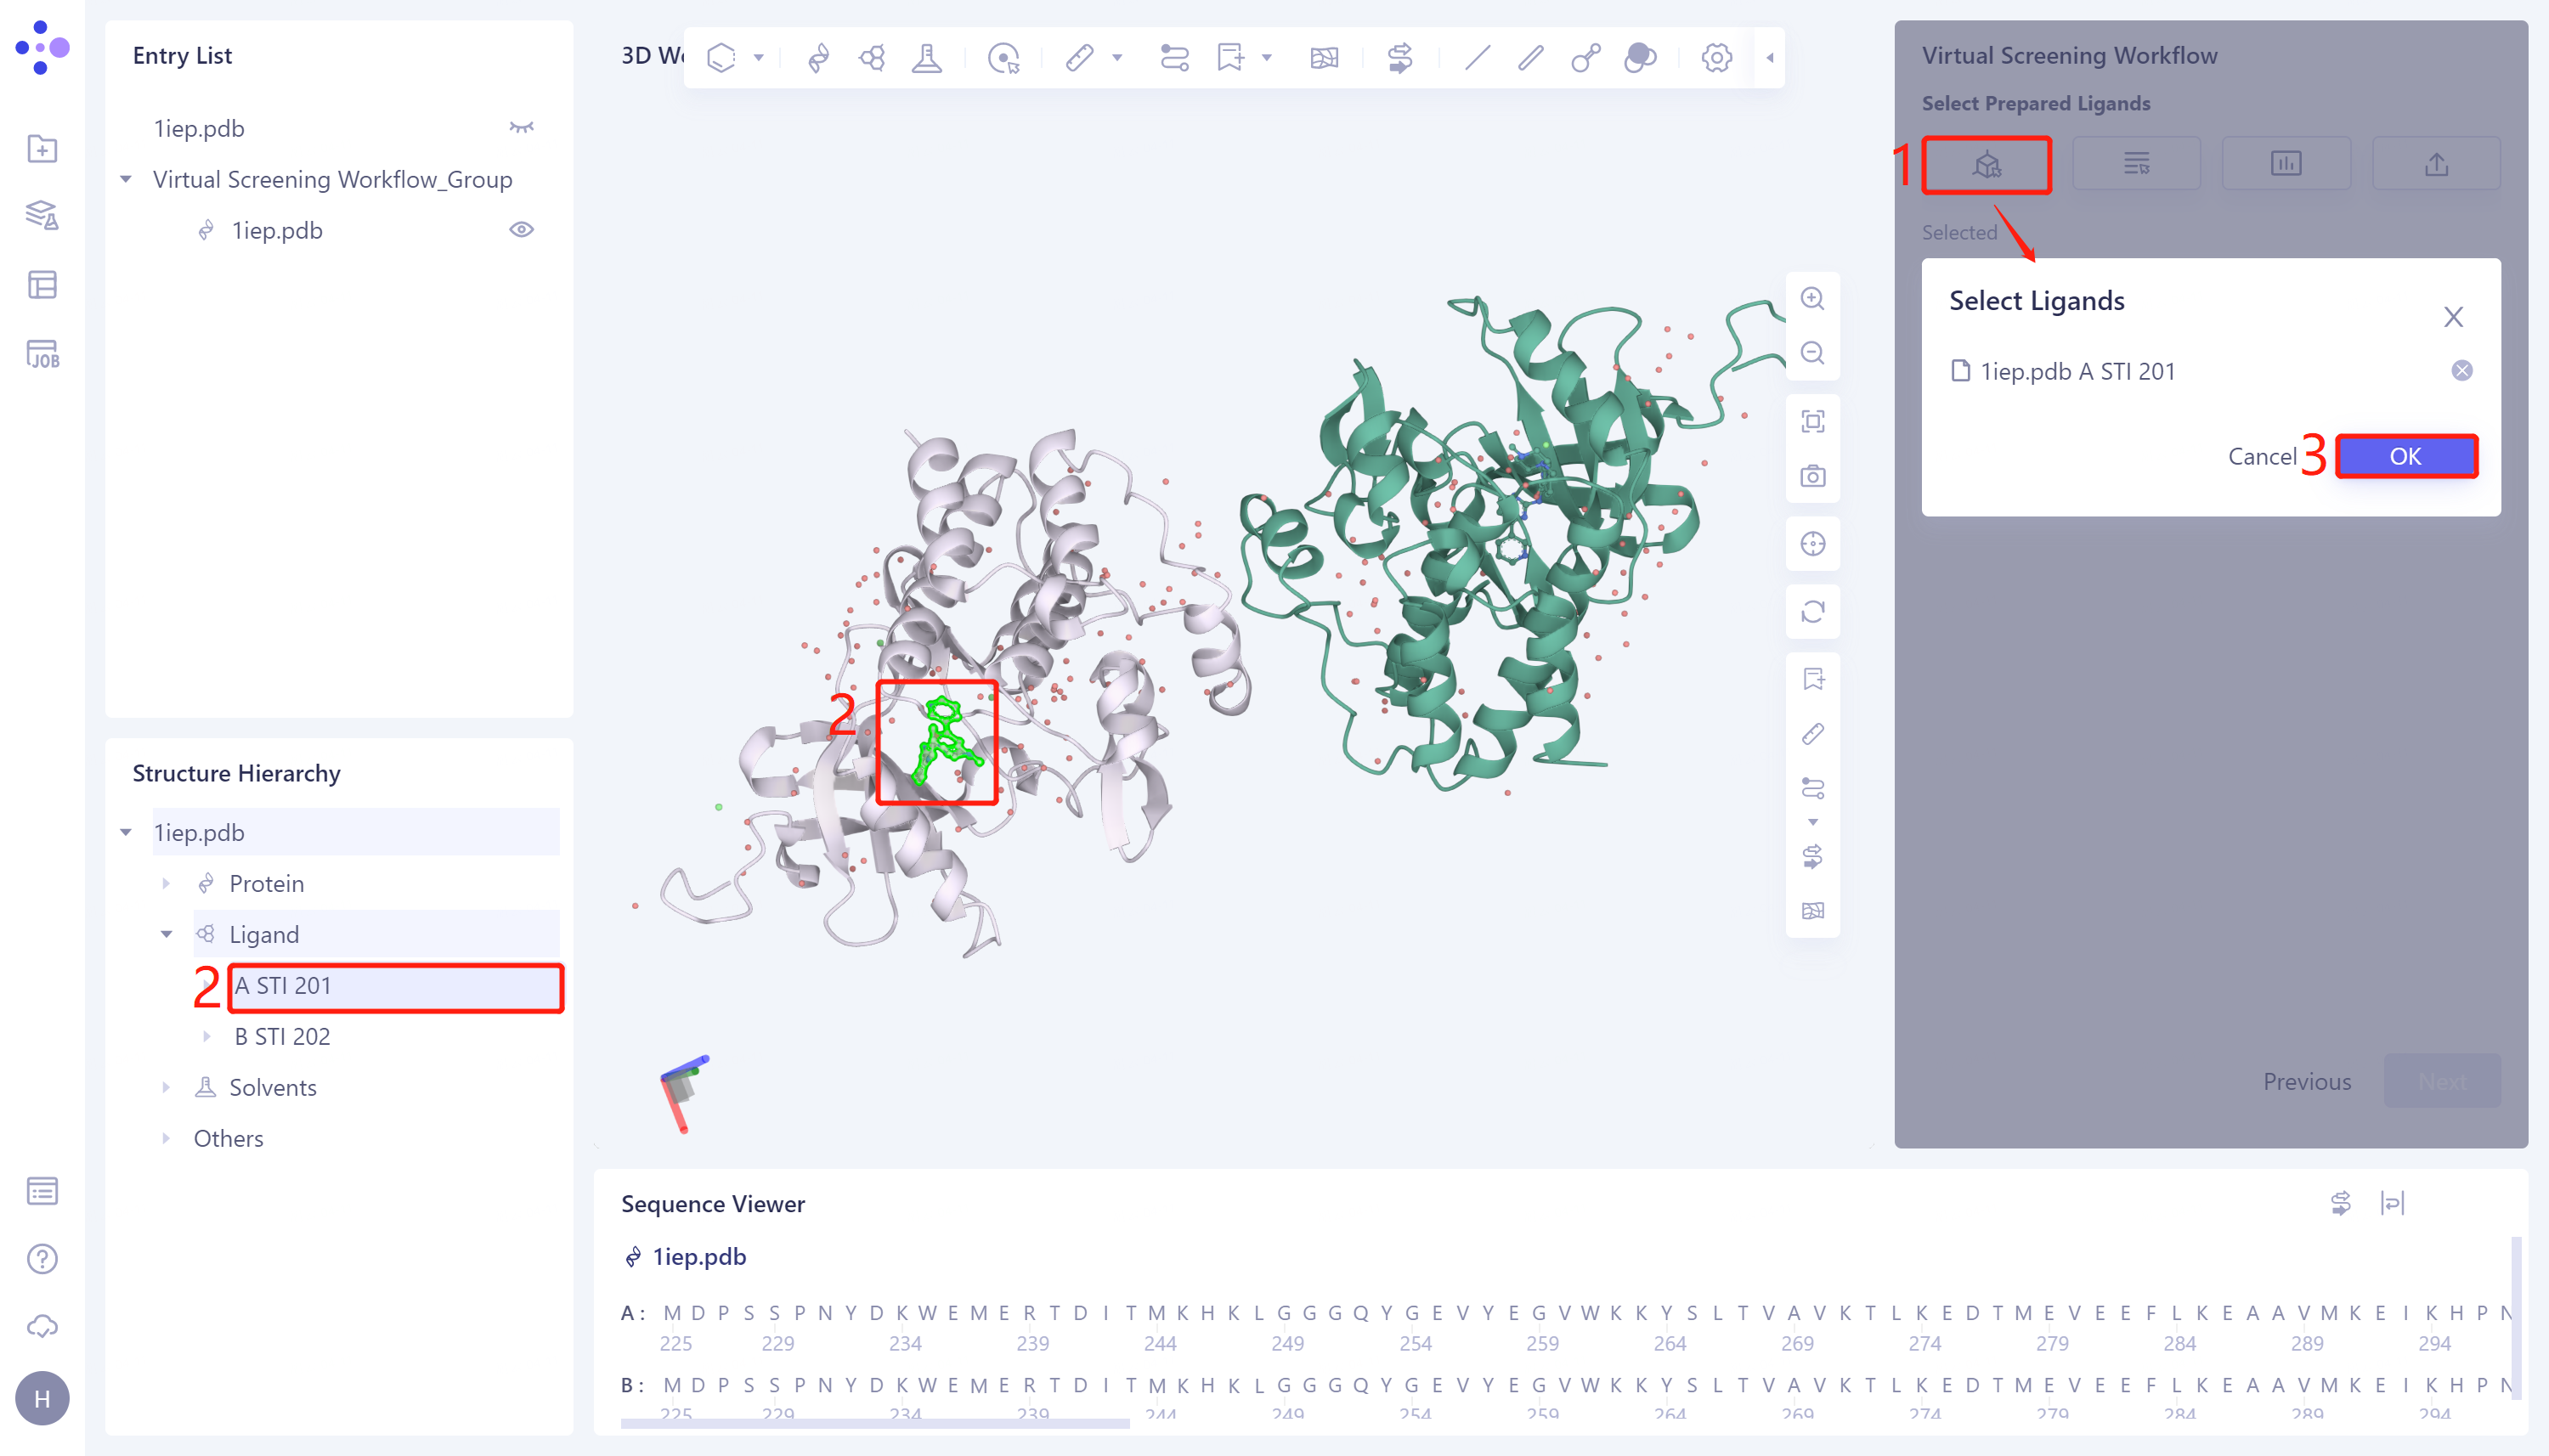
1)Select from 3D: Click the Select from 3D checkbox → the Select Ligands box will pop up → Select the desired ligand structure in the Structure Hierarchy/3D Workspace window on the left side of the interface → Select the ligand name selected in the Select Structure box, and click OK.
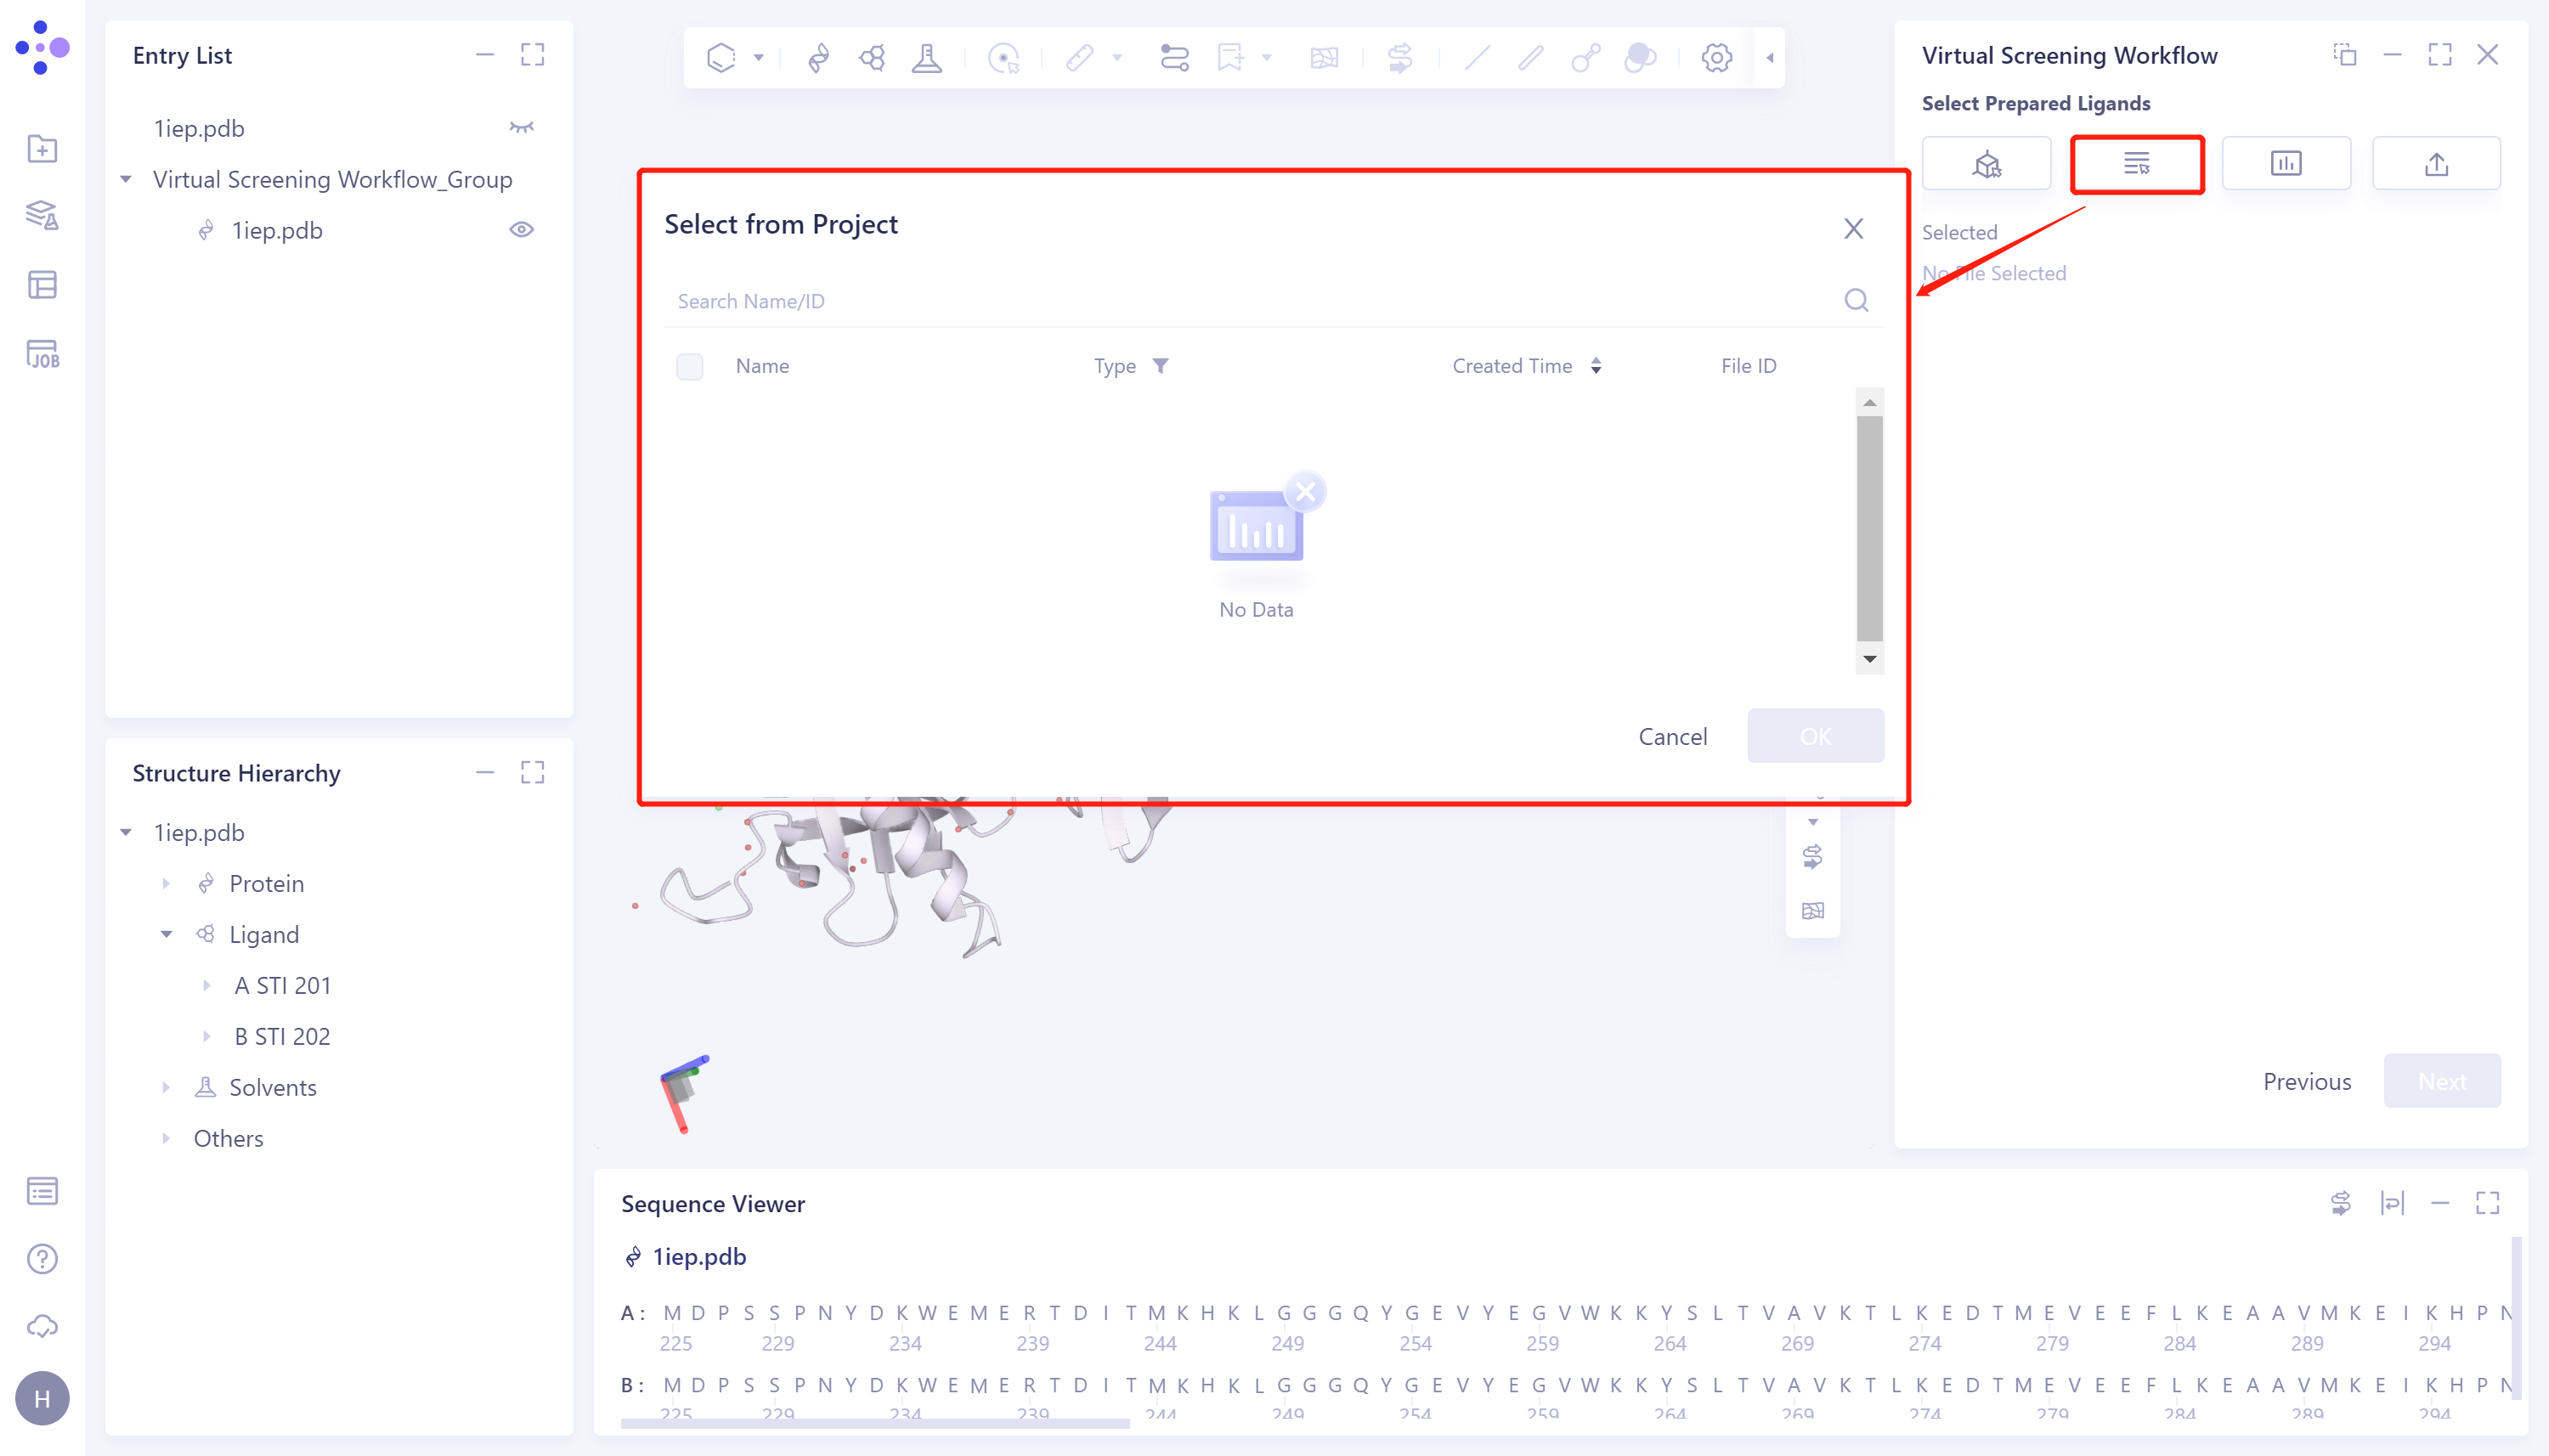
- 2)Select from Project: Click the Select from Project checkbox → the Select from Project interface pops up in the middle of the interface → Select the desired ligand structure → click OK.
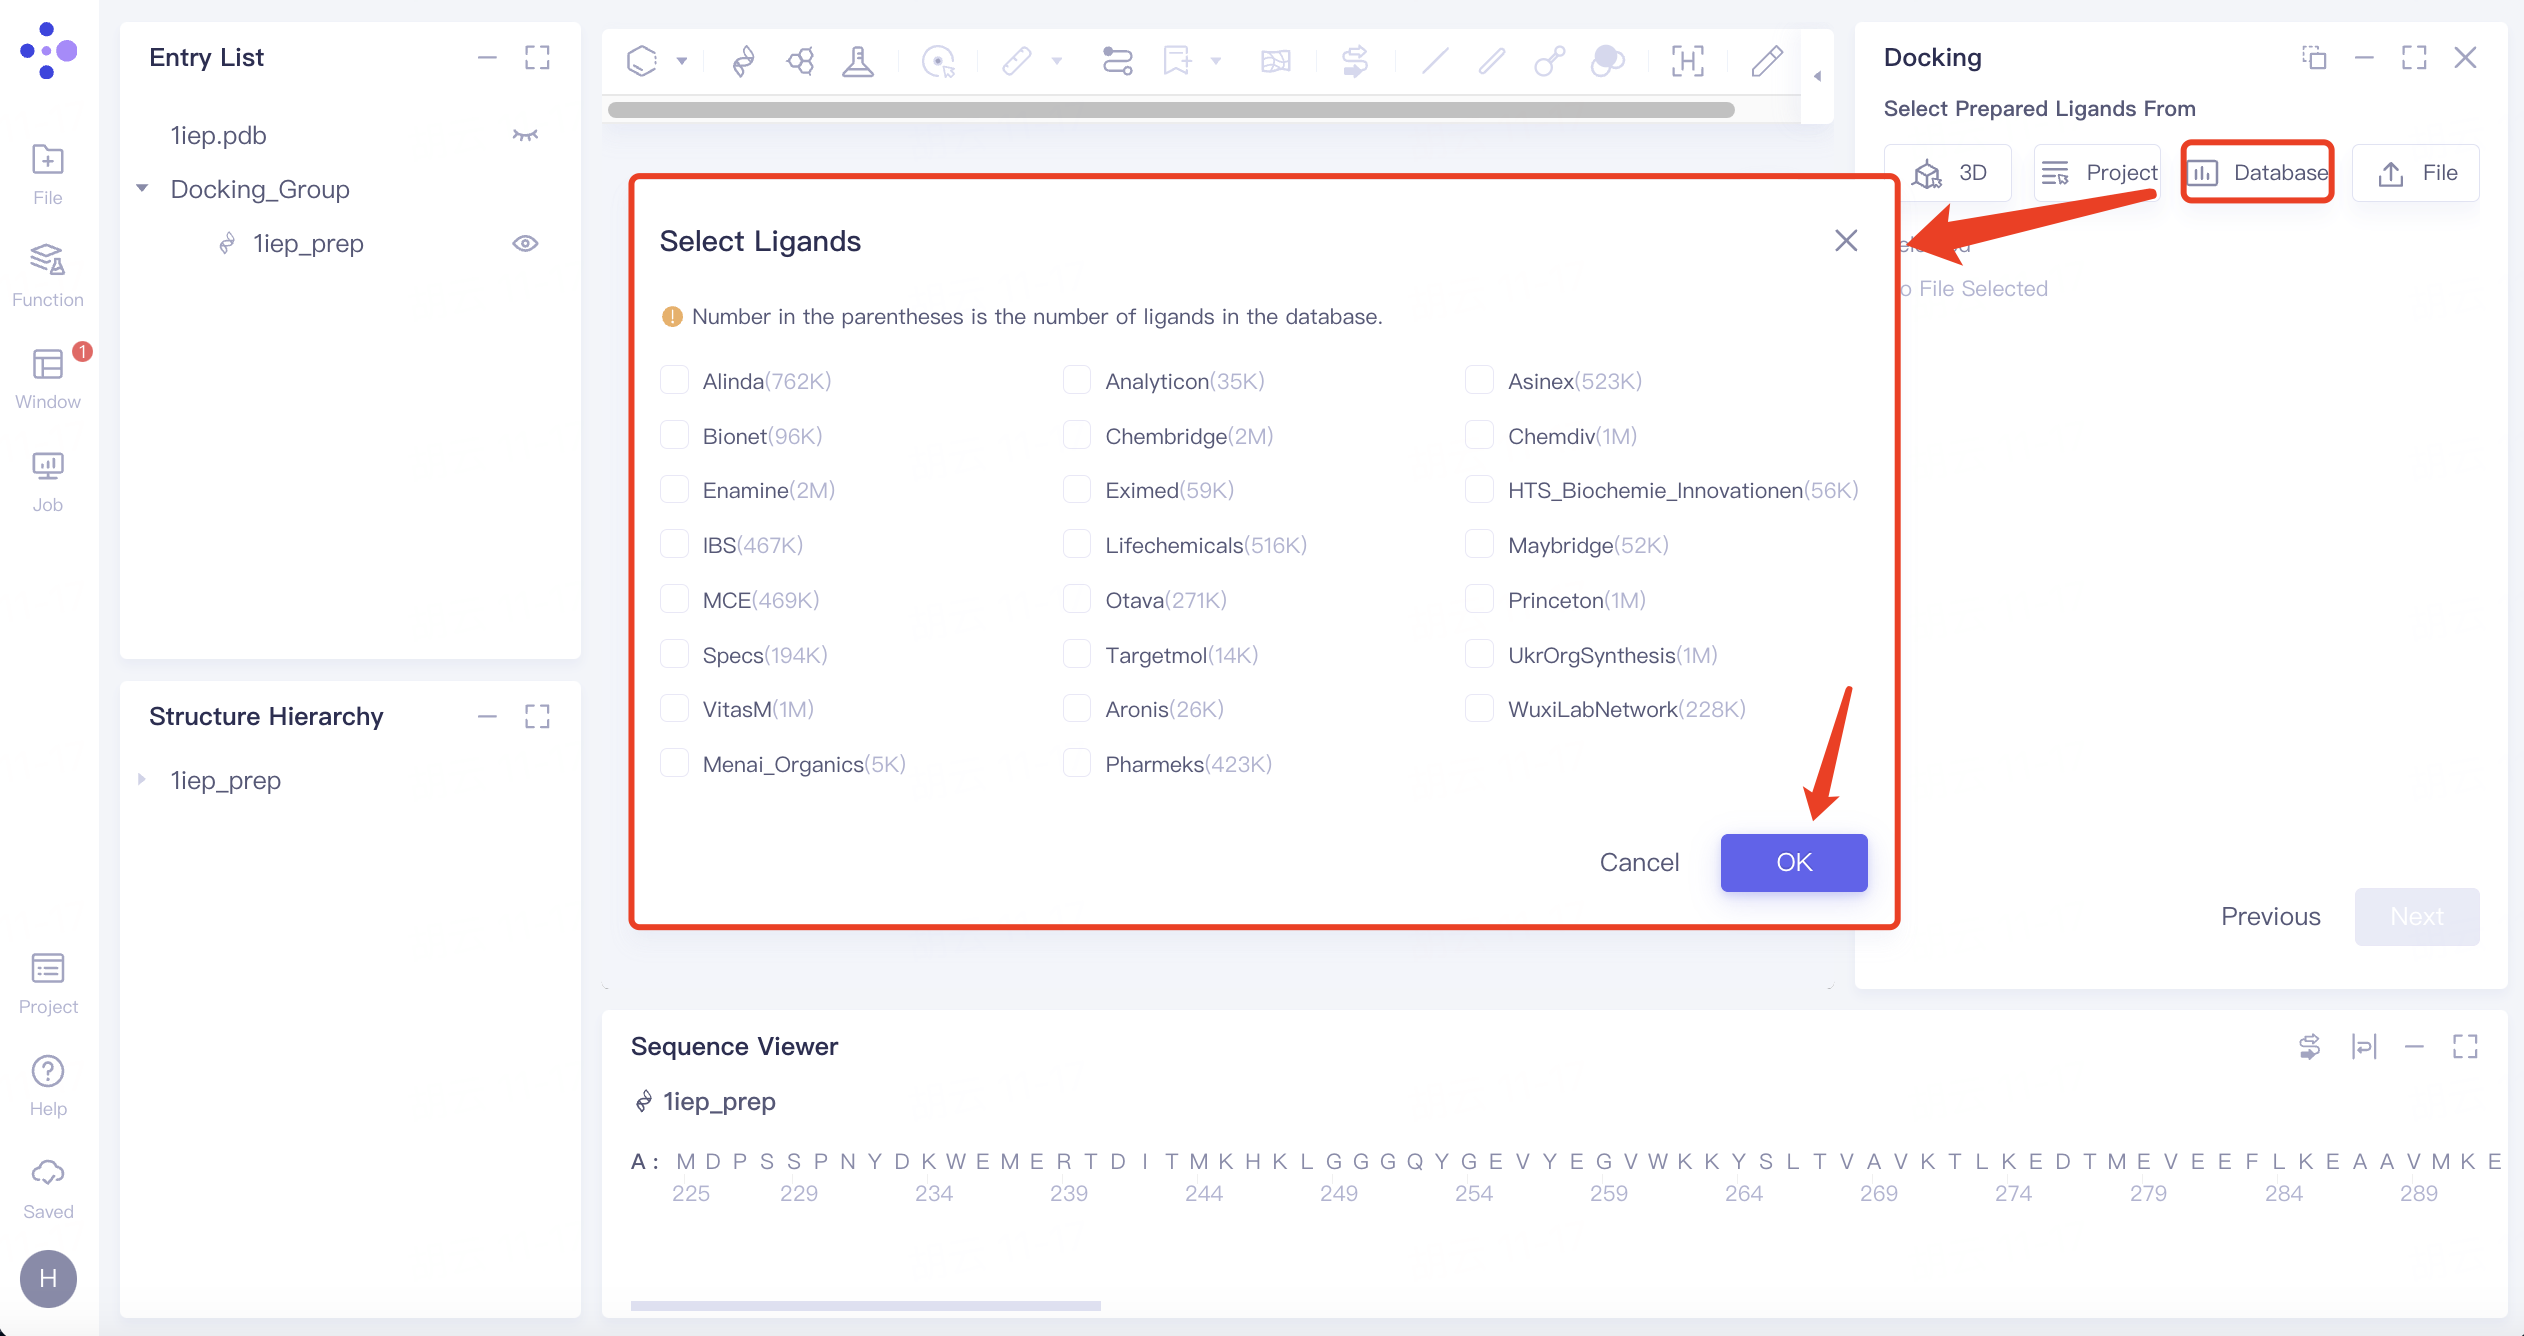
- 3)Select from Database: Click the Select from Database checkbox → The Select Ligands interface pops up in the middle of the interface → Select the required ligand dataset → Click OK.
- 4)Select File: Select the desired ligand file (.mol and .sdf file formats are supported) from the local folder and upload it.
-
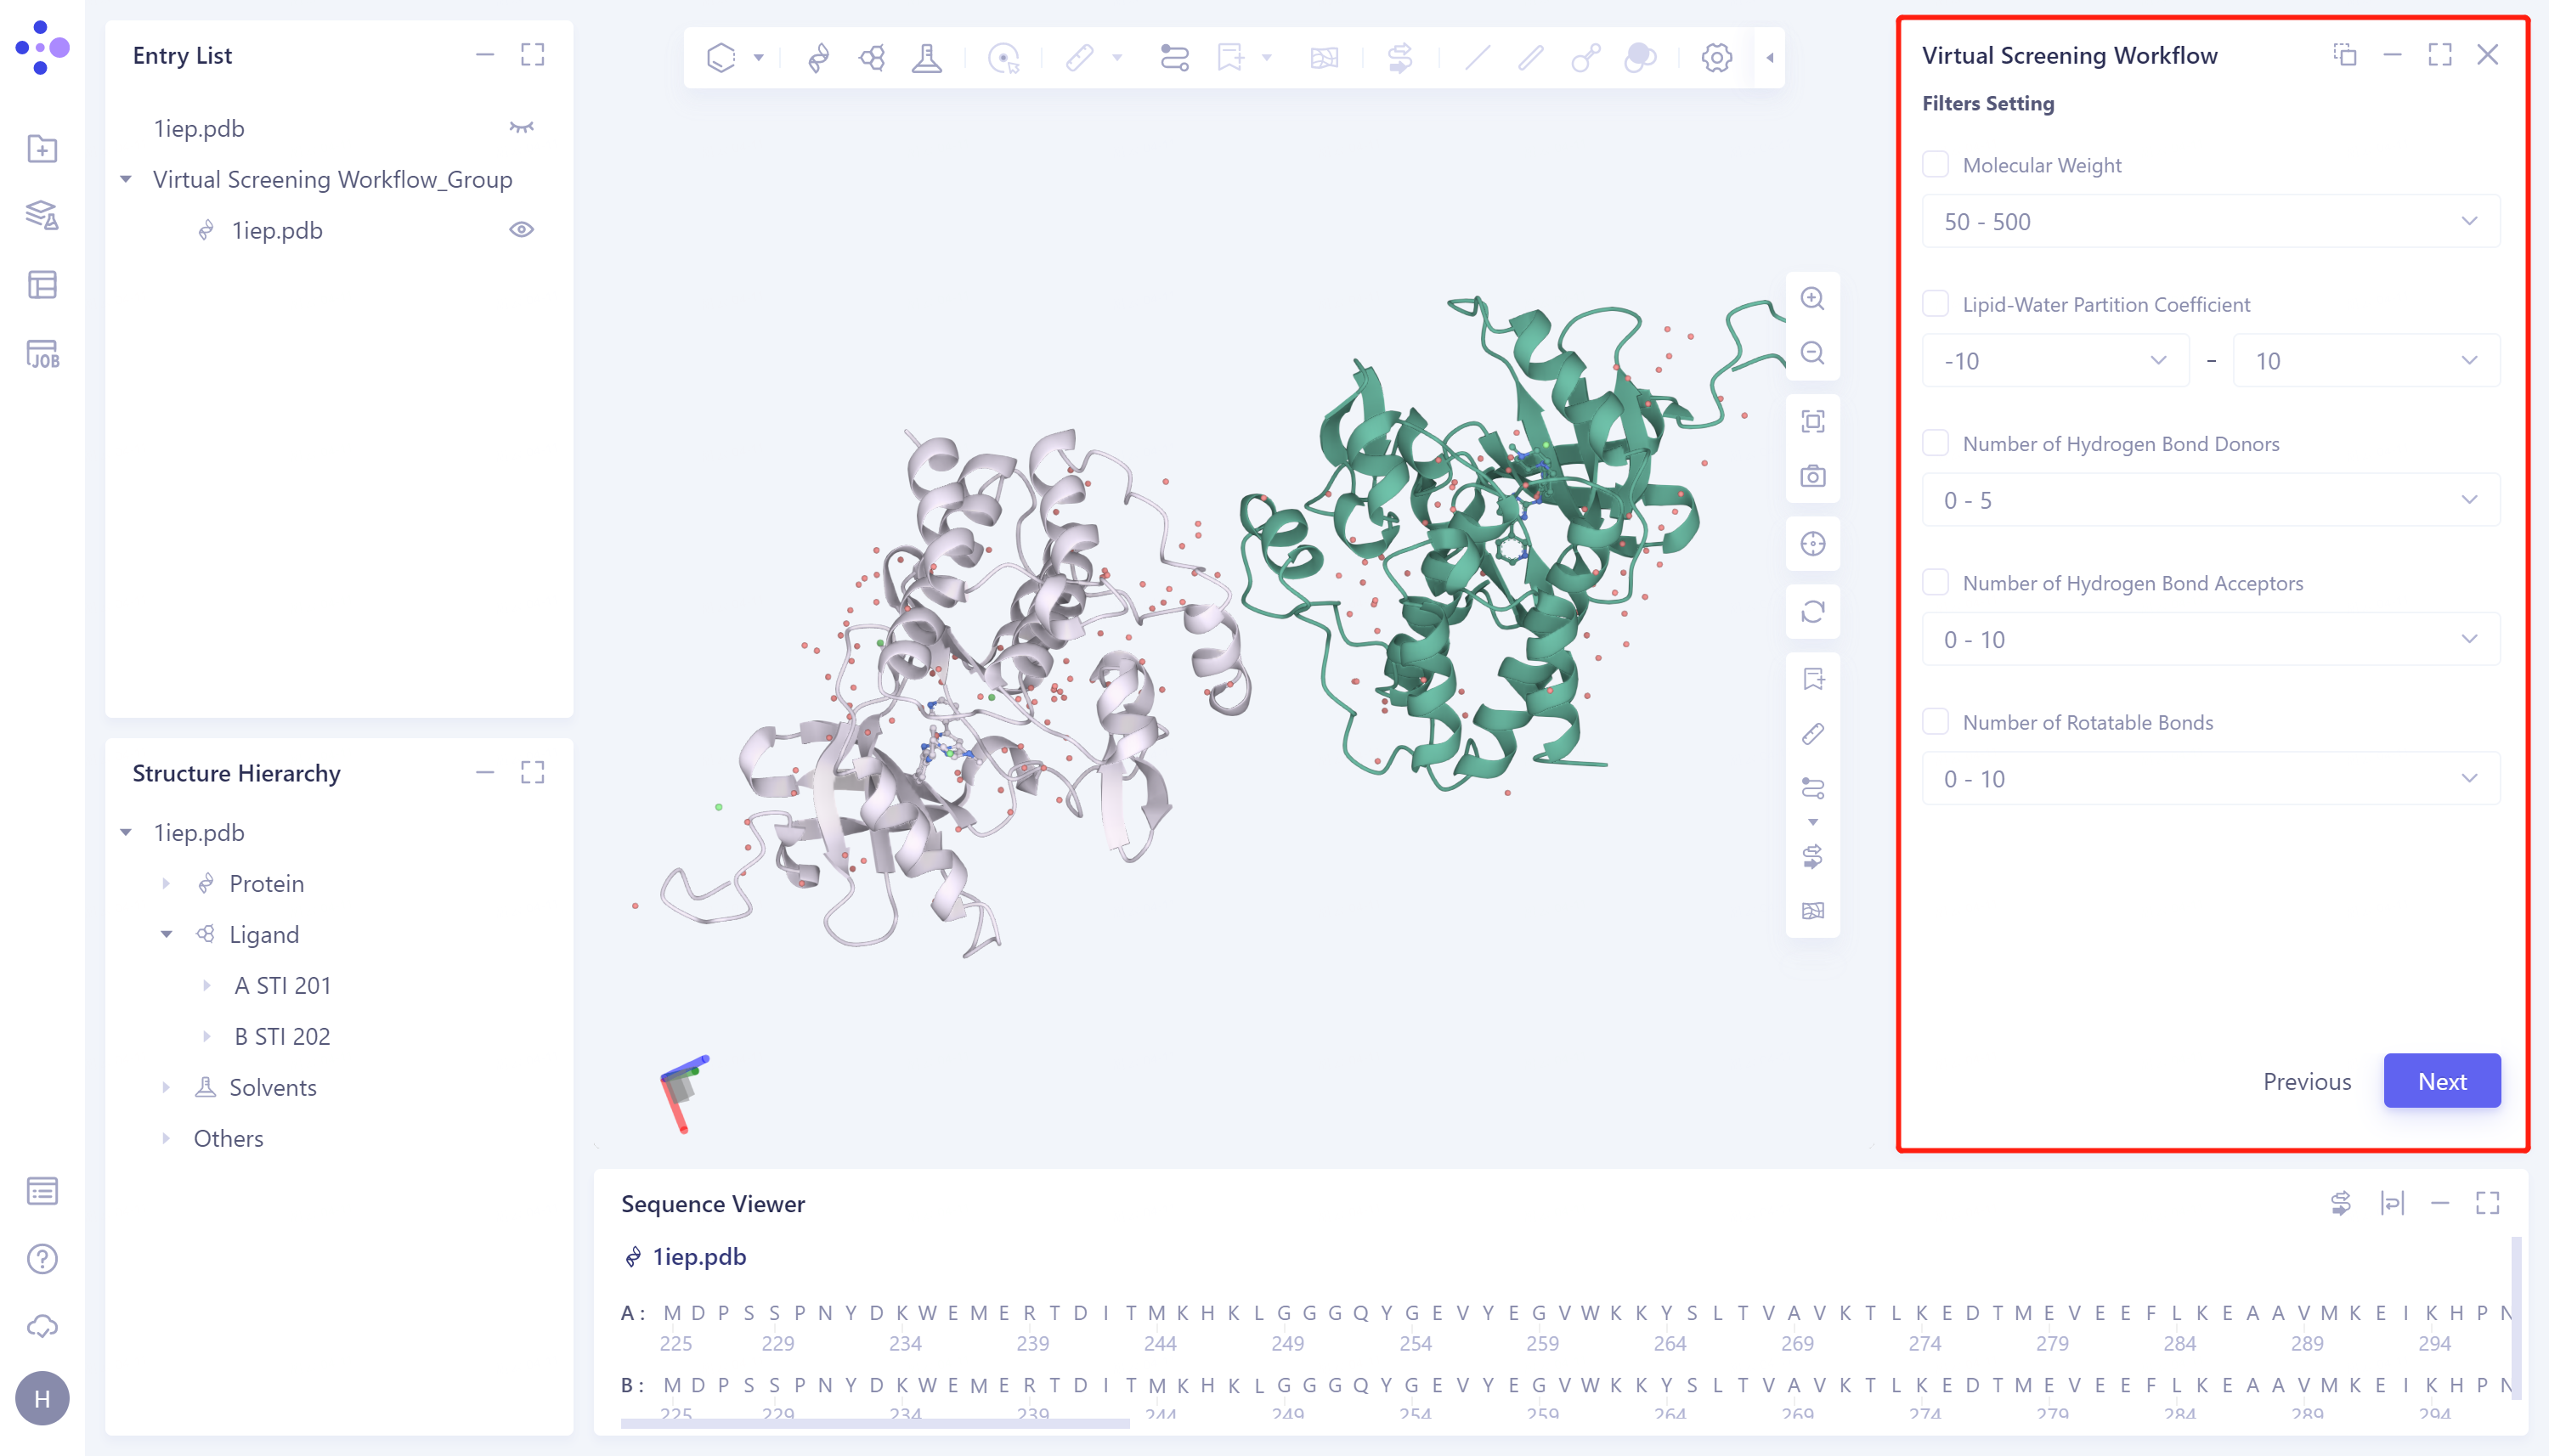
Set filter criteria: If you have restrictions on the properties of the selected molecules, you can restrict the range of molecules to be screened through the properties provided in the Filter Settings window. The specific operations are: tick the molecular properties of the desired limited range → Adjust the range → Next to enter the next step. If there is no special requirement, directly click Next to skip this step.
-
Molecular Weight: Molecular Mass;
-
Lipid-Water Partition Coefficient: Lipid-Water Partition Coefficient;
-
Number of Hydrogen Bond Donors: Number of Hydrogen Bond Donors;
-
Number of Hydrogen Bond Acceptors: Number of Hydrogen Bond Acceptors;
-
Number of Rotatable Bonds: Number of rotatable keys.
-
2.2.3 Docking box settings
-
There are 5 ways to define the docking box, as follows:
-
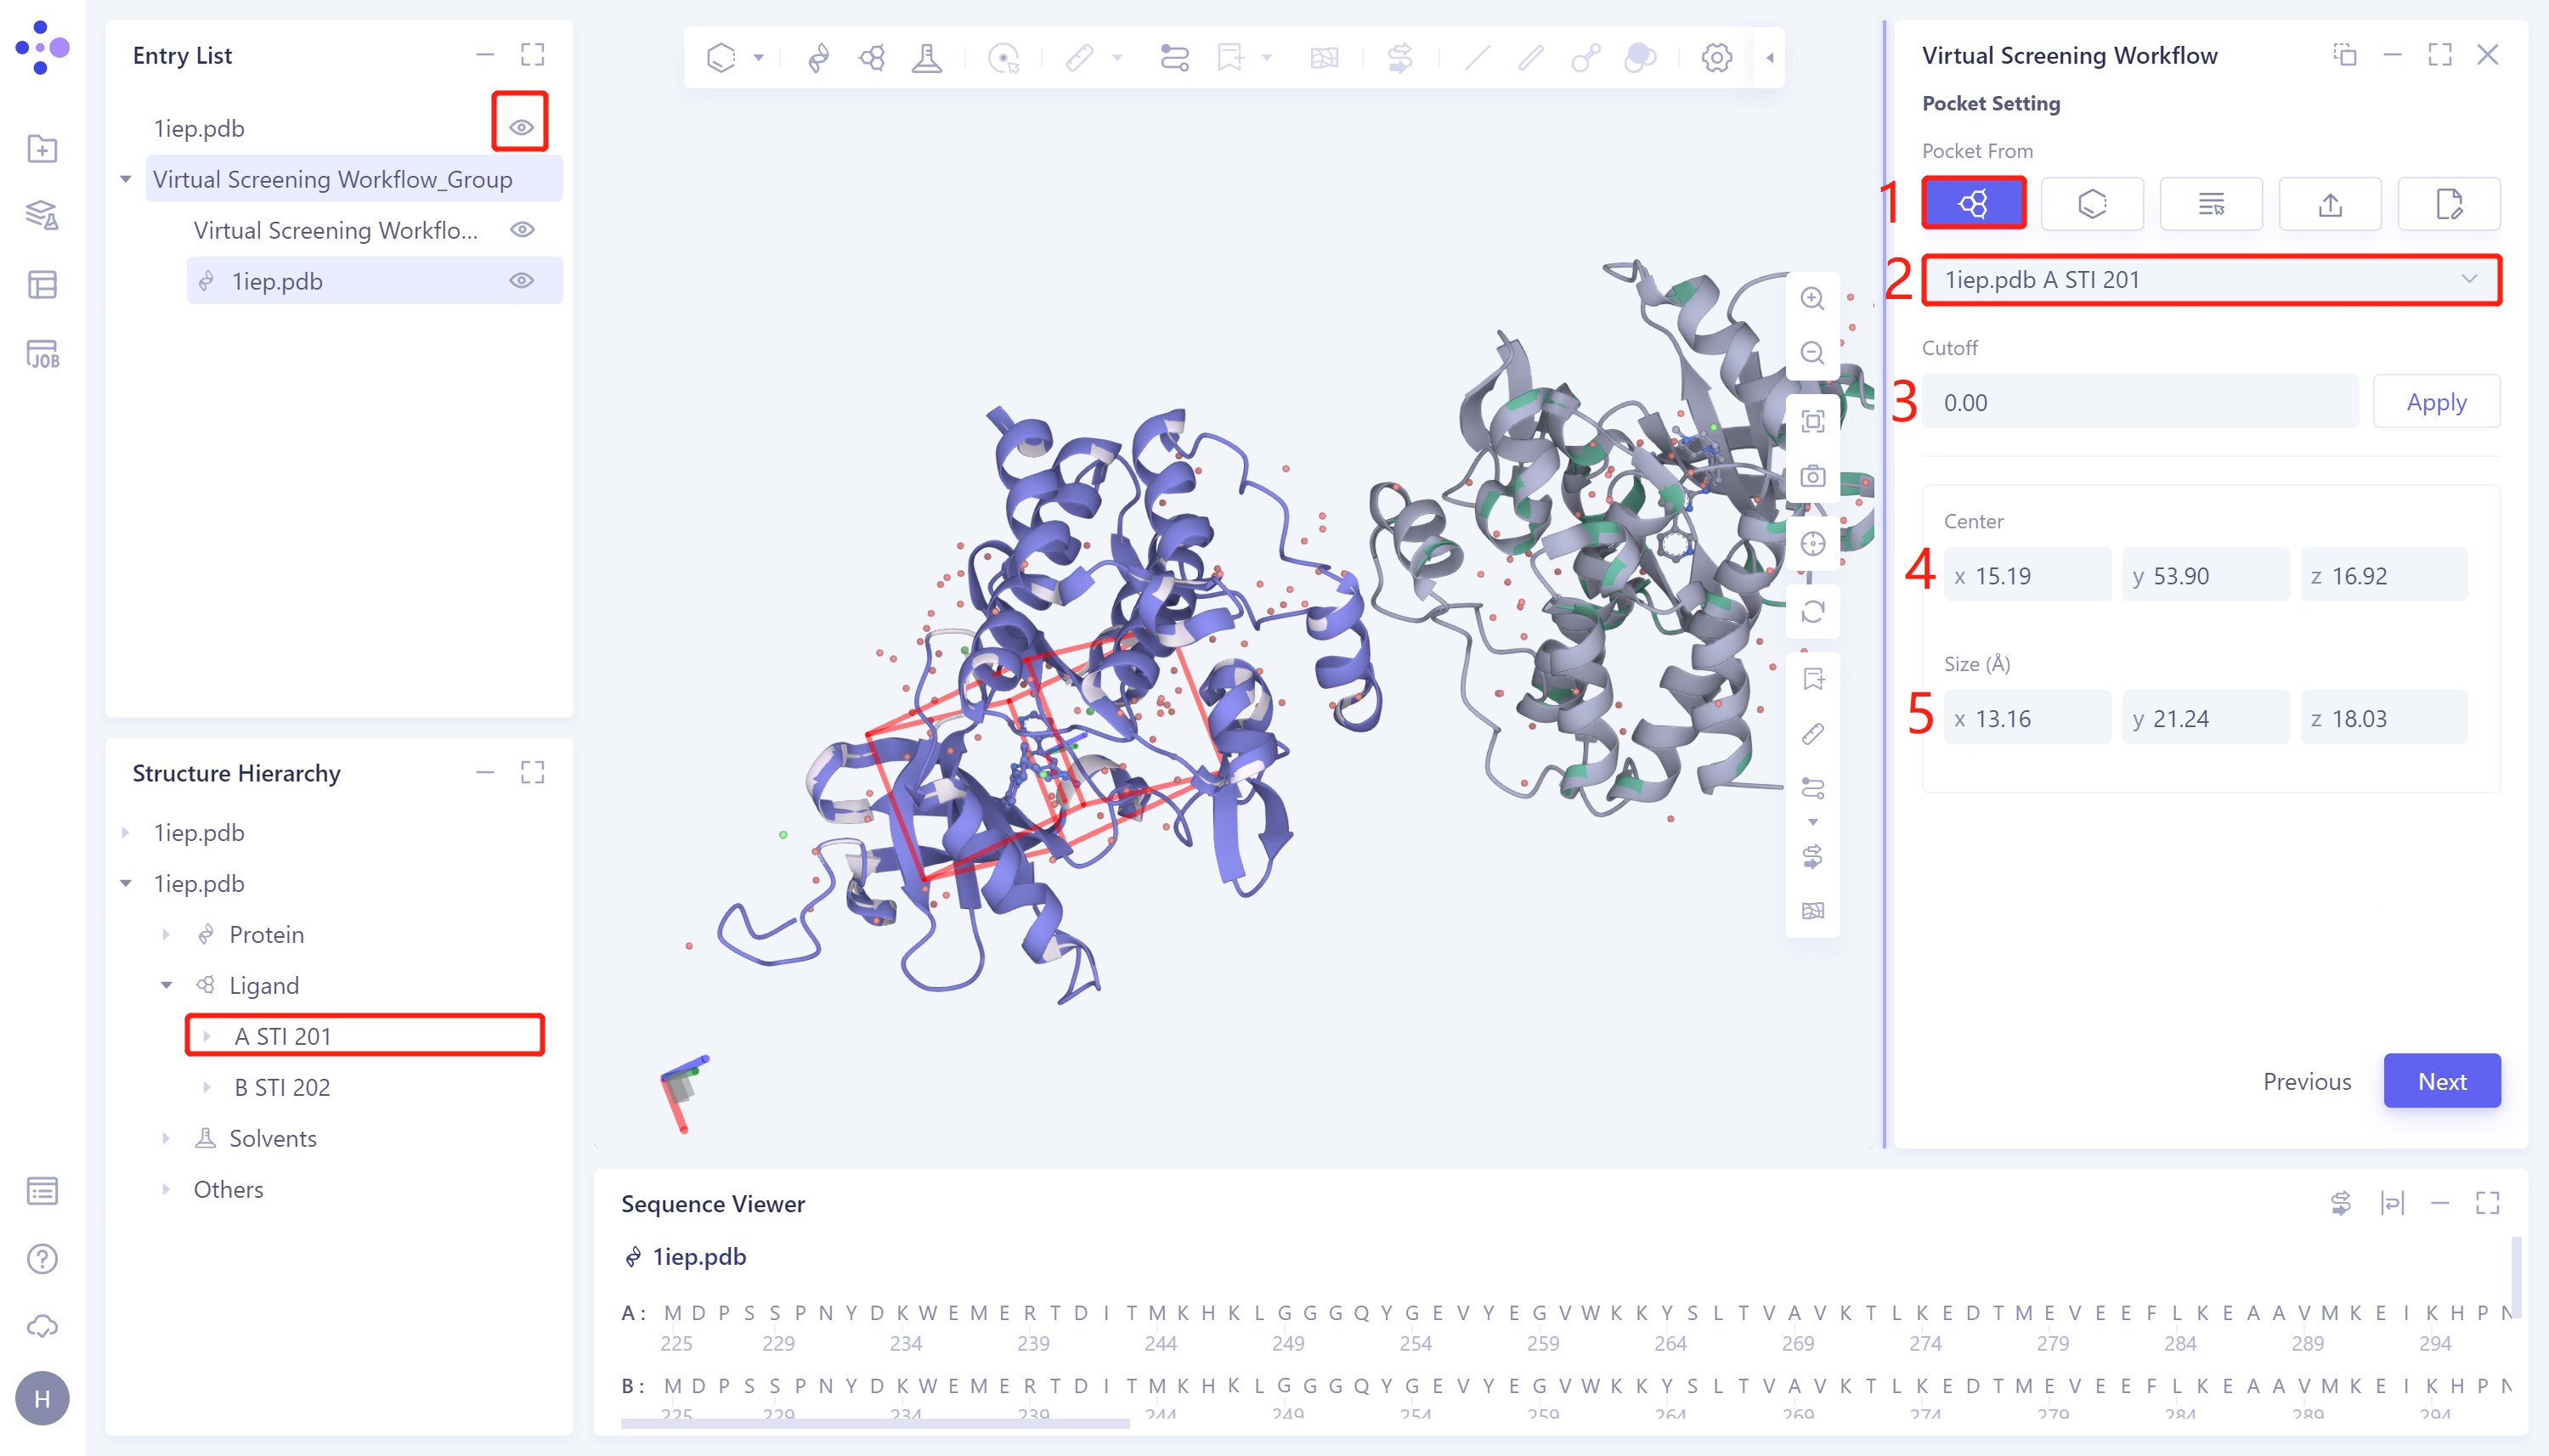
1)Select Ligand in the structure as center: This method defines the docking box in the region where the ligand is displayed in the 3D Workspace window. The specific steps are: click the Select Ligand in the structure as center checkbox → Select Ligand Name to select the ligand name (only when the ligand is displayed in the 3D Workspace window, the ligand option will be given in Select Ligand Name), and automatically after selection Generate a box → Cutoff set the box size. The larger the value, the larger the box. After setting, click Apply to the current box → Center to manually set the coordinates of the center of the box → Size to manually set the box size → click Next to enter the next step.
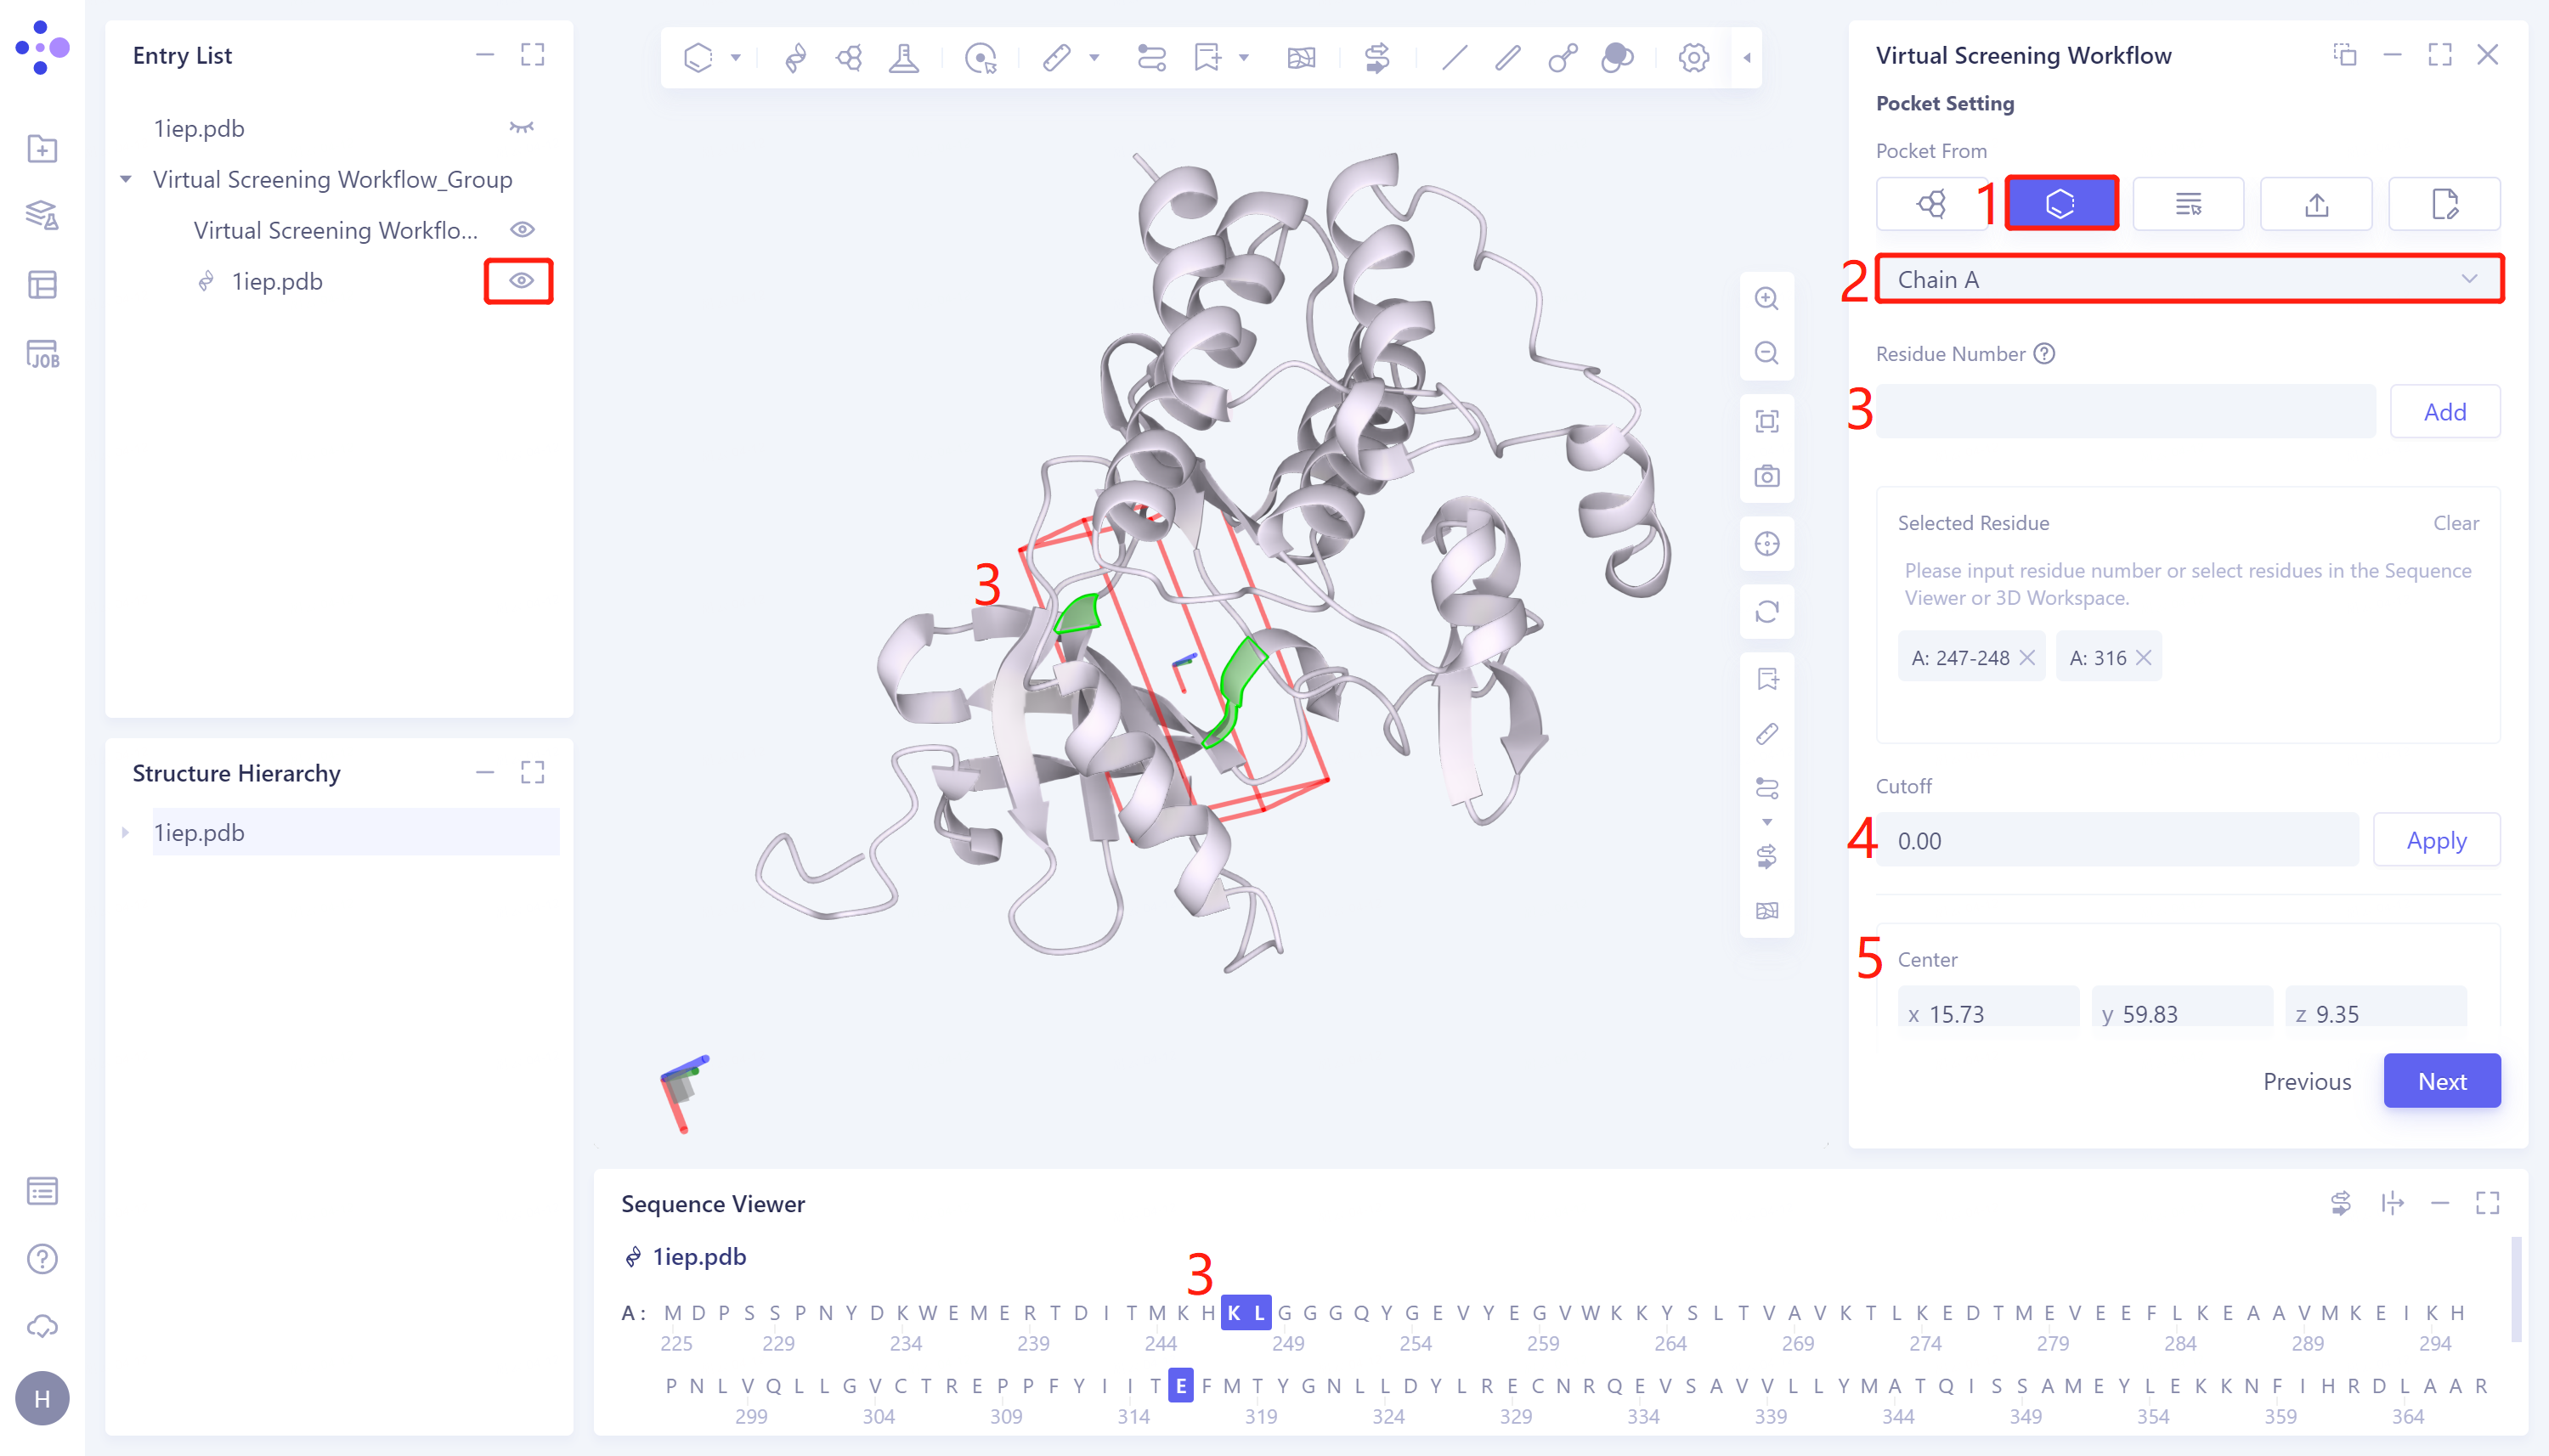
- 2)Select Residues as Center: This method generates docking boxes by selecting amino acid residues in the protein sequence. The specific steps are: Click the Select Residues as Center checkbox → Select Residue Select the protein chain name in the Chain ID checkbox (the Select Residue Chain ID checkbox will only give an option when the protein receptor under this task is displayed in the 3D Workspace window) → Select the amino acid residue through the Residue Number (enter the serial number corresponding to the residue, click Add)/3D Workspace window (click on the residue on the edge of the docking box to specify the box location)/Sequence Viewer window (click on the residue), the selected Amino acid residues are automatically displayed in the Selected Residue box, and the docking box is automatically generated → Cutoff Set the box size. The larger the value, the larger the box. After setting, click Apply to the current box → Center to manually adjust the coordinates of the center of the box → Size You can manually set the box size → click Next to enter the next step.
- 3)Select Pocket from Project: This method selects the box in the project on the Hermite platform as the docking box in this task. The specific steps are: click the Select Pocket from Project checkbox → the pop-up Select Pocket from Project box to select the desired box → click OK → Center to manually adjust the coordinates of the center of the box → Size to manually set the box size → click Next to enter the next step.
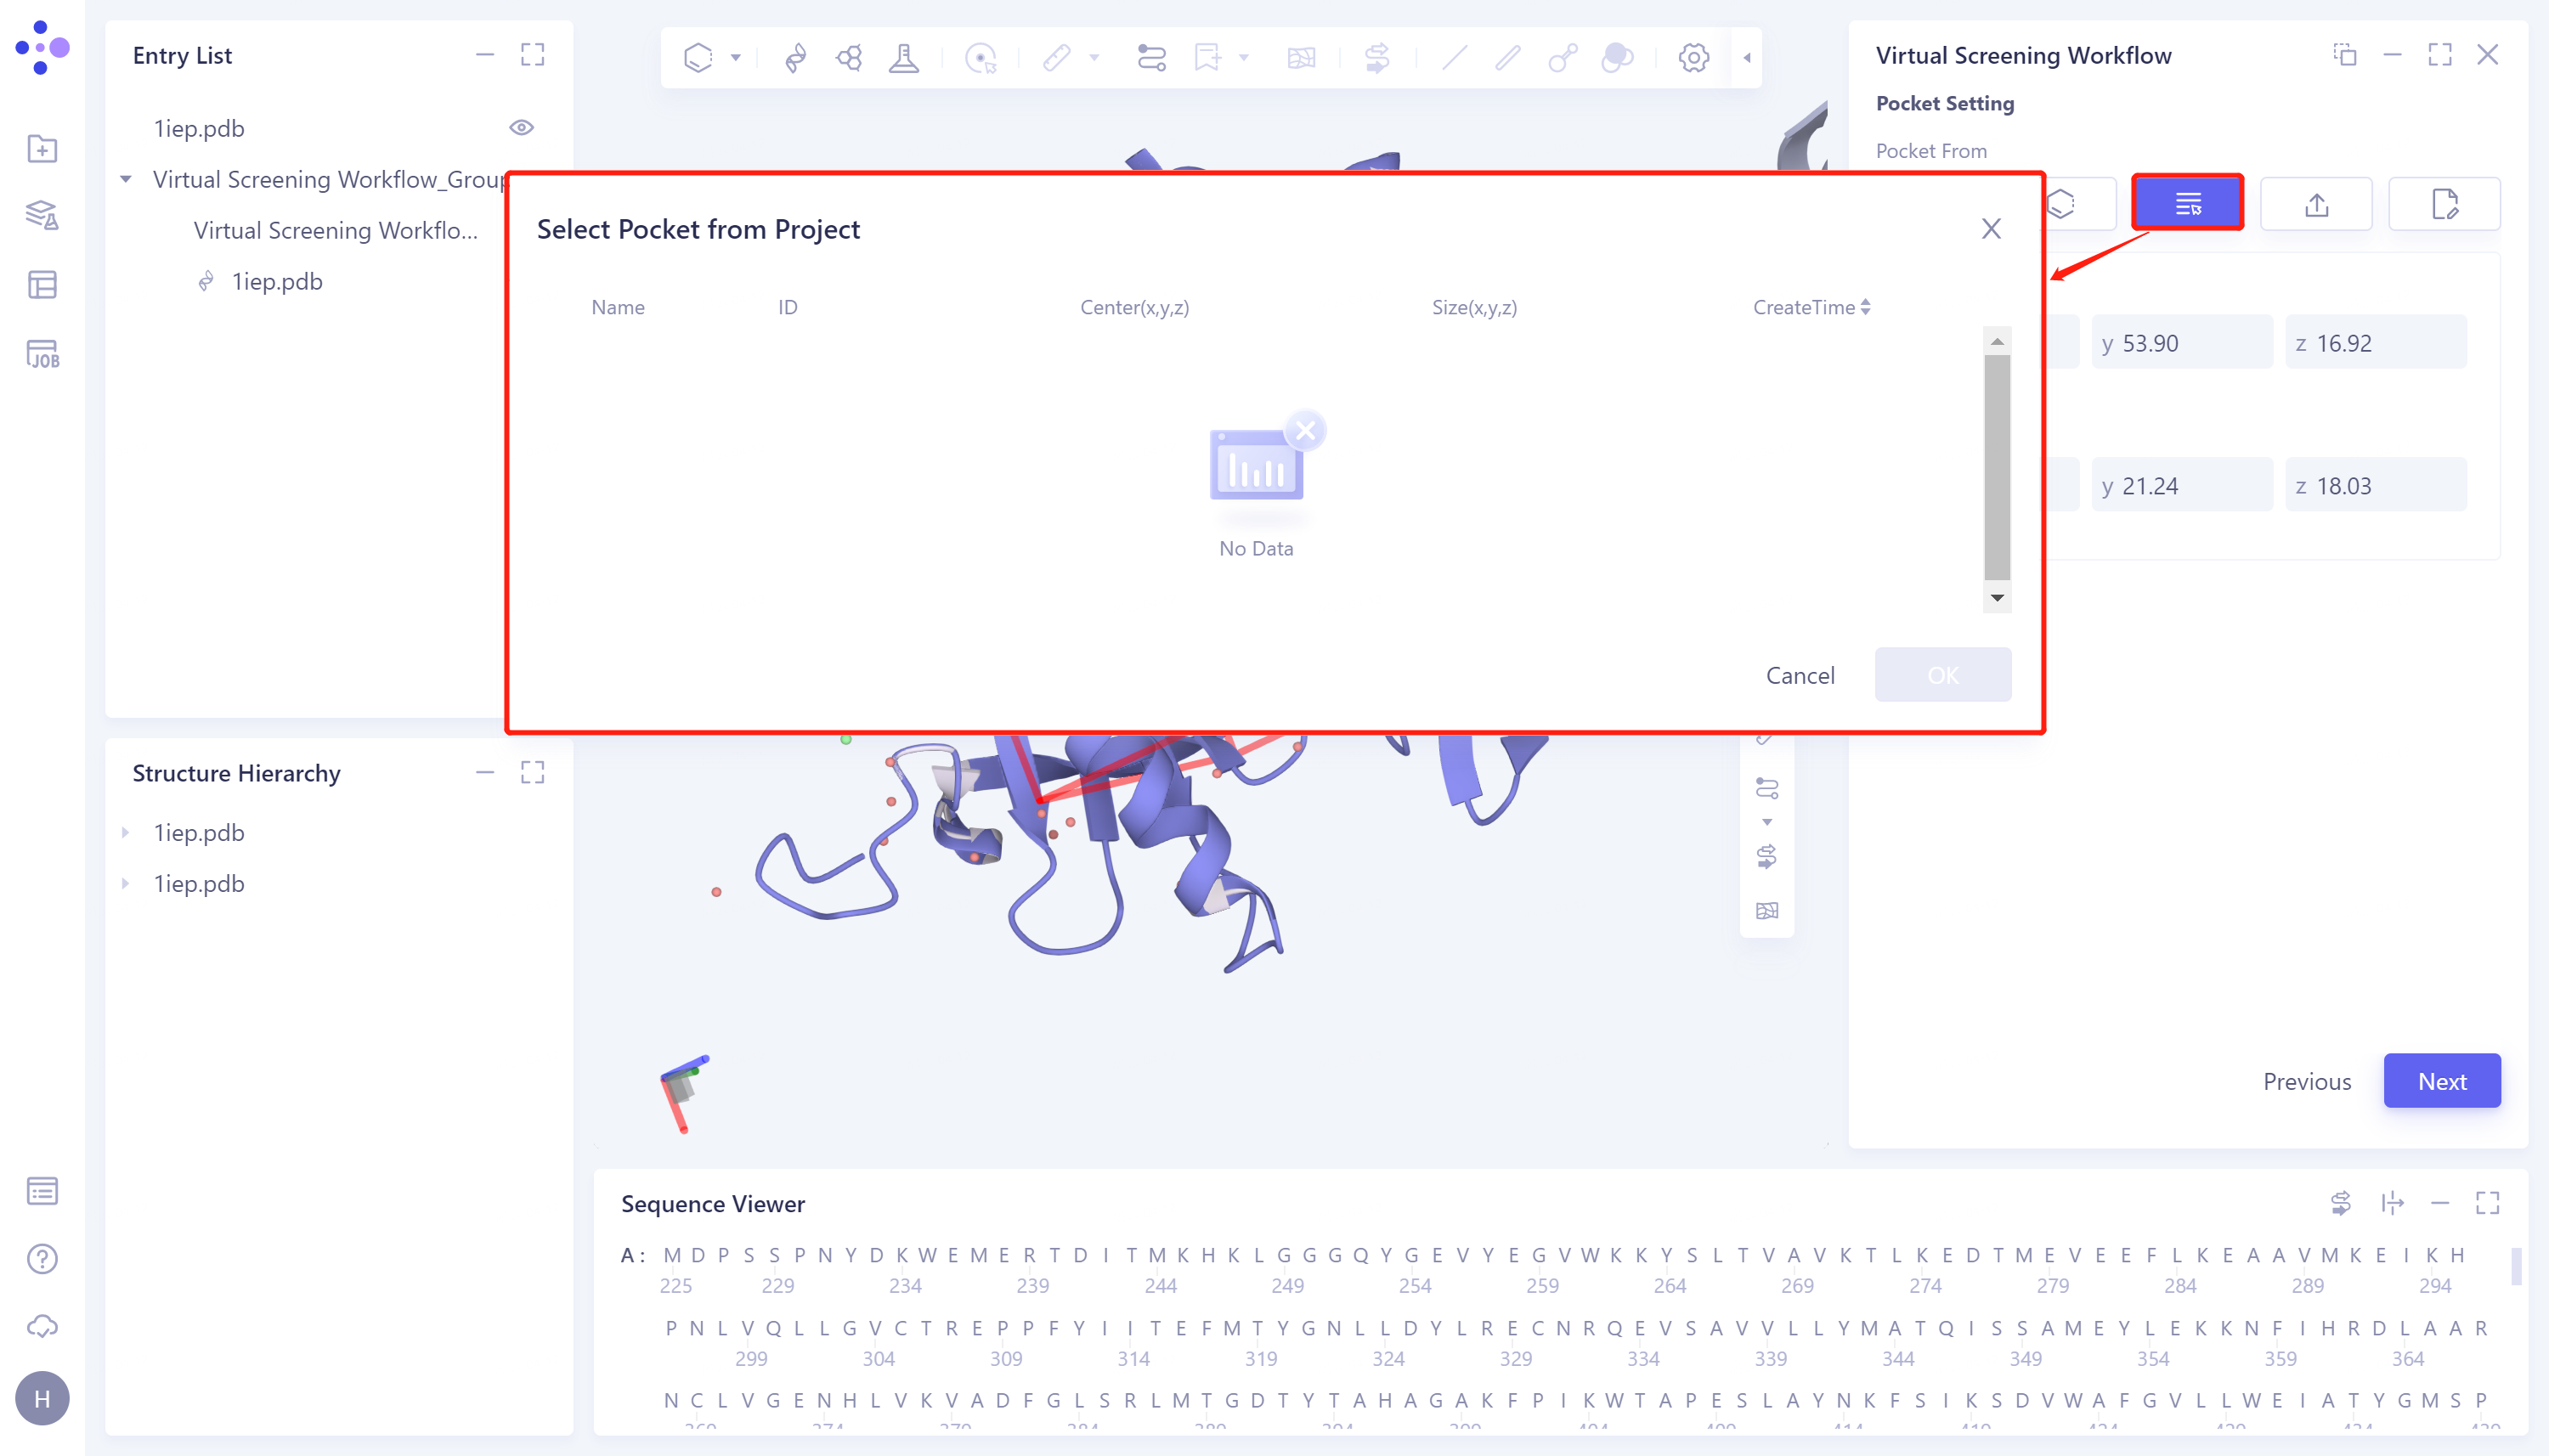
- 4)Select File: Support importing box files (.txt format) from local files. The specific steps are: click the Select File checkbox → select the box file (.txt file) in the local file → Center can manually adjust the coordinates of the center of the box → Size can manually set the box size → click Next to enter the next step.
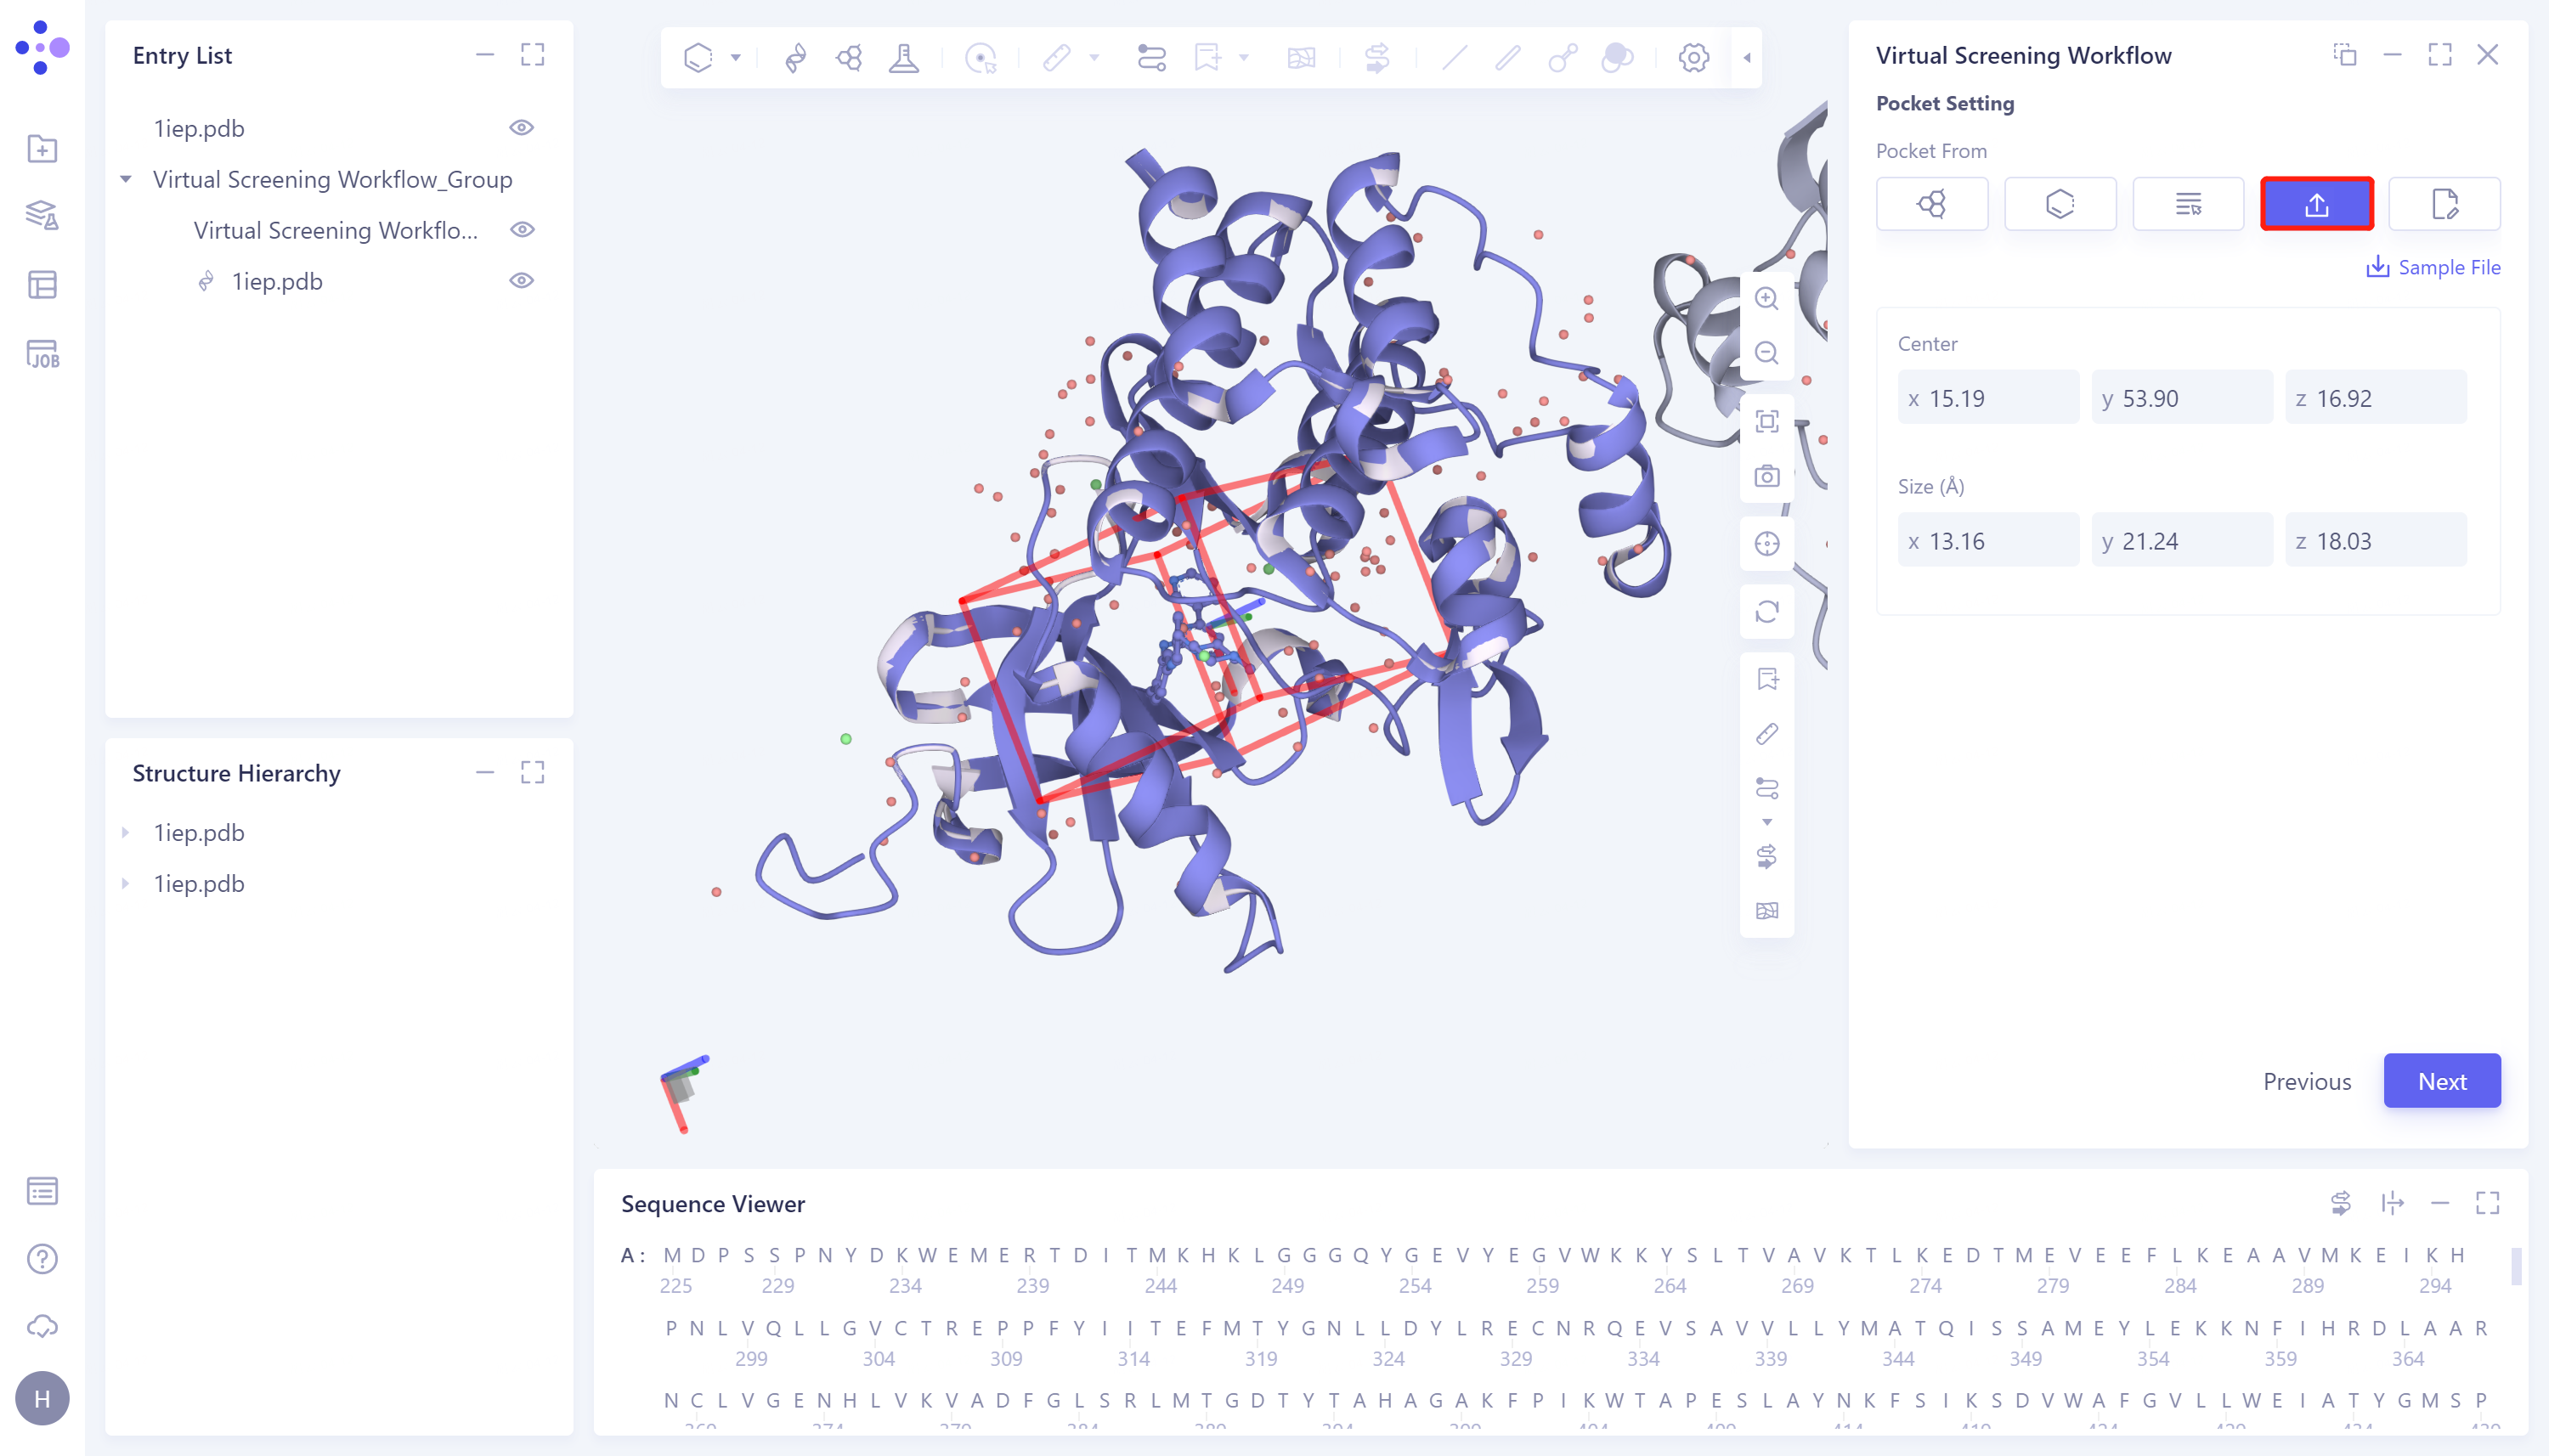
- 5)Input: Enter the box parameters directly manually. The specific steps are: click the Input box → Set the coordinates of the center of the box at Center → Set the box size at Size → Click Next to enter the next step.
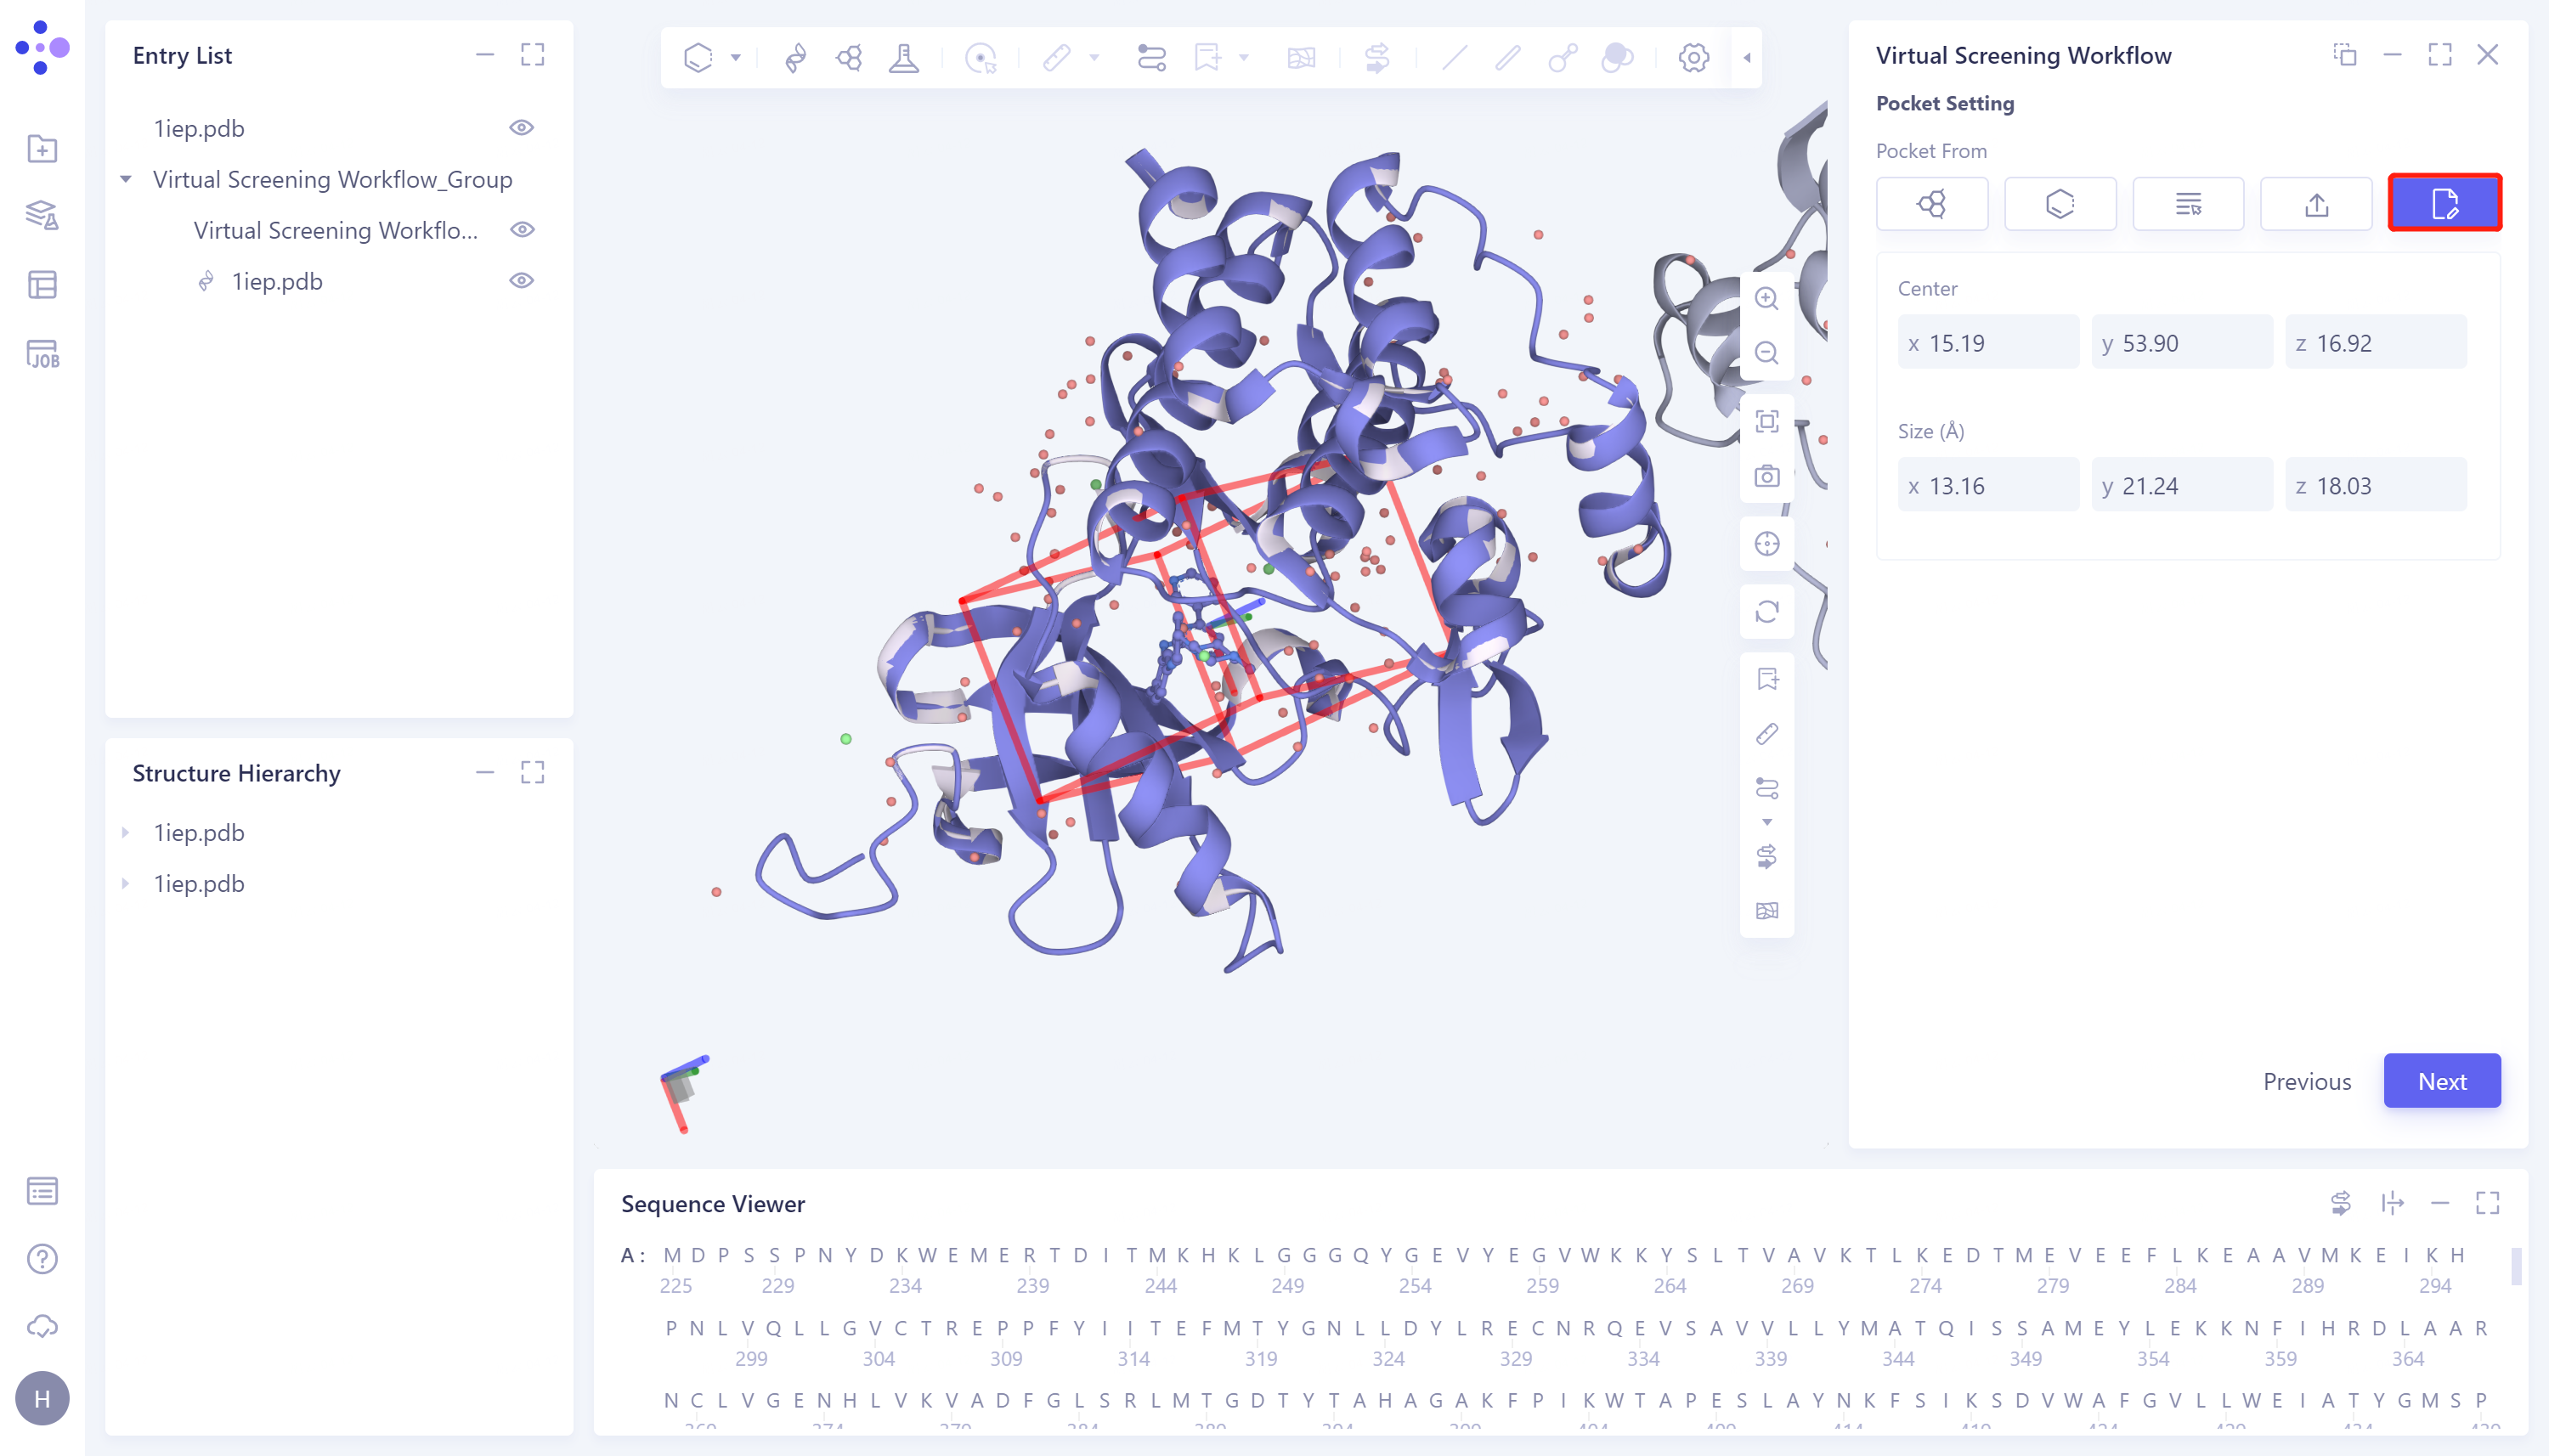
- Note: The volume of the box must not be less than 1000 Μ³.
2.2.4 Docking parameters
-
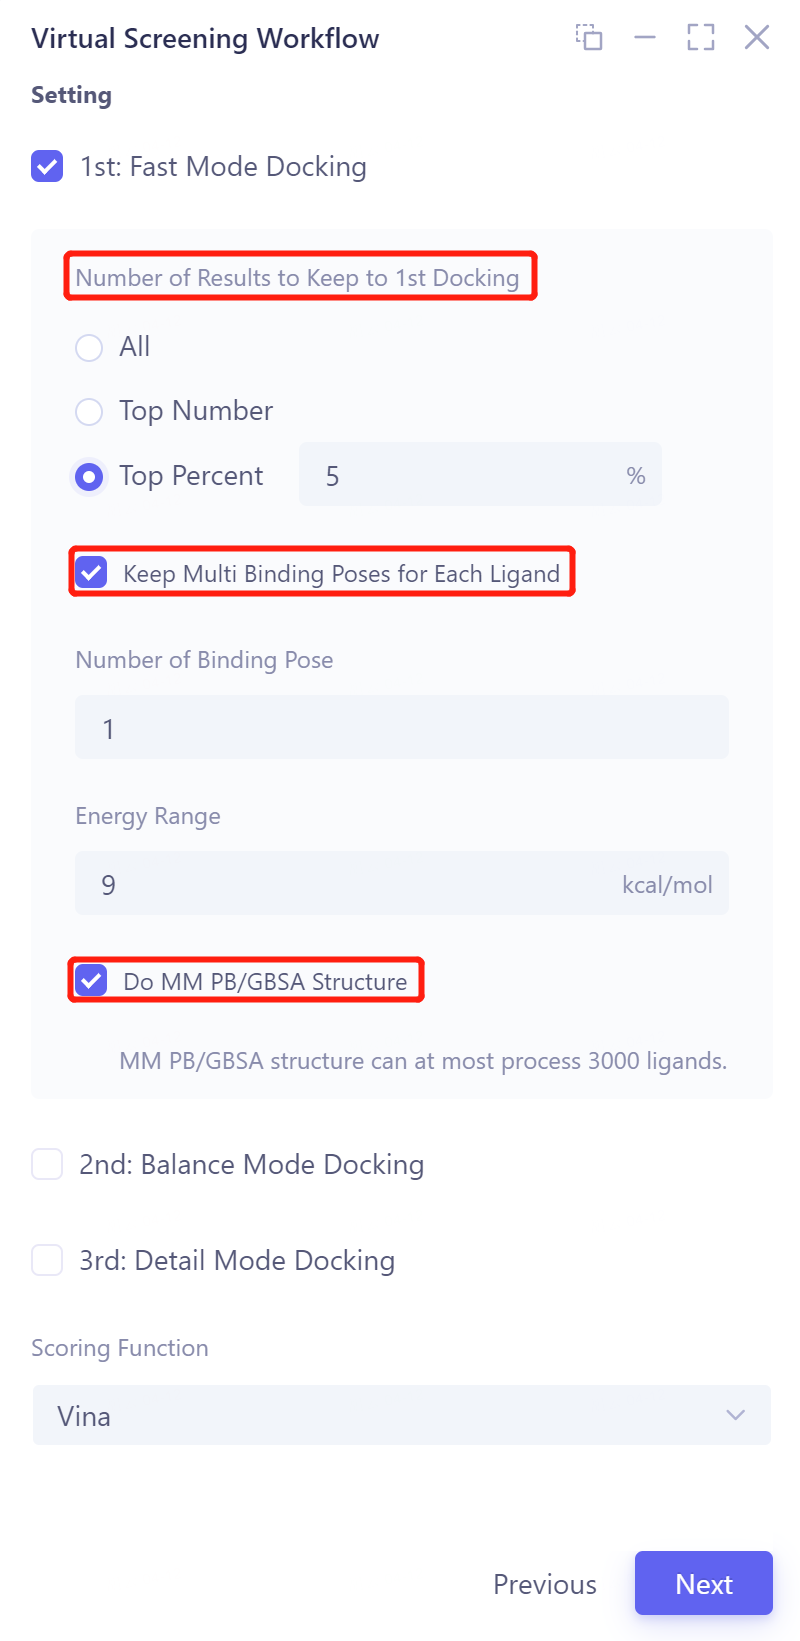
Search mode, optional Fast Mode Docking , Balanced Mode Docking, Detailed Mode Docking, adjustable parameters:
-
Number of Results to Keep to 1st/2nd/3rd Docking , optional All/Top Number/Top Percent.
-
Keep Multi Binding Poses for Each Ligand : Generate multiple conformations per ligand
-
Number of Binding Pose: The number of conformations generated, the number supported is 1~ 10;
-
Energy Range (kcal/mol): The maximum energy value that differs from the optimal binding model, supporting 1~ 9;
-
Do MM PB/GBSA Structure: MM PB/GBSA Structure can handle up to 3000 ligands .
-
Scoring function, optional Vina , Vinardo, AutoDock4.
-
-
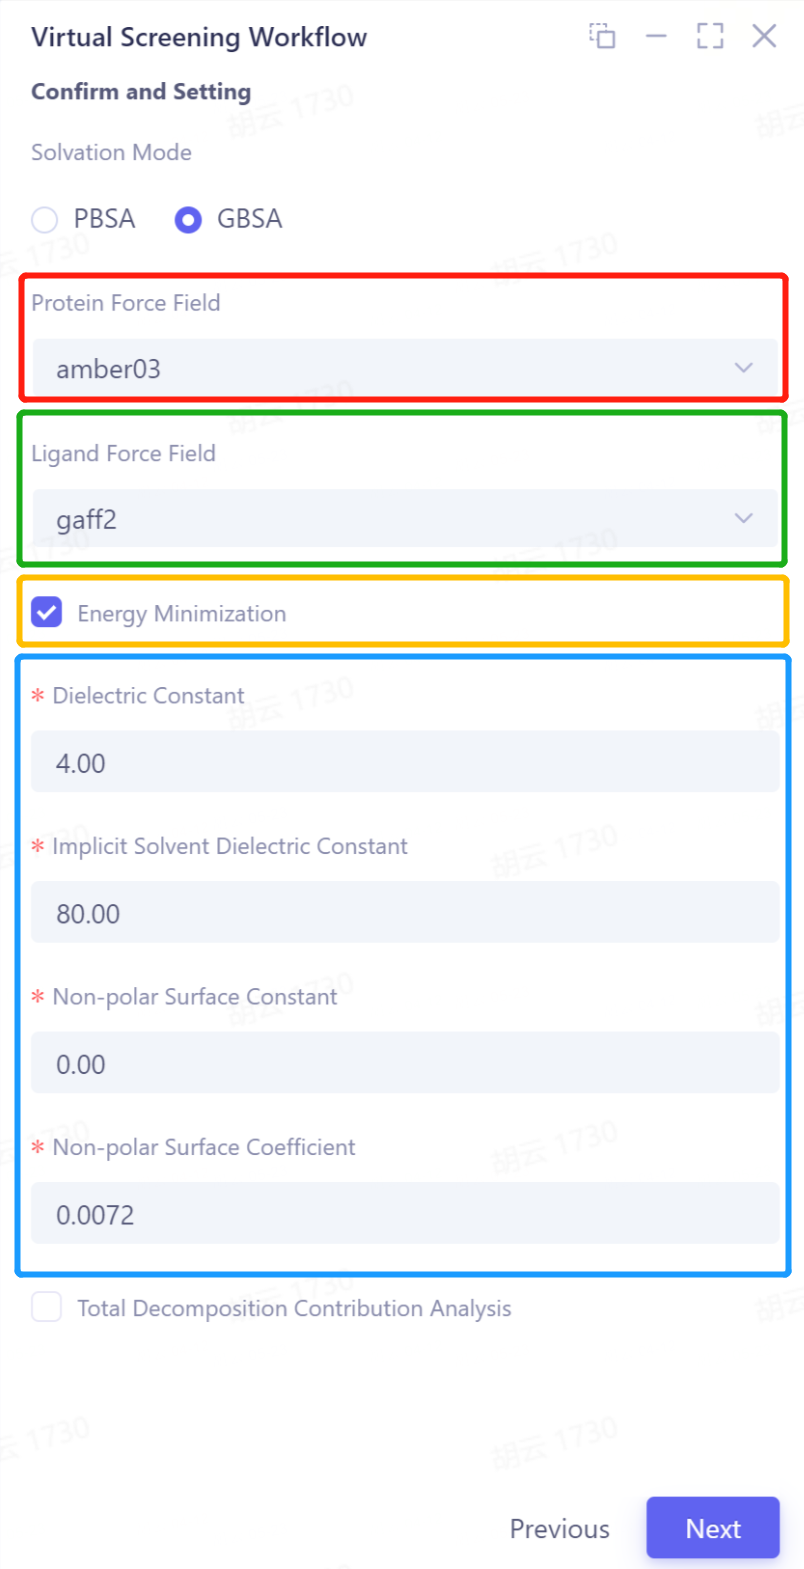
If Do MM PB/GBSA Structure is checked in the previous step, enter the interface to set the parameters of MM PB/GBSA:
-
Solvation Mode: Determine the surface area generation method, support PB and GB models, optional PBSA or GBSA;
-
Determine the protein and distribution field, set calculation parameters:
- Red box: Select protein force field, optional amber03, amber99sb, amber99sb-ildn, amber99sb-star-ildn-mut; < br/> Green box: Select matching force field, optional gaff2, gaff; < br/> Yellow box: Select whether to minimize energy; < br/> Blue box: Configure solvent environmental parameters (Dielectric Constant, Implicit Solvent Dielectric Constant, Non-polar Surface Constant, Non-polar Surface Coefficient).
- (Note: It is strongly recommended to leave the default parameters)
-
Total Decomposition Contribution Analysis: Calculate the energy contribution of amino acid residues .
-
2.2.5 Confirmation
-
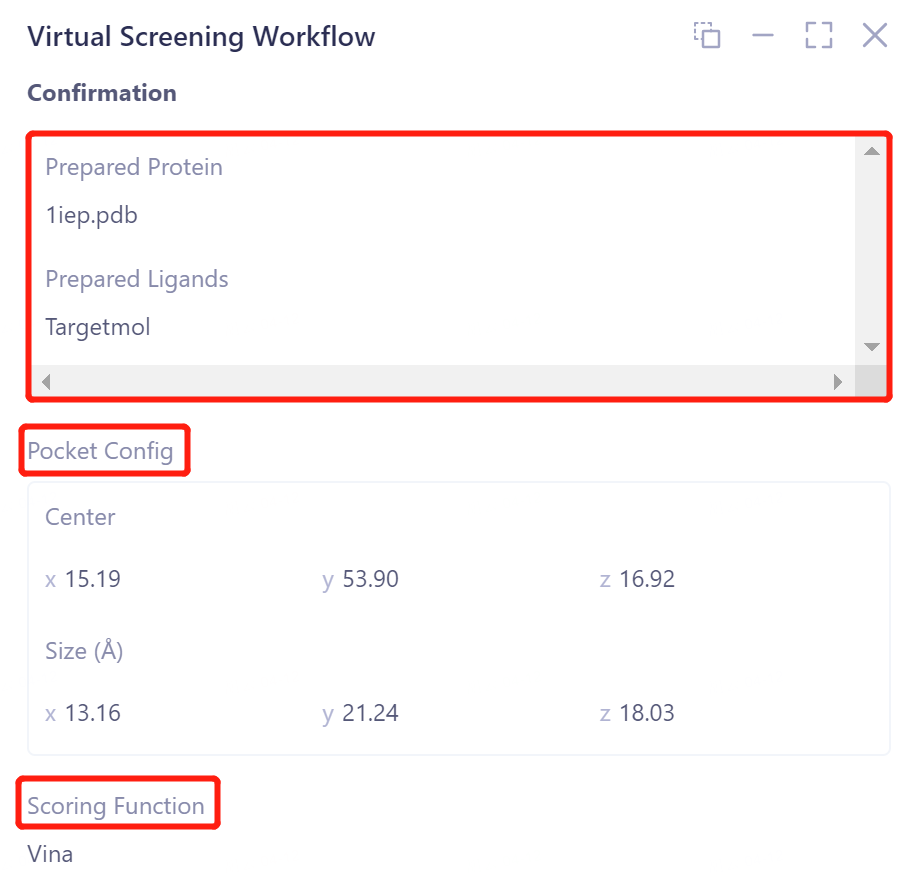
Confirm the input egg white and ligand files;
-
Confirm the location and size of the docking box at the Pocket Config ;
-
Scoring Function confirms the selected scoring function;
-
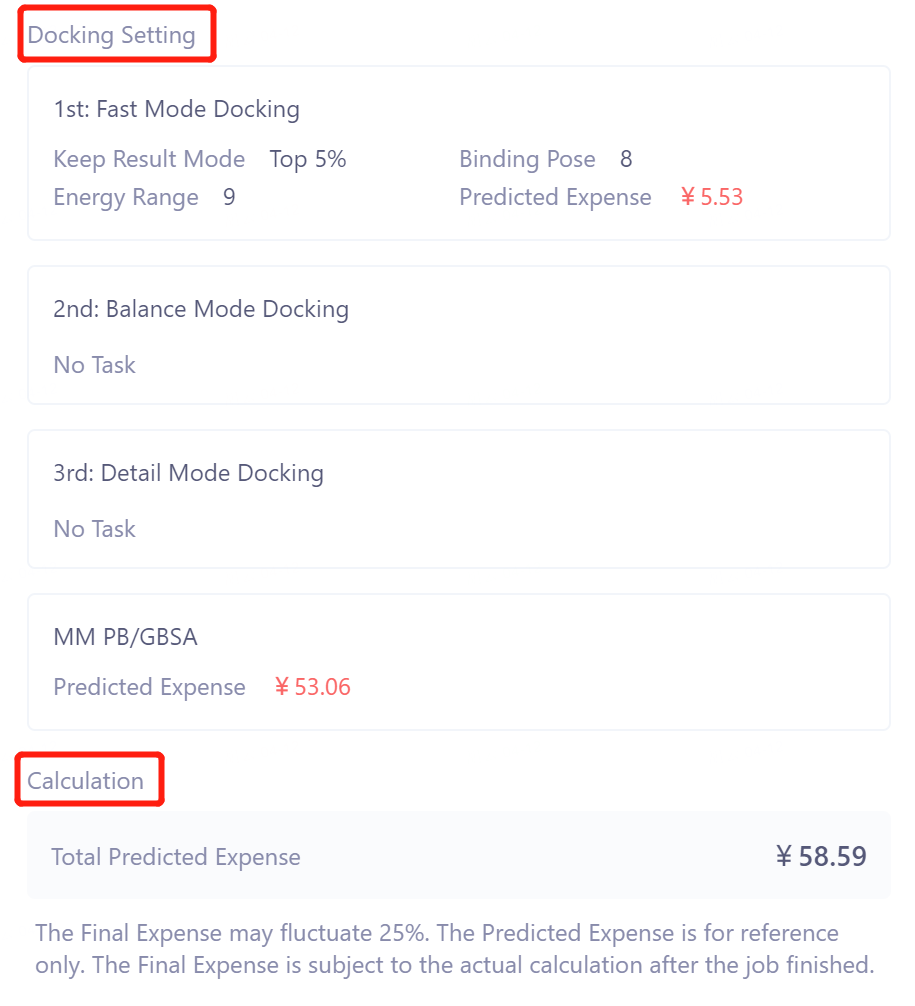
Docking Settings confirm docking parameters and calculation costs;
-
Total Predicted Expenses at Calculation gives the total cost of the task.
-
Name the task at Job Name;
-
Click Submit to submit the task.
3. Results presentation
3.1 Entrance
-
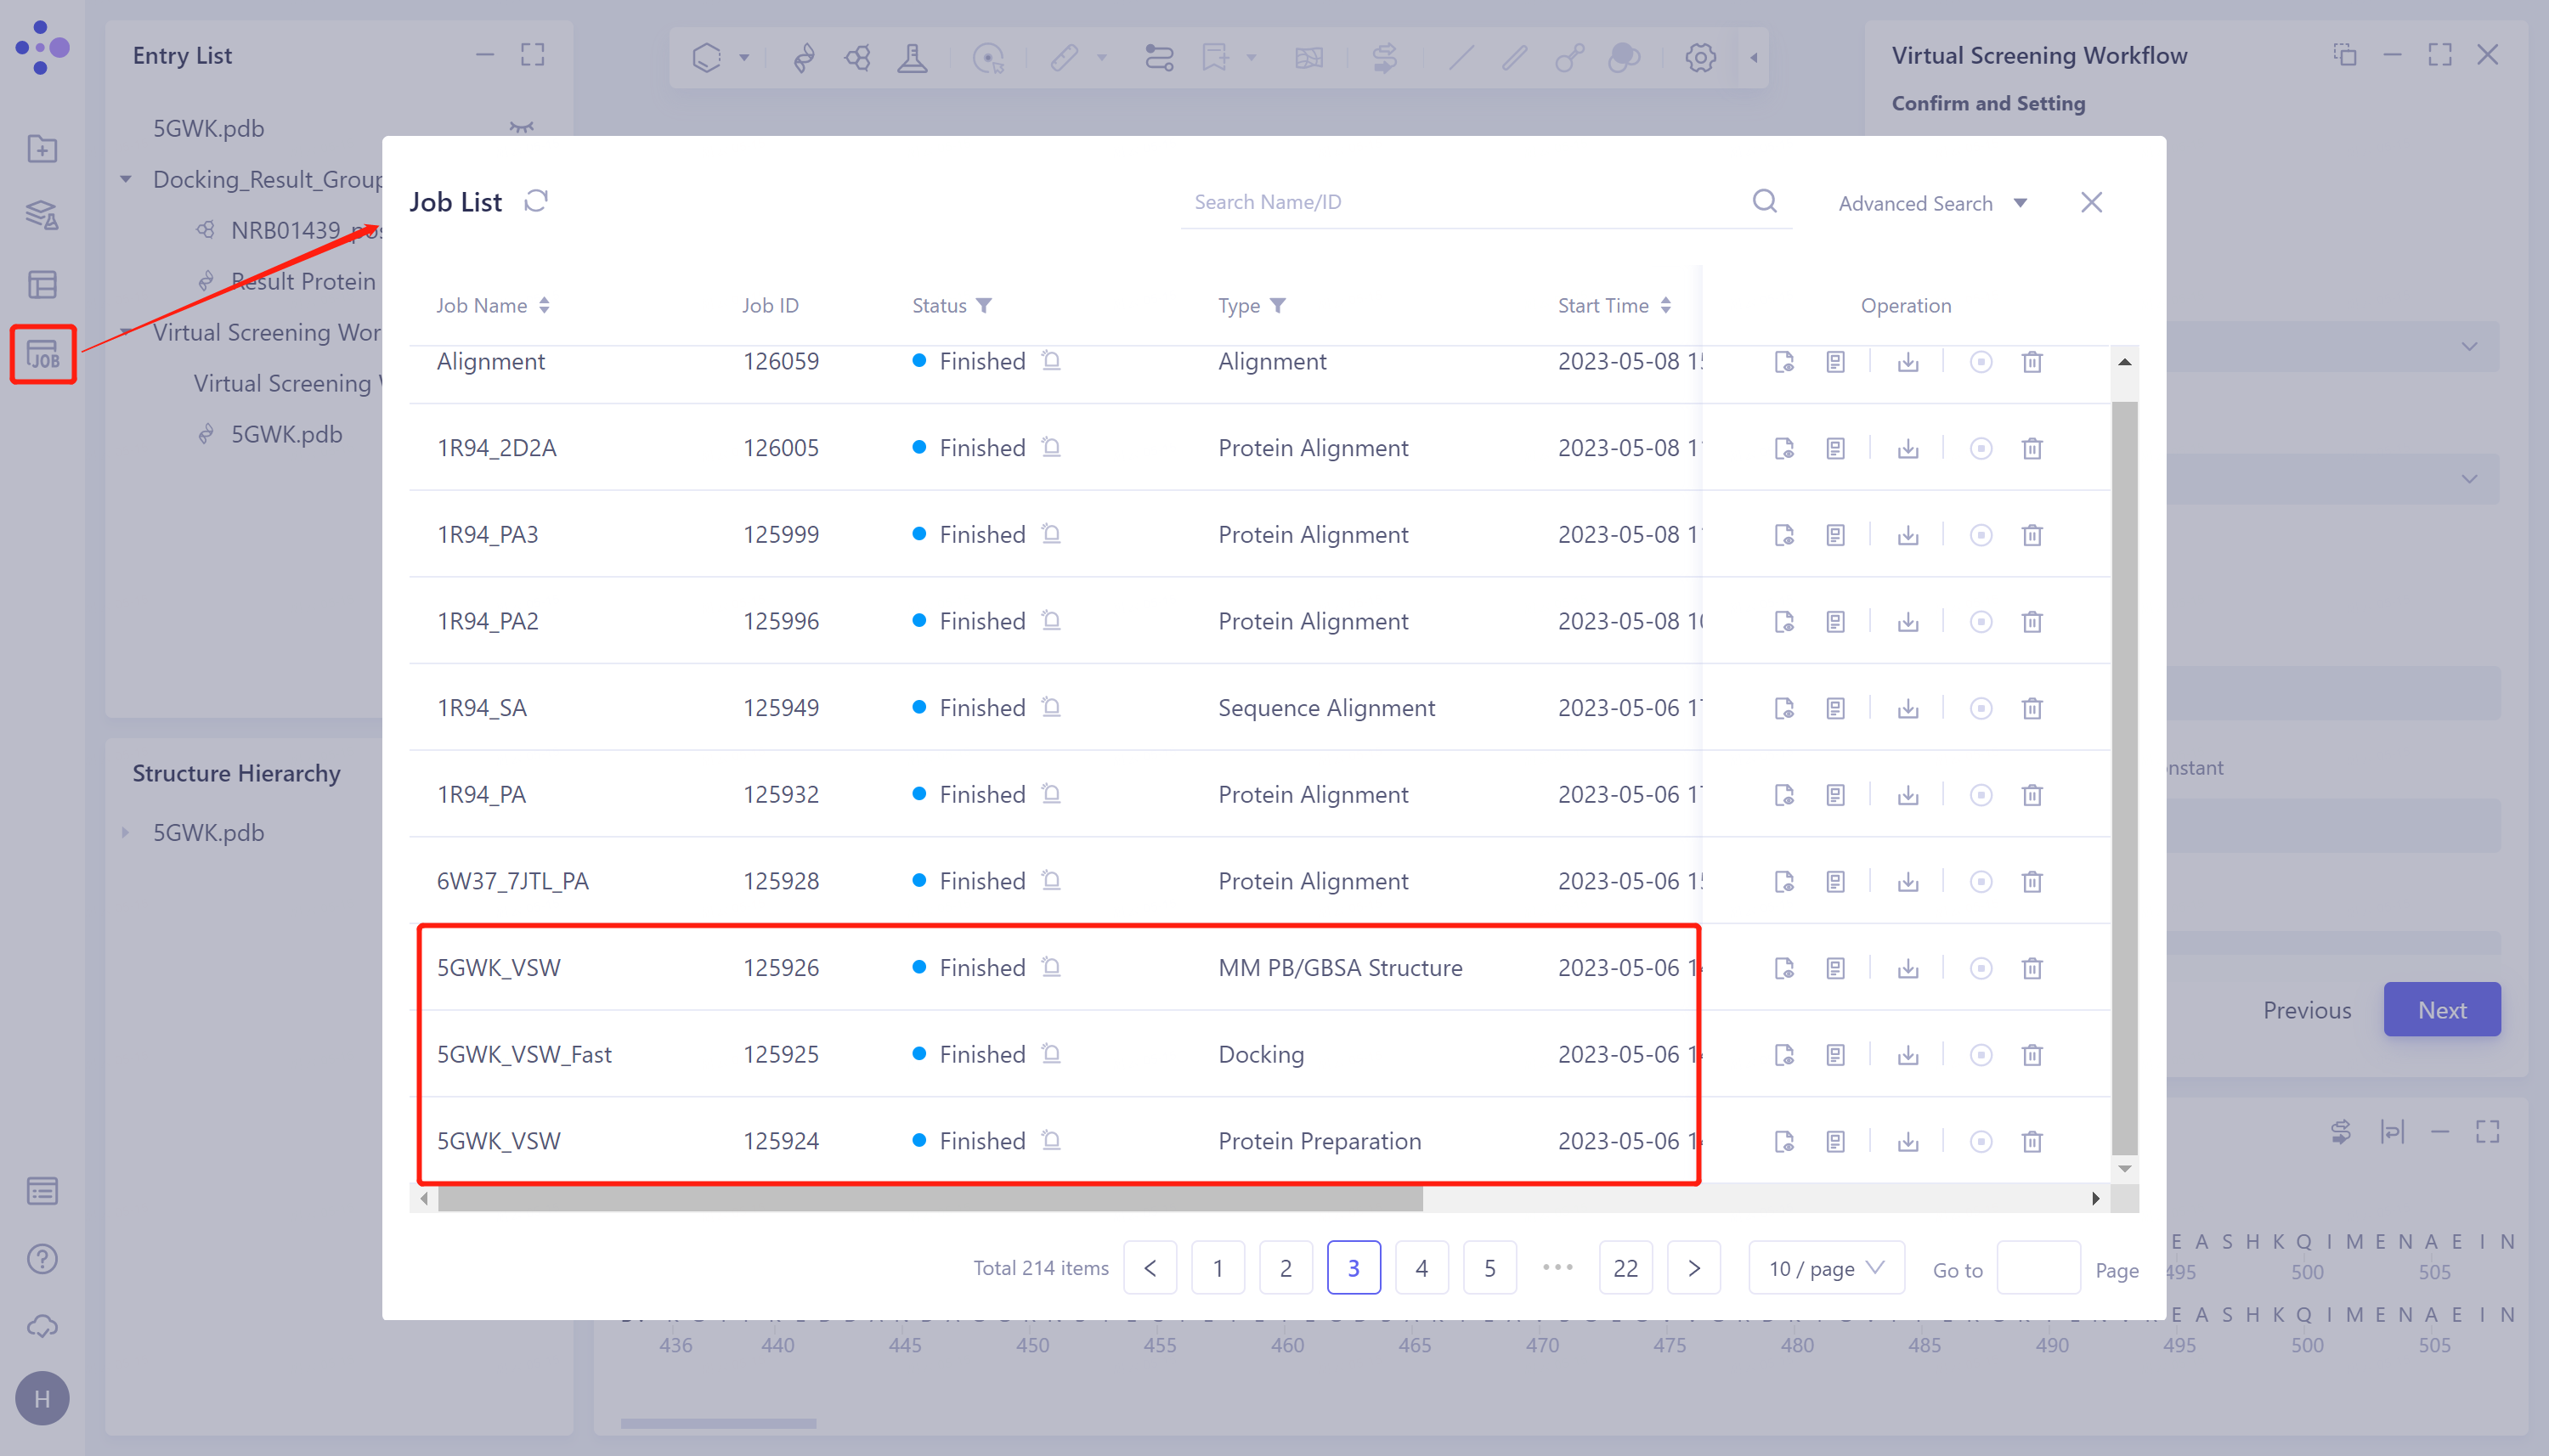
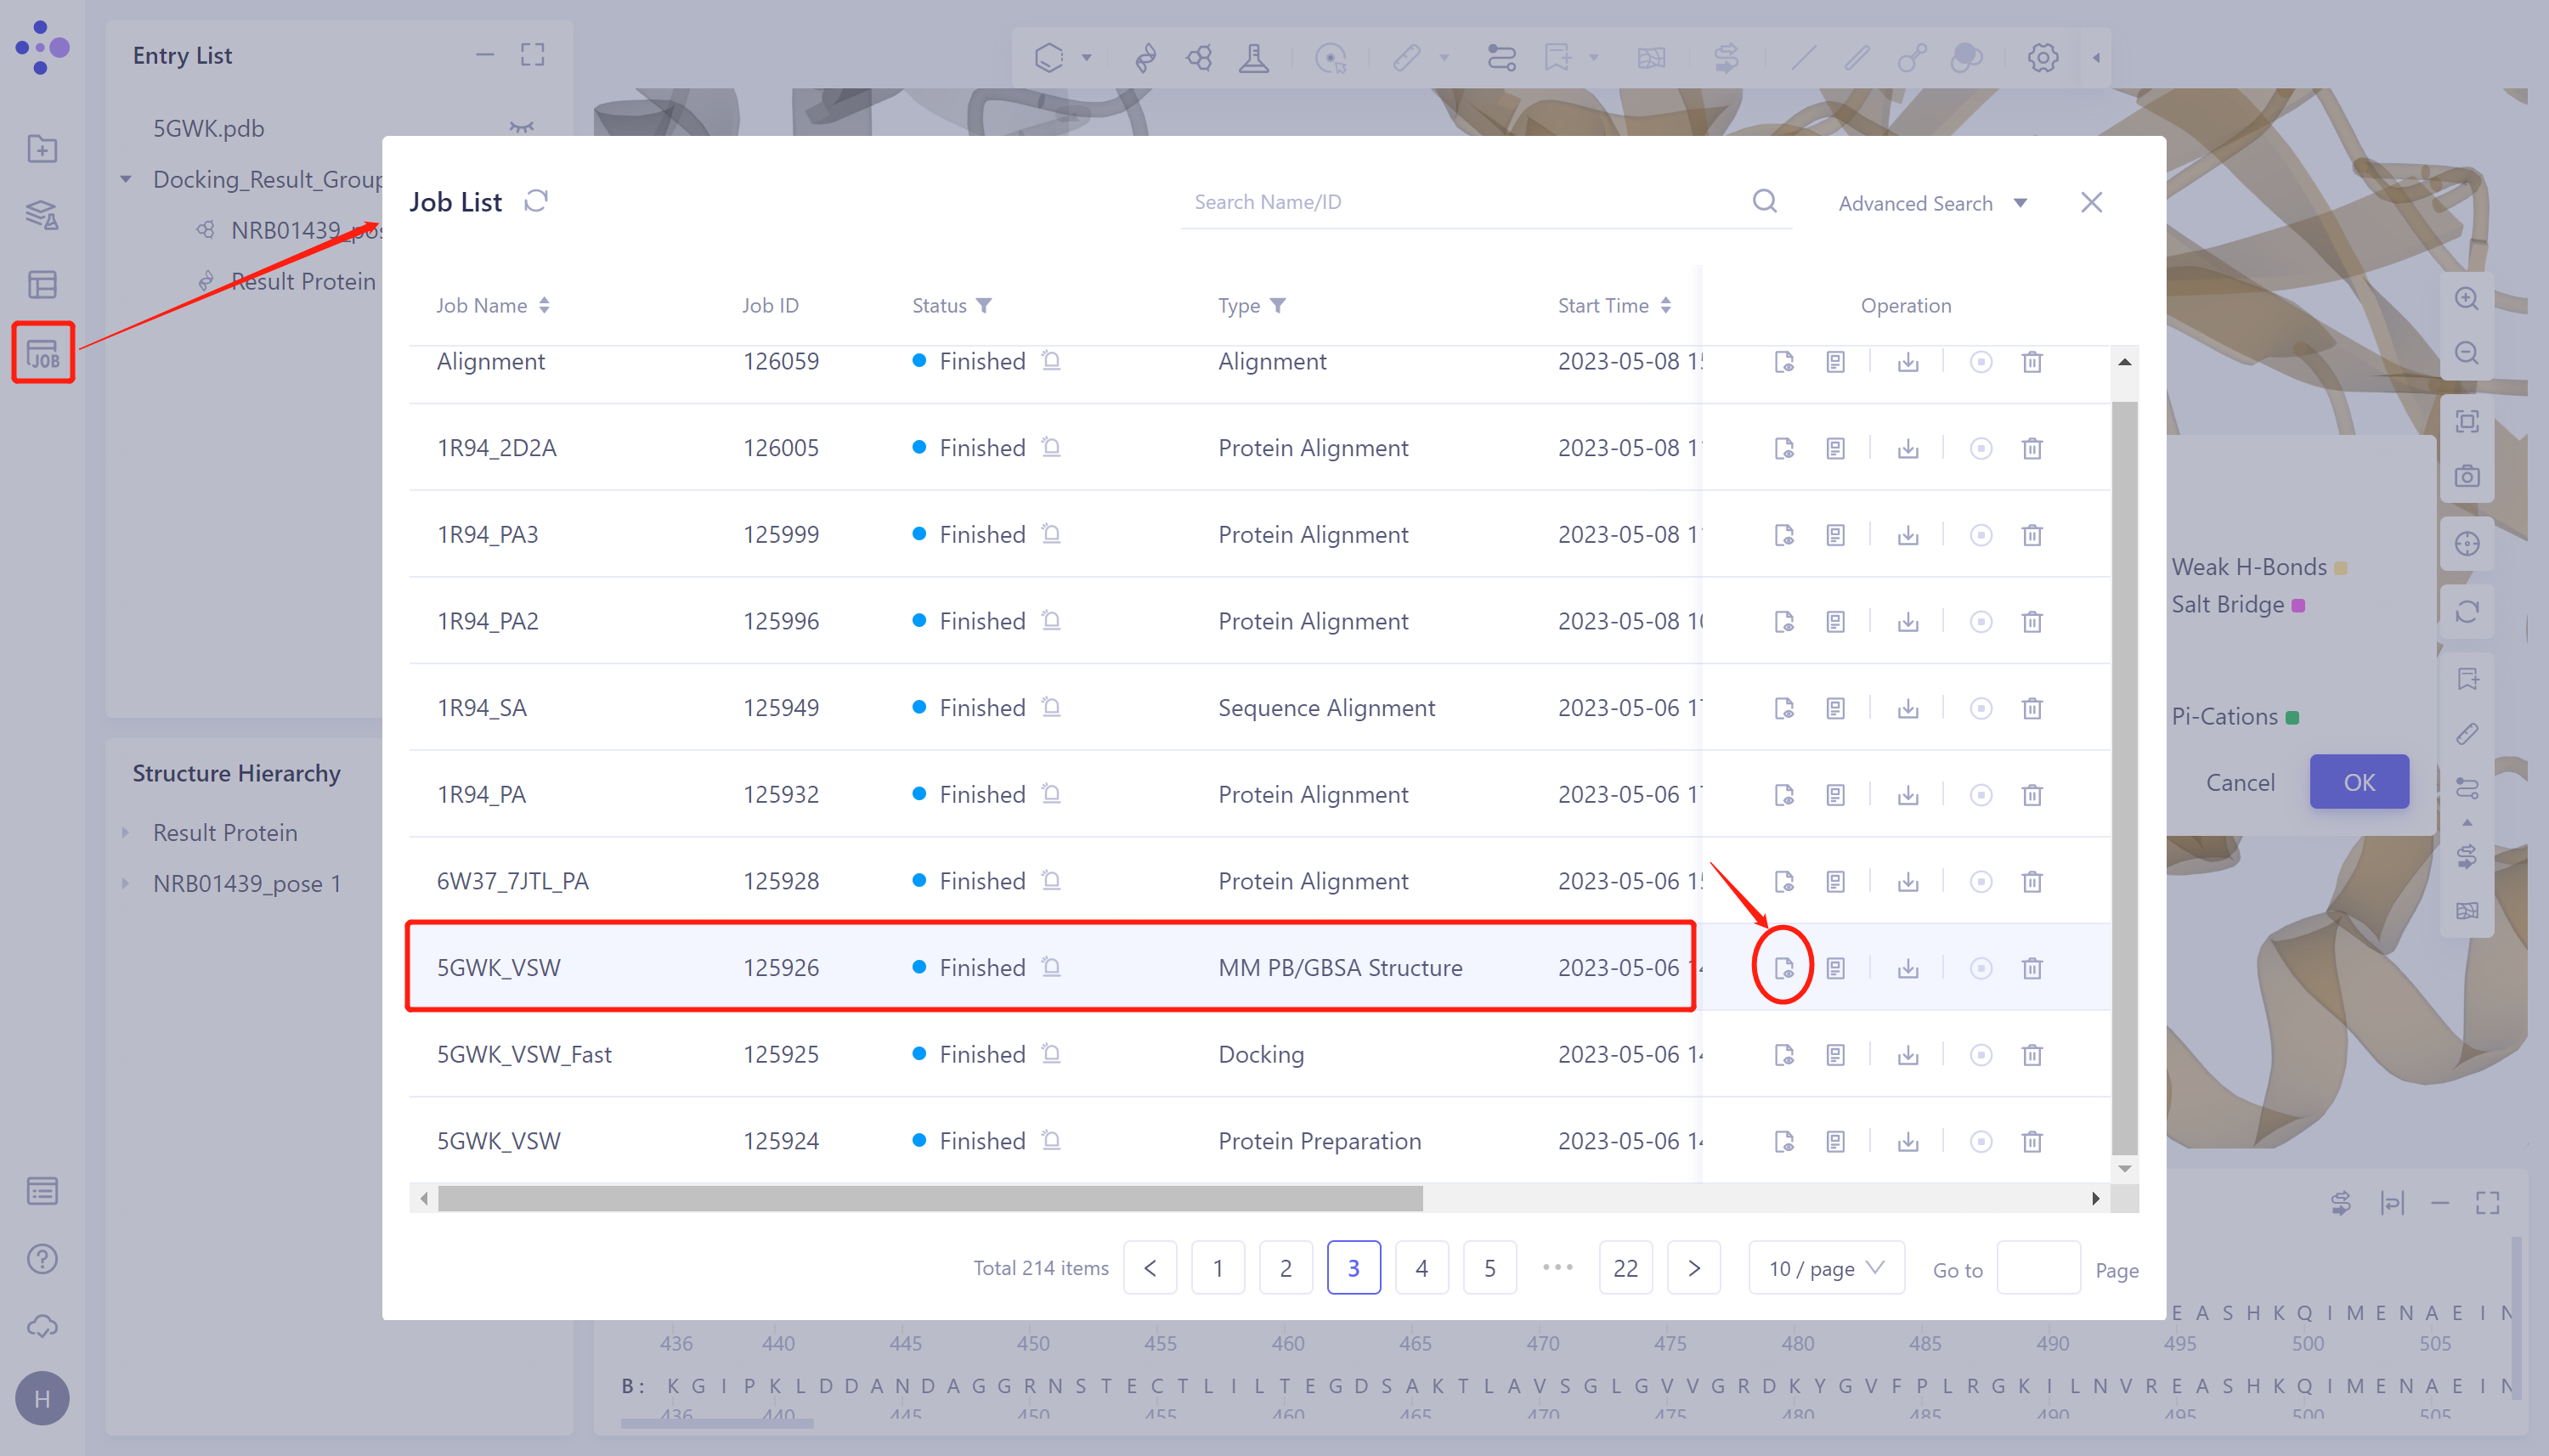
The left general menu bar Menu Job → Find the required task.
-
The task can be found by searching for Job Name or by filtering through Job Type.
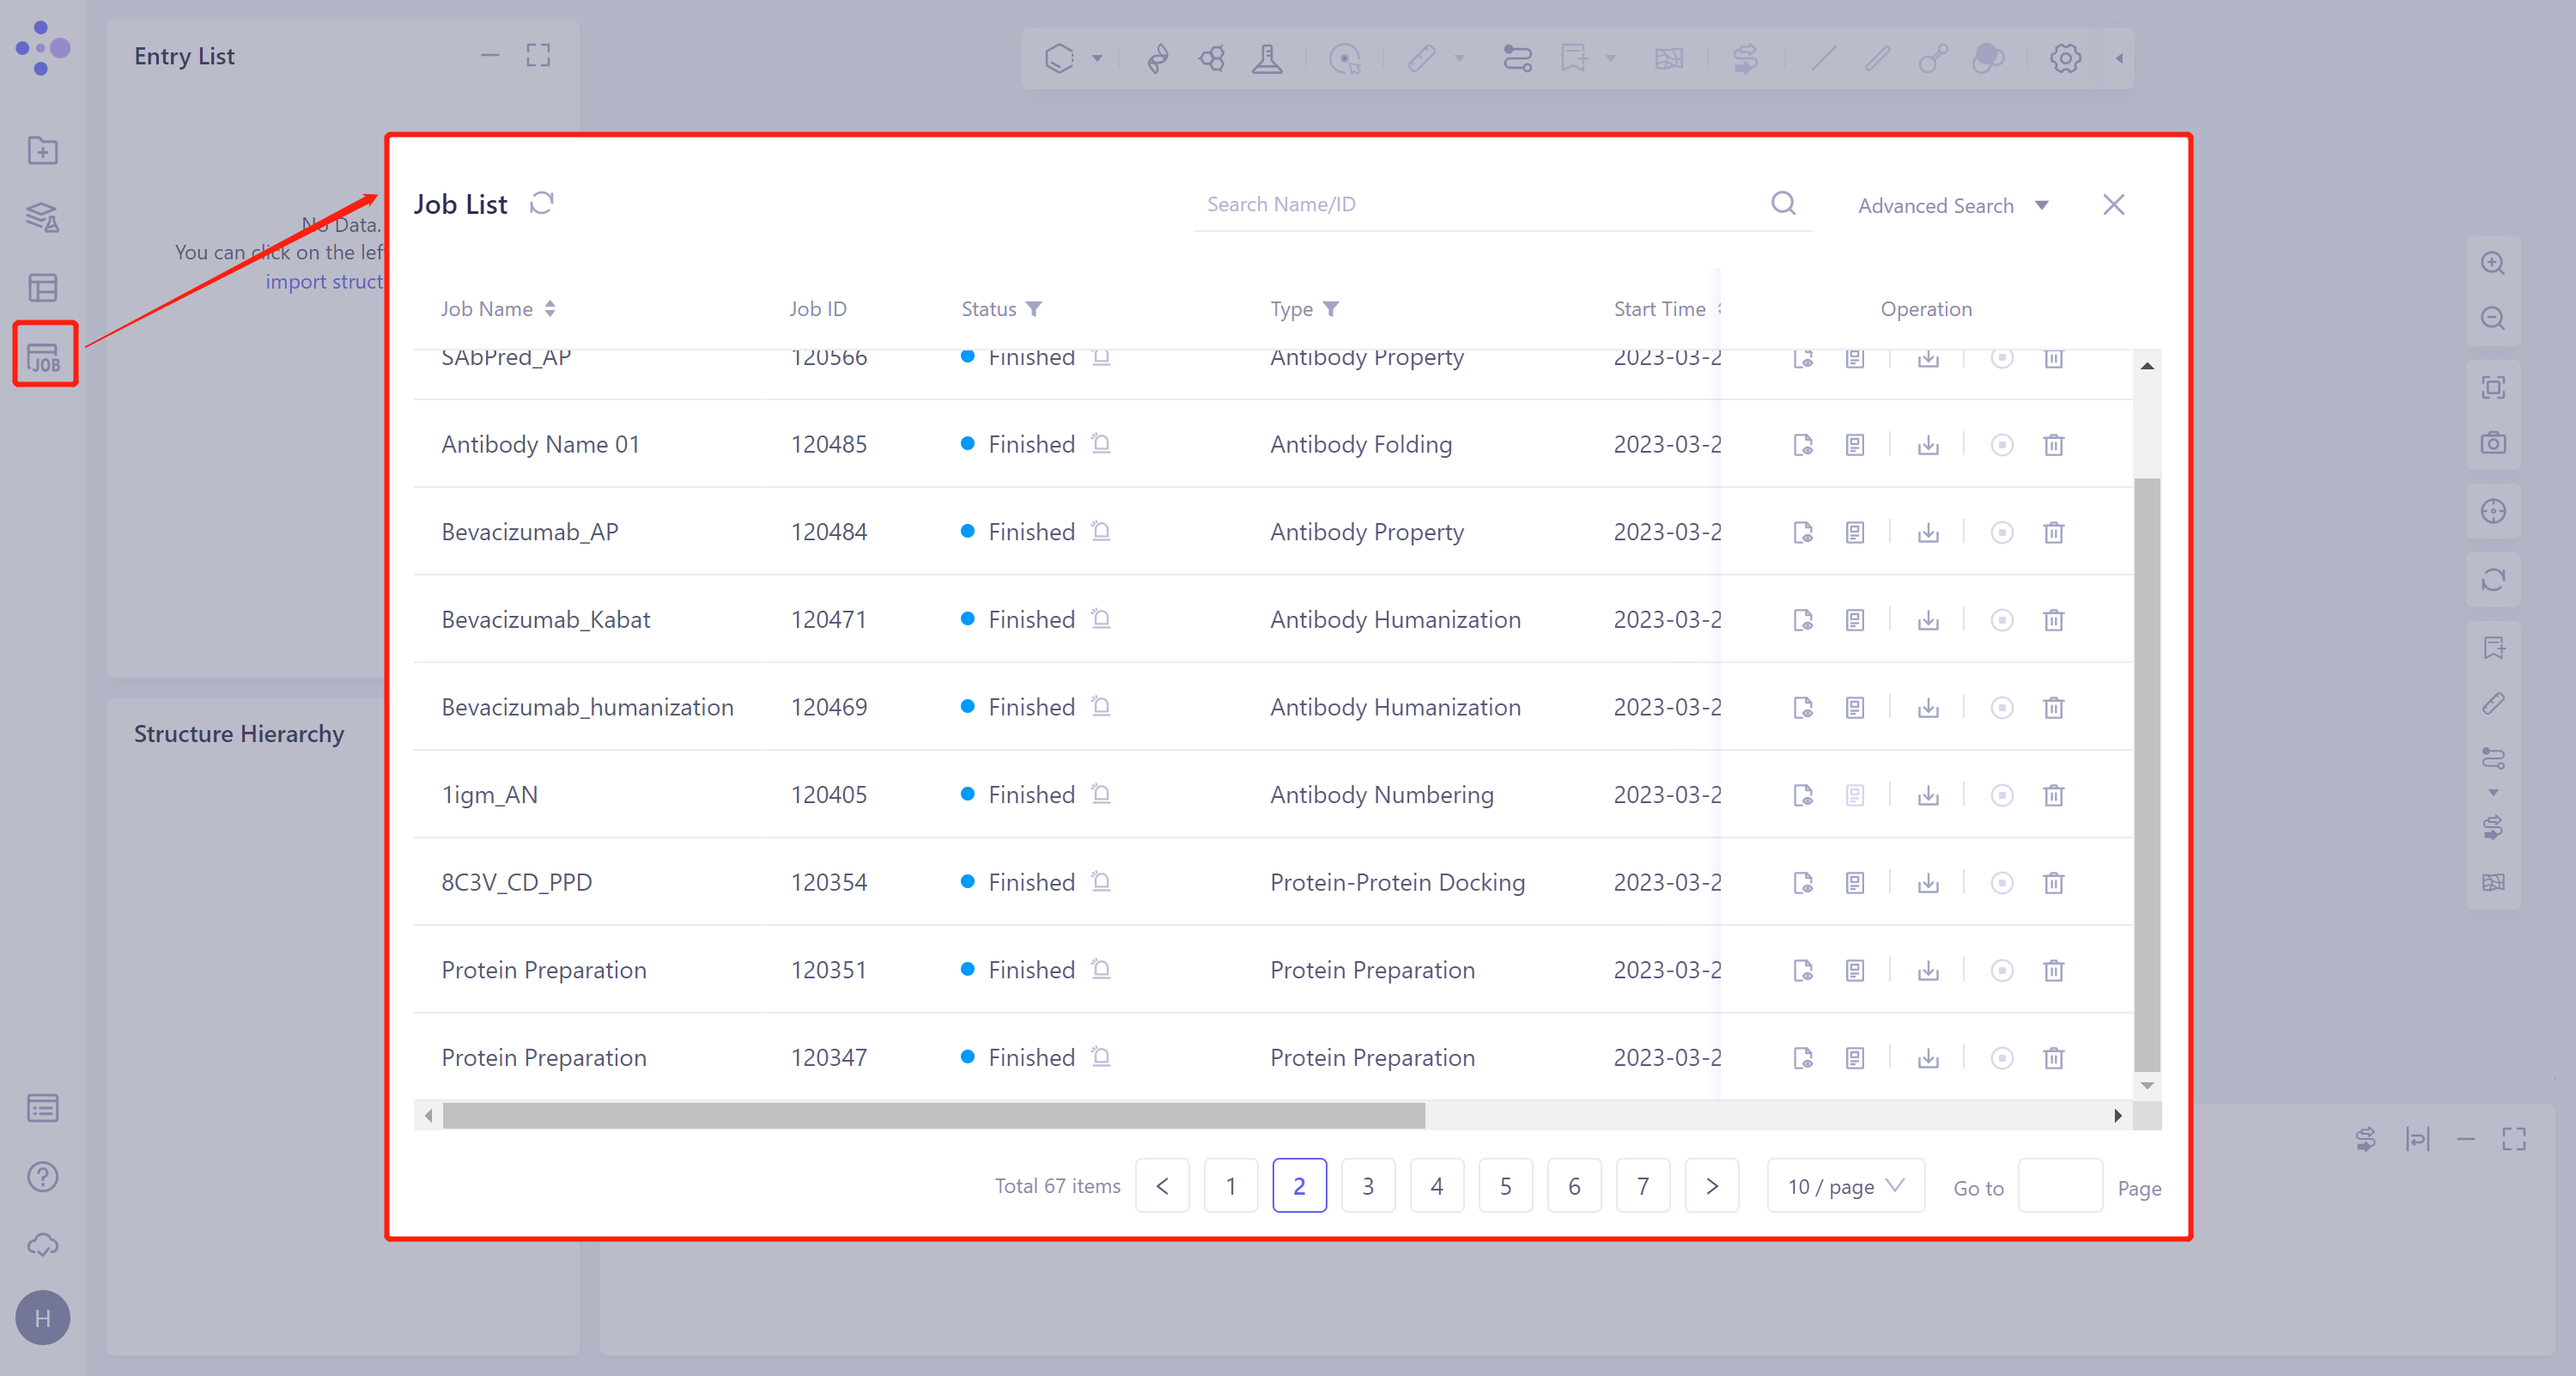
- This task generates four types of subtasks: Protein Preparation, Ligand Preparation (this task is not generated when the ligand is entered into the Database provided by the platform), Docking (including Fast, Balance and Detail, which are related to the check of the submitted task) and MM PB/GBSA Structure (generated after checking the calculation), which records the results of protein preparation, the results of virtual screening, and the results of MM PB/GBSA, respectively.
3.2 Docking results display
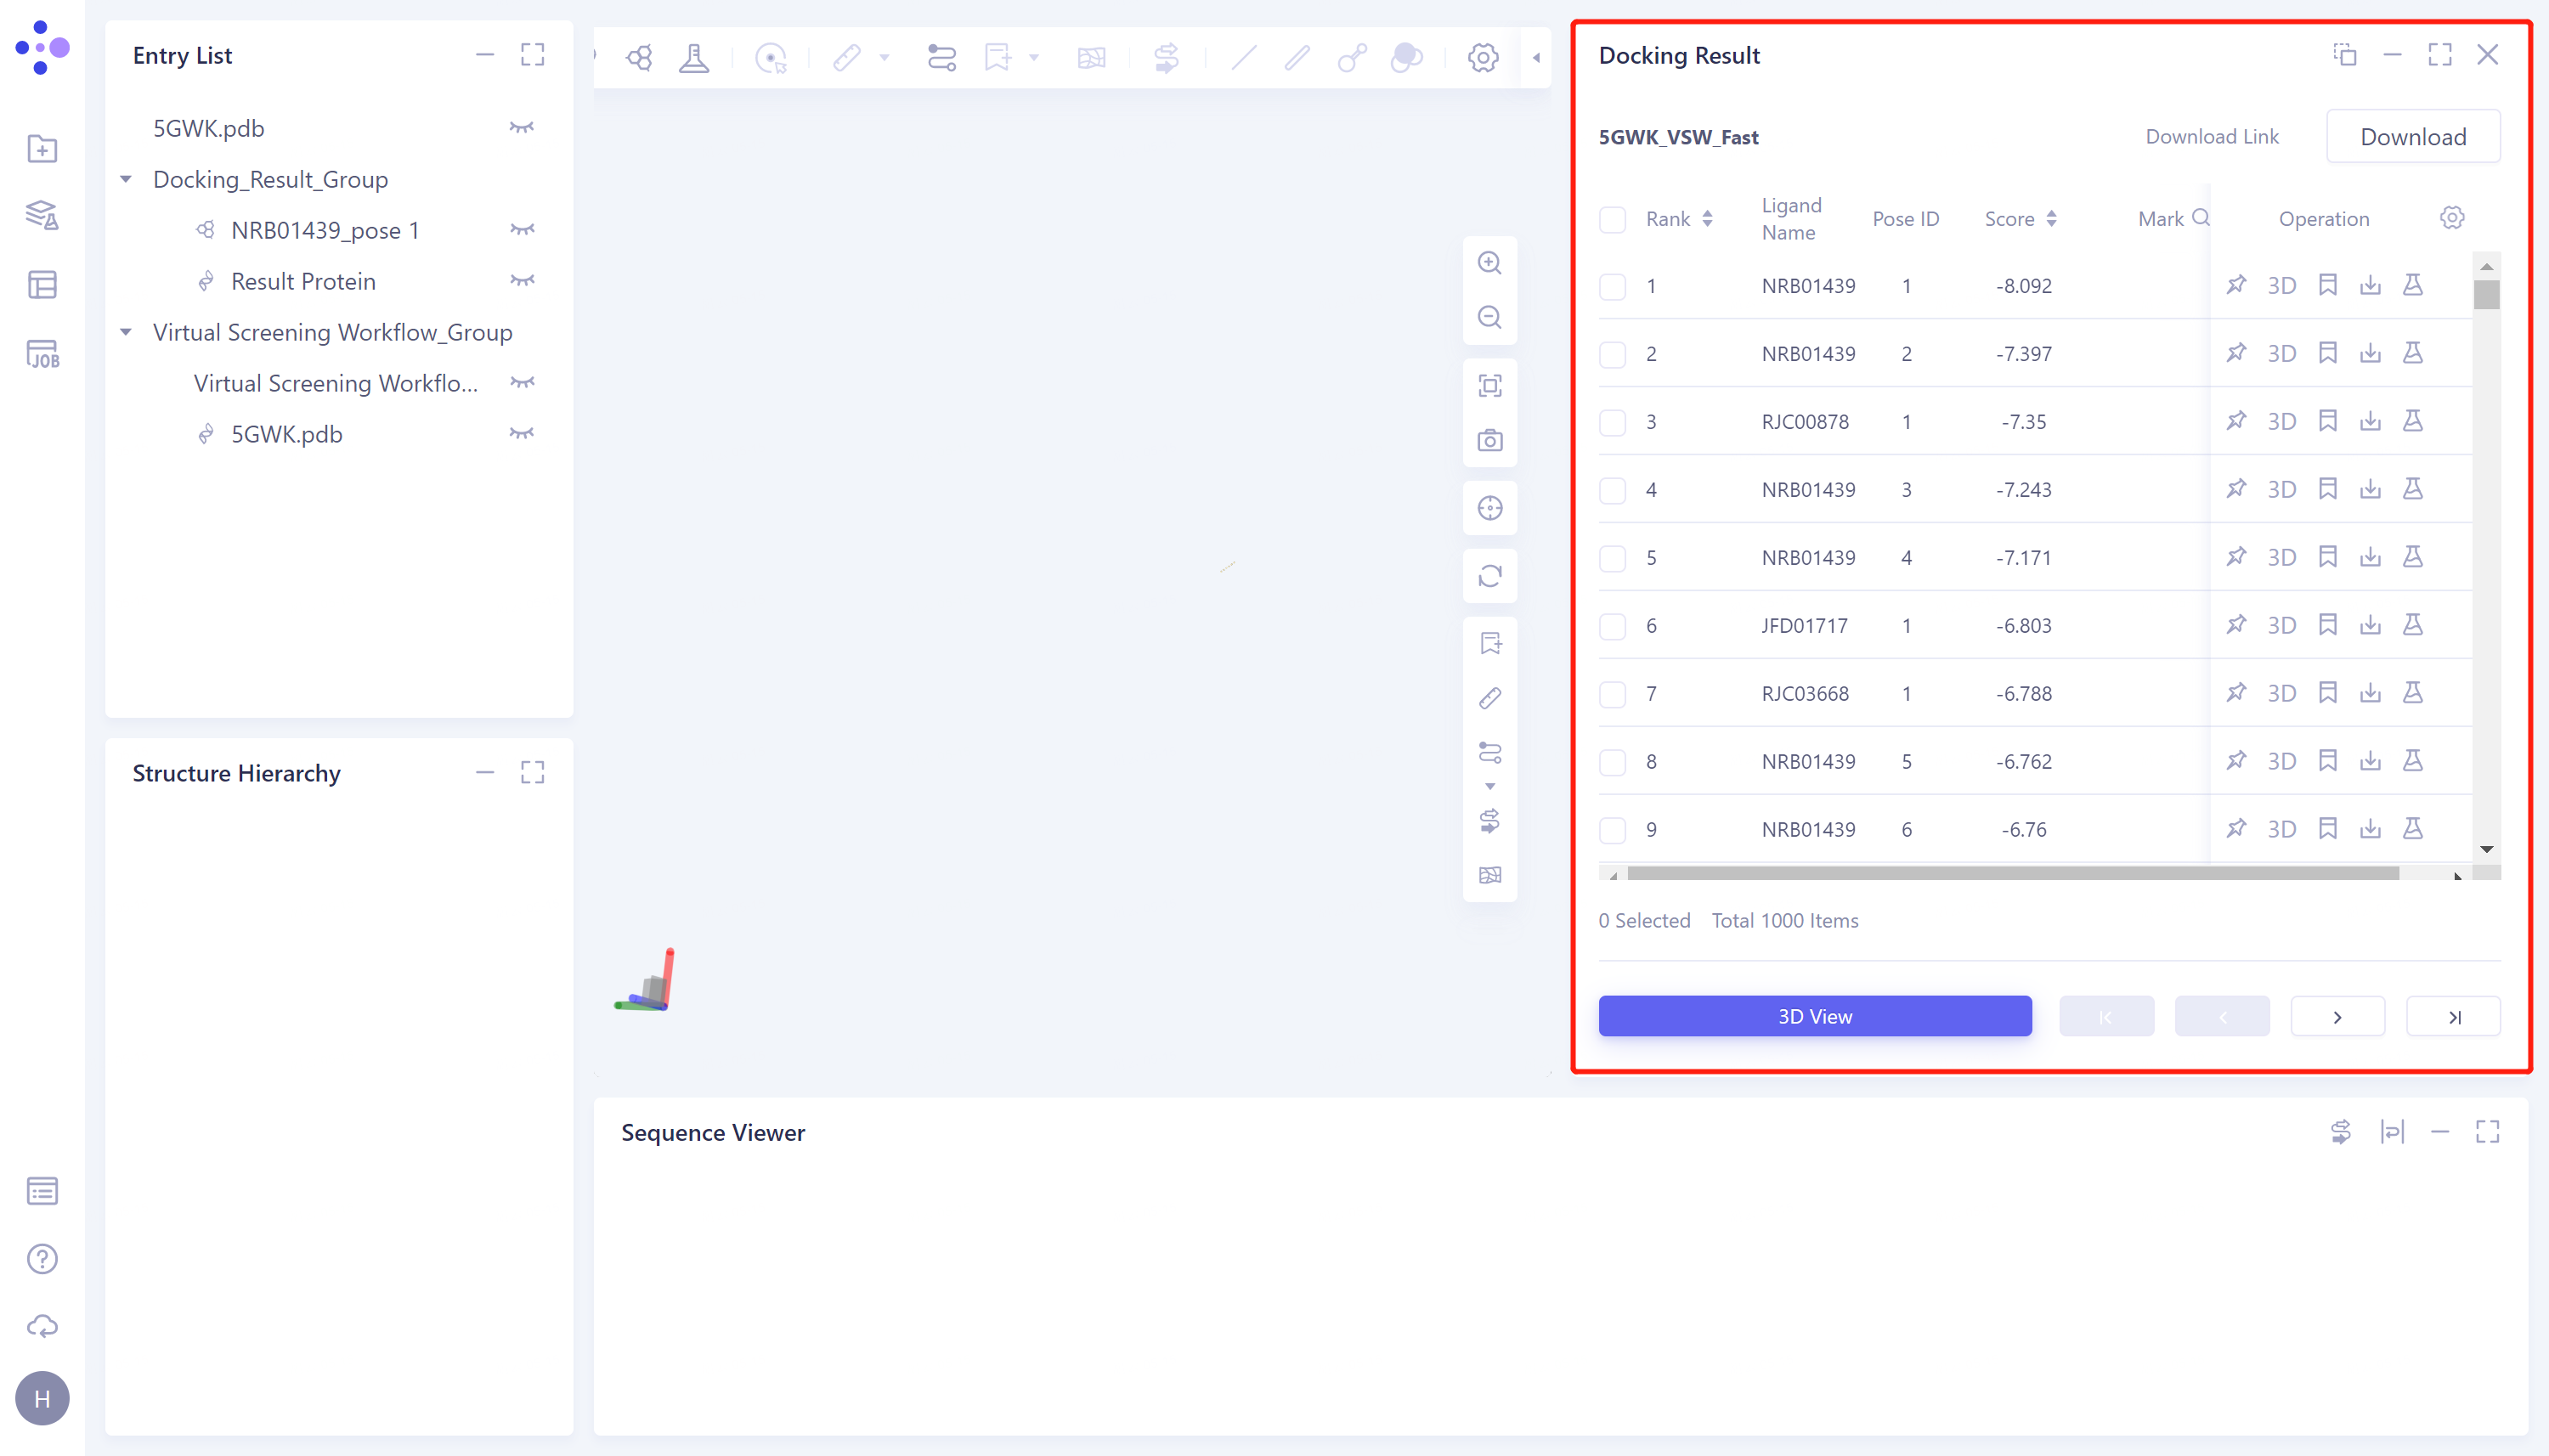
- Select the task you want to view, and click Show in the Operation column to display the result of the task. The interface is shown in the figure.

-
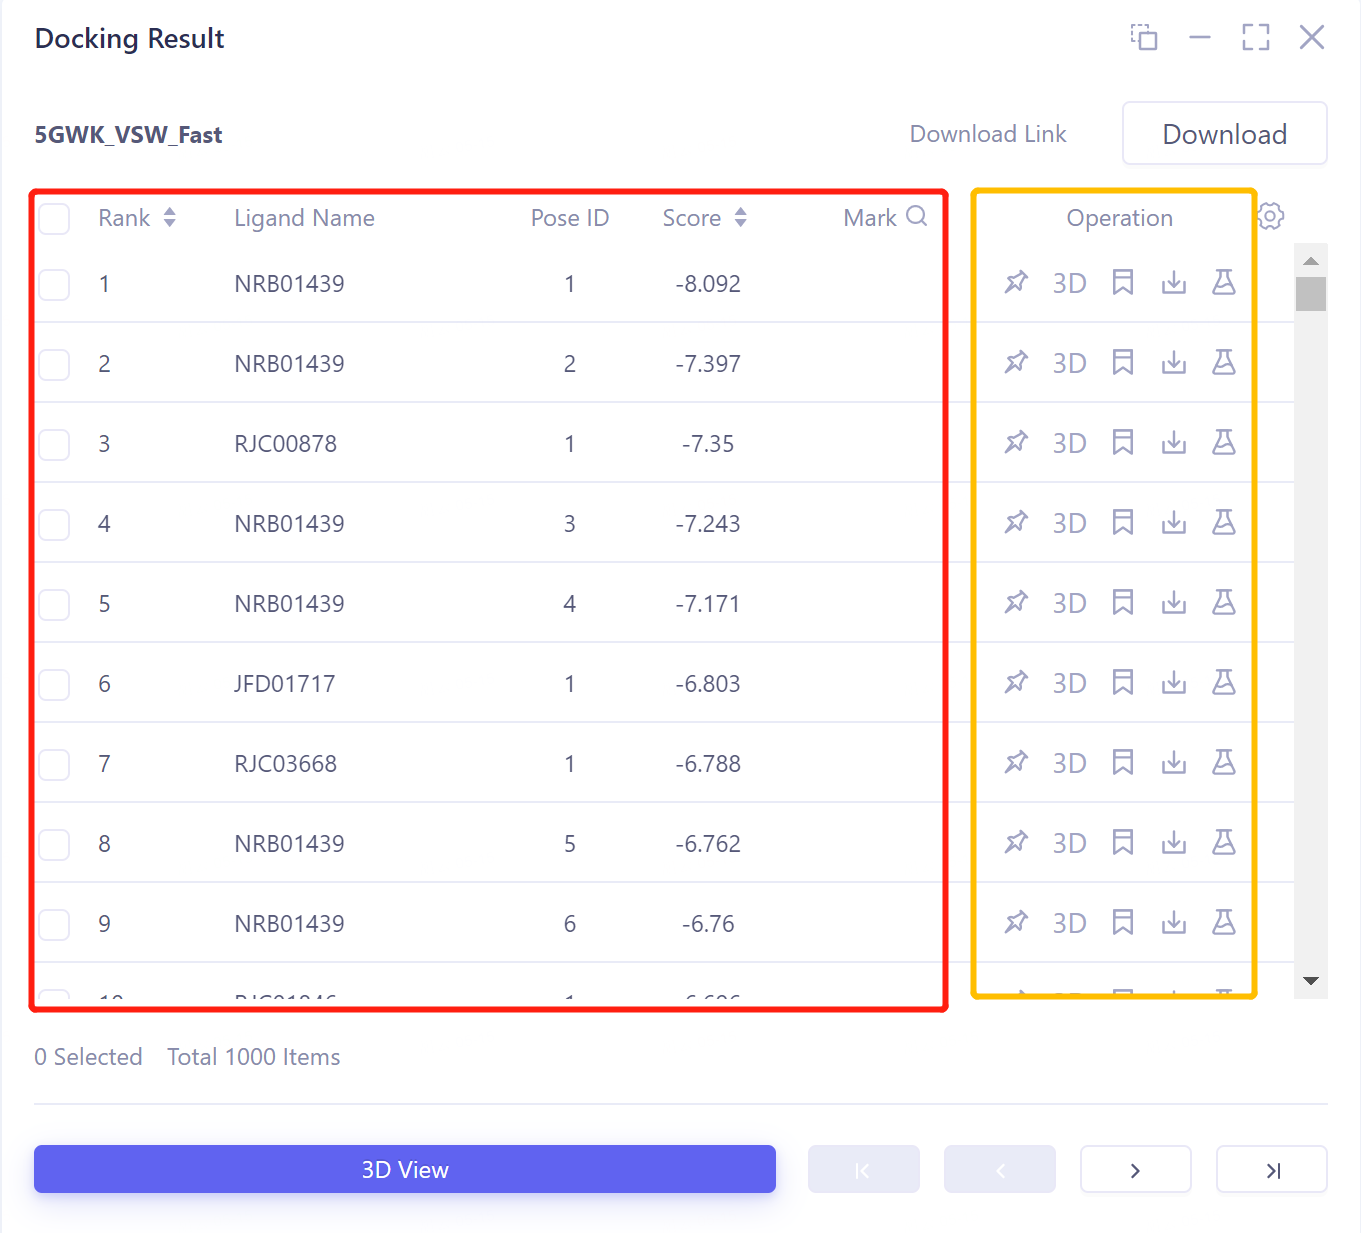
Docking Result table description:
-
Ligand Name indicates the ligand name;
-
Pose ID records the serial number of the ligand binding gesture;
-
Score is the docking score of ligand and protein, click to sort from high to low or from low to high;
-
There are 5 operation options under Operation to operate on the row molecule:
-
Fixed: Fixed display in 3D Workspace.
-
3D: Display the ligand in 3D Workspace.
-
Mark: For some special data rows, you can click Mark to make a manual note. After the note is done, it will be displayed in the Mark column, and it supports searching by note.
-
Download: Download the docked molecule, which can be saved in sdf, mol and mol2 formats.
-
Properties: Non-standard Properties that come with Ligand .
-
-
Image description:
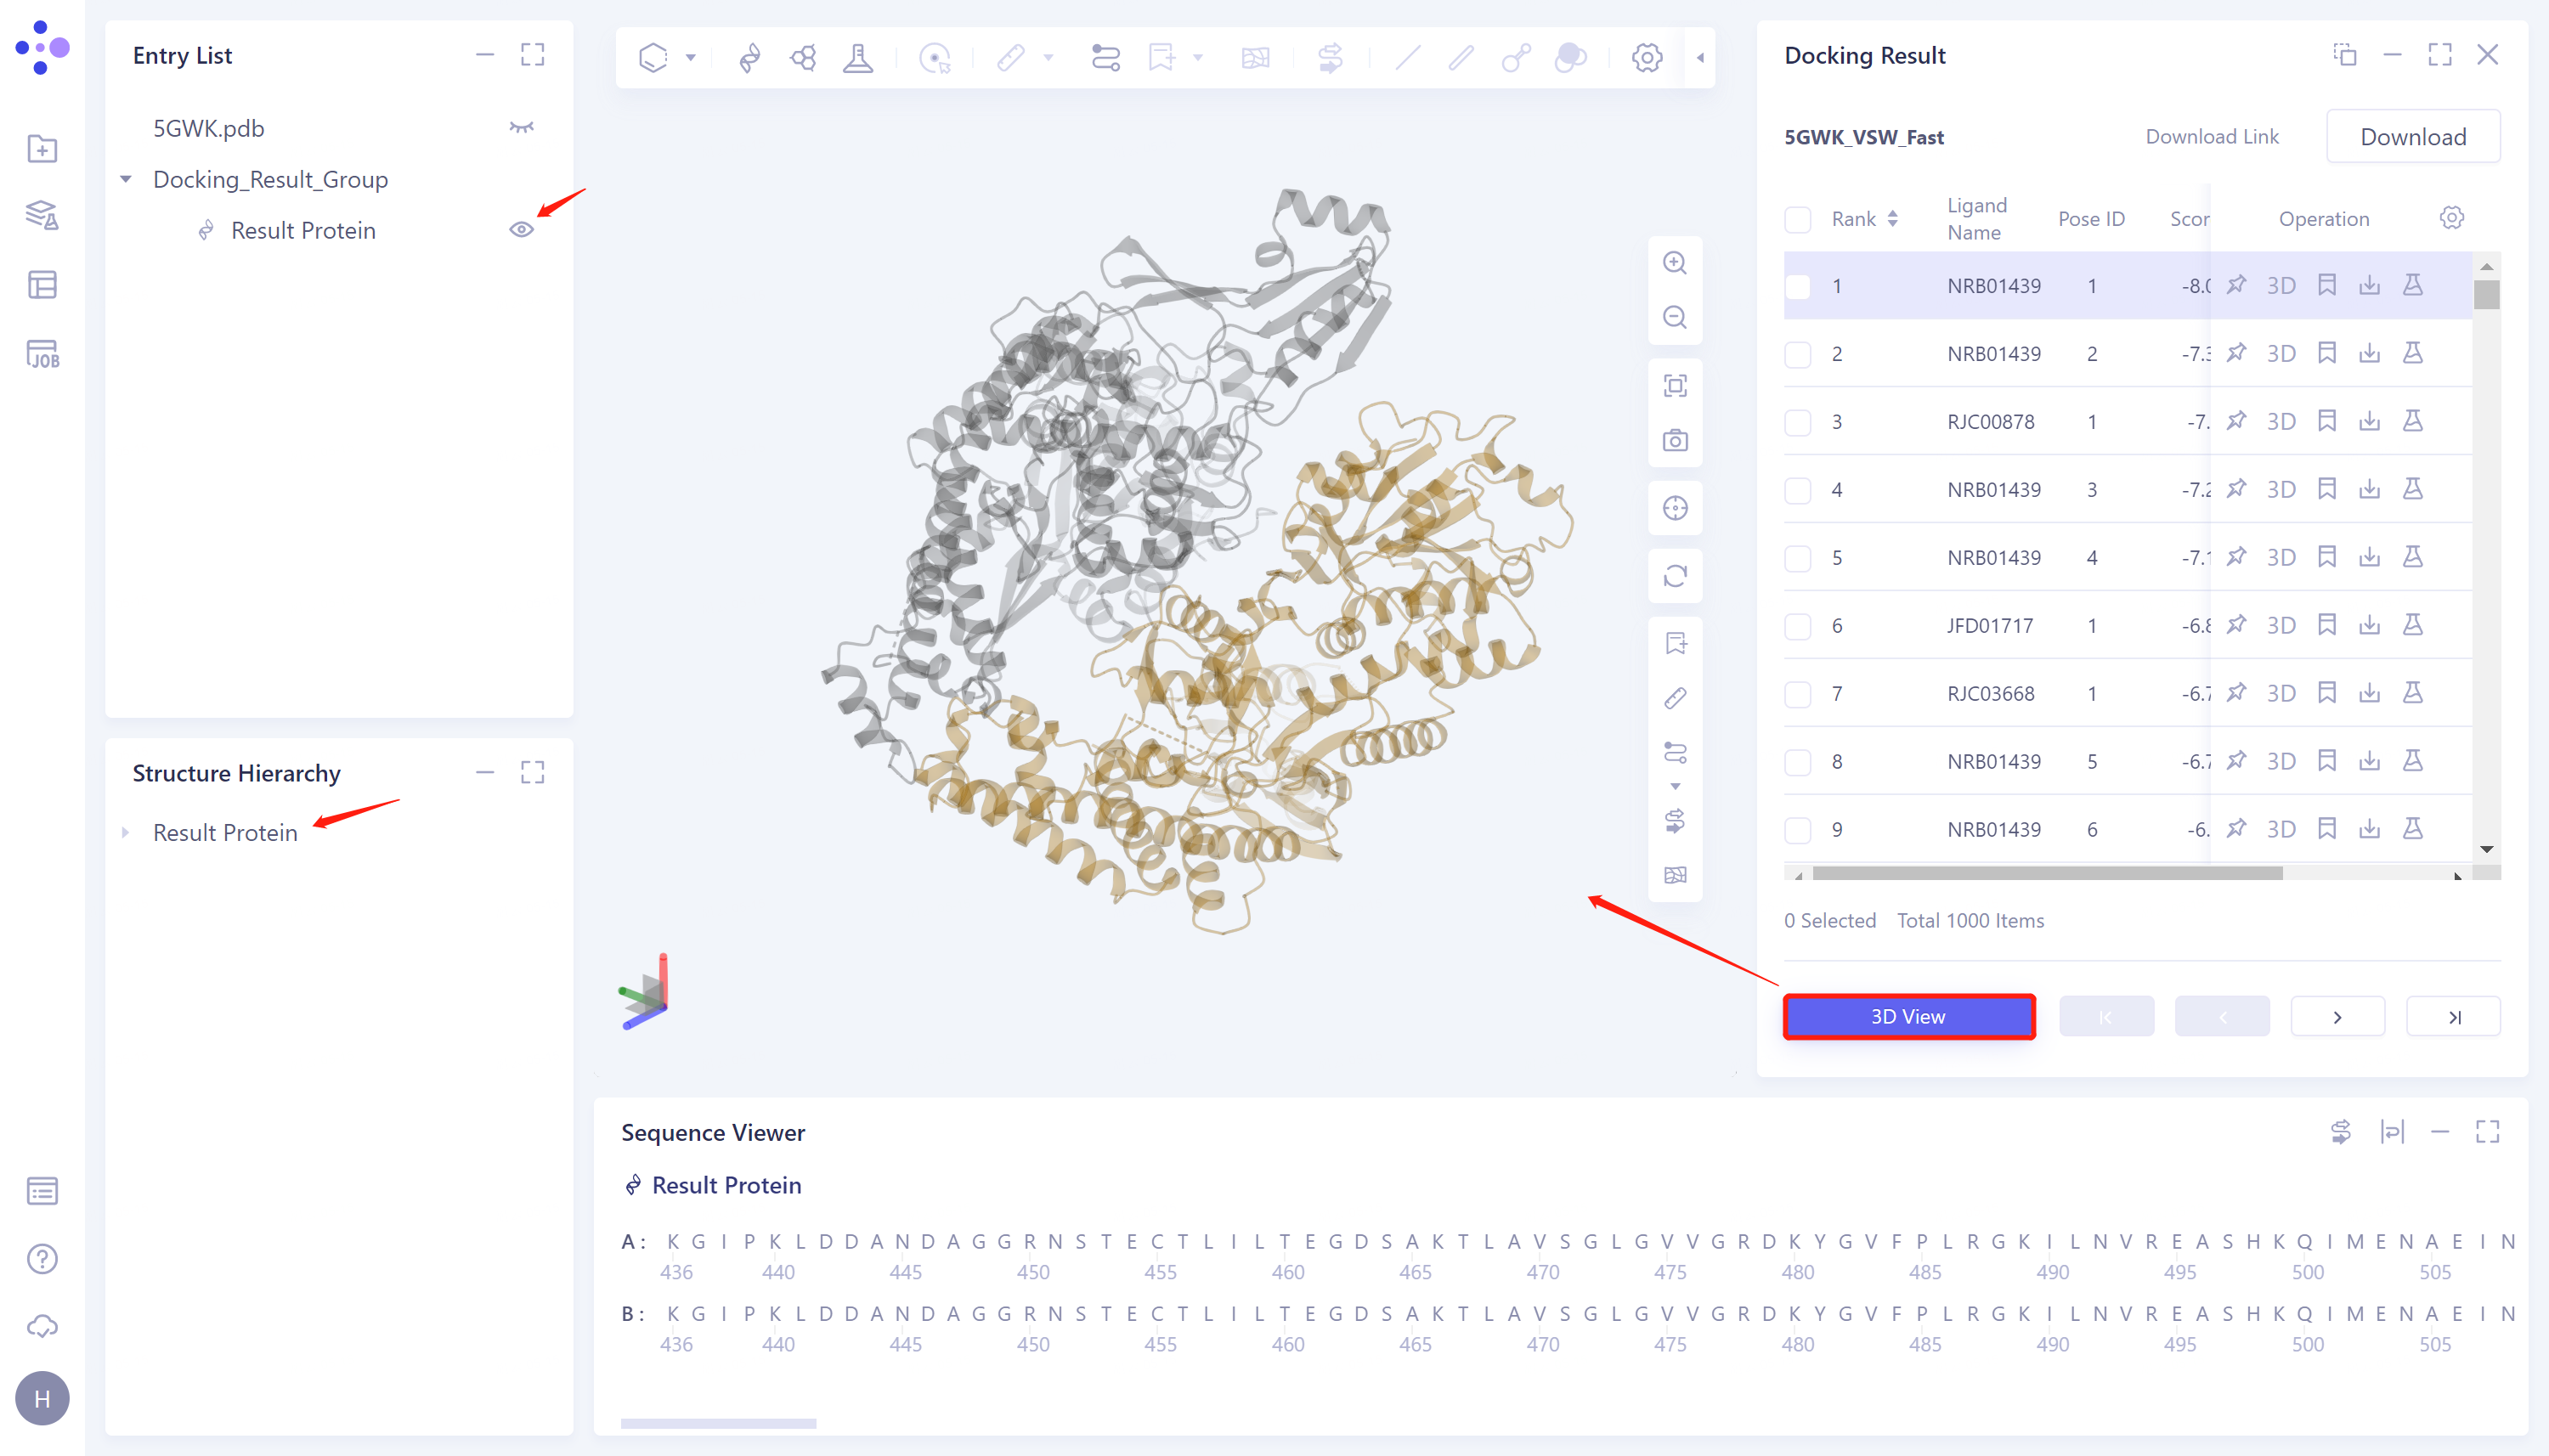
-
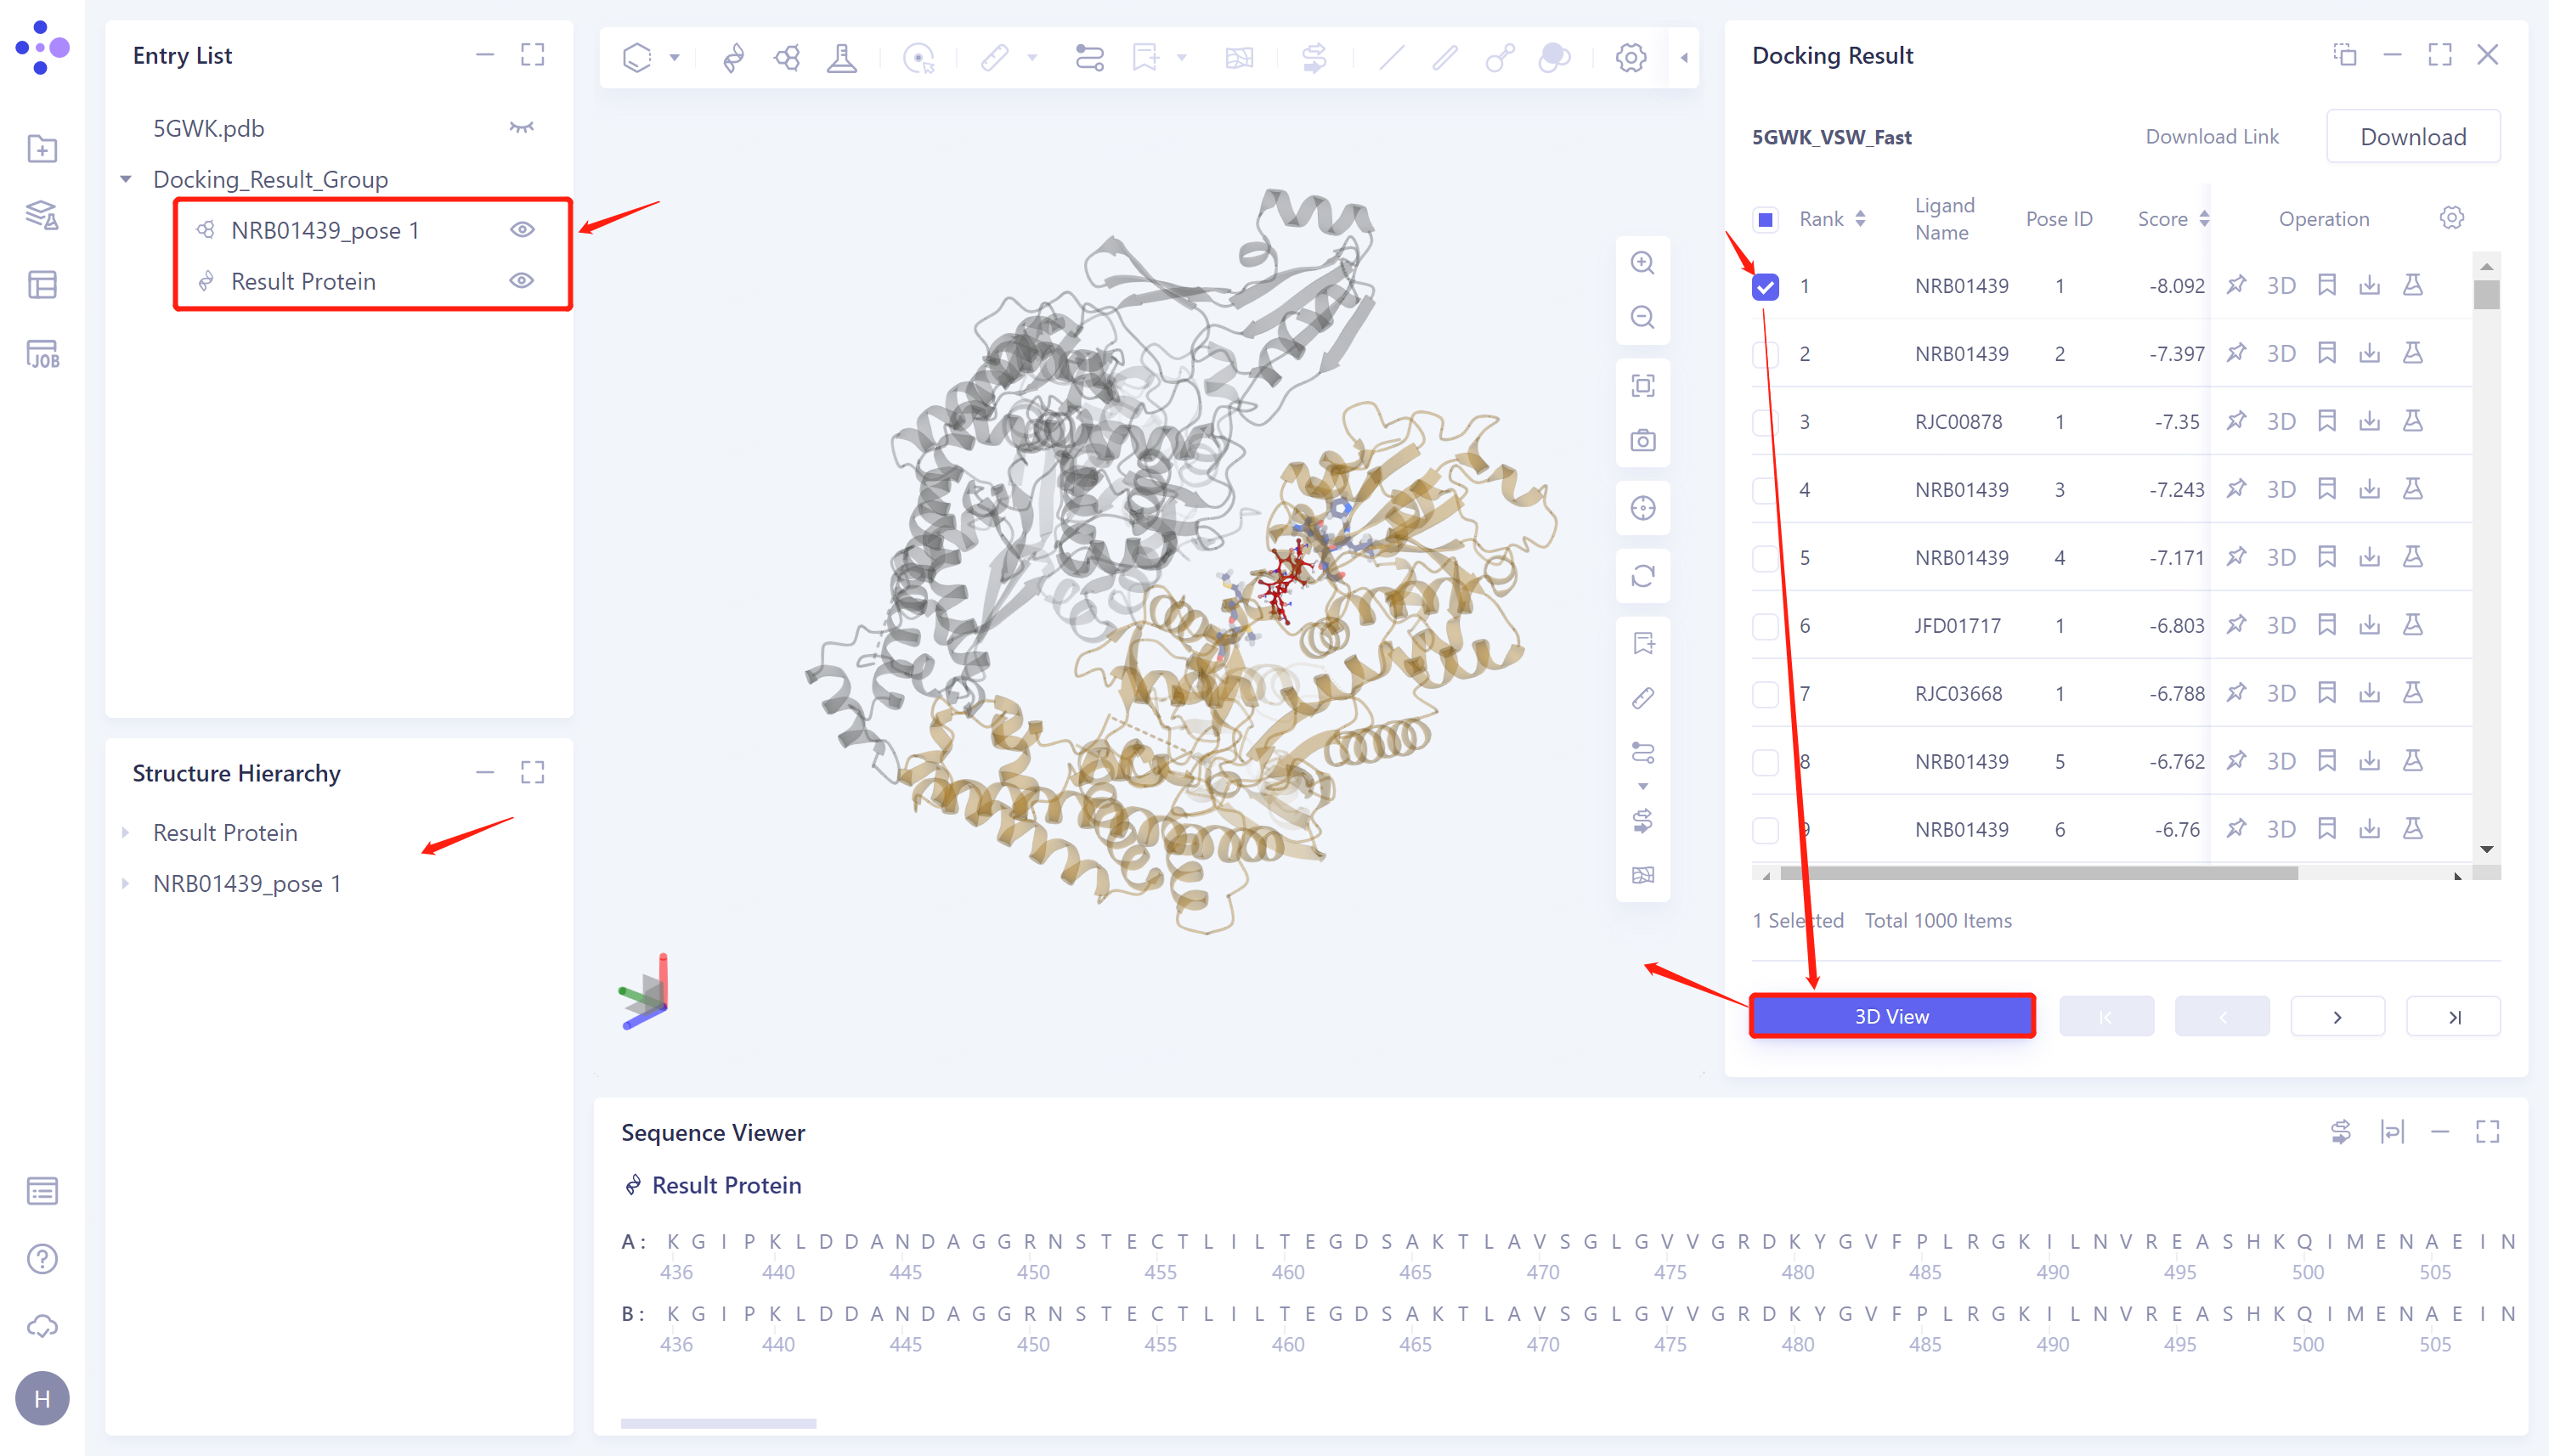
3D View: Display the results in the 3D Workspace window;
-
Click directly on the 3D Viewer to display the protein structure for docking in the 3D Workspace window;
-
Docking image display: Select the checkbox corresponding to the ligand to be displayed in the Docking Result table on the right → click 3D View → 3D Workspace to display the docking result.
-
-
3D Workspace window display:
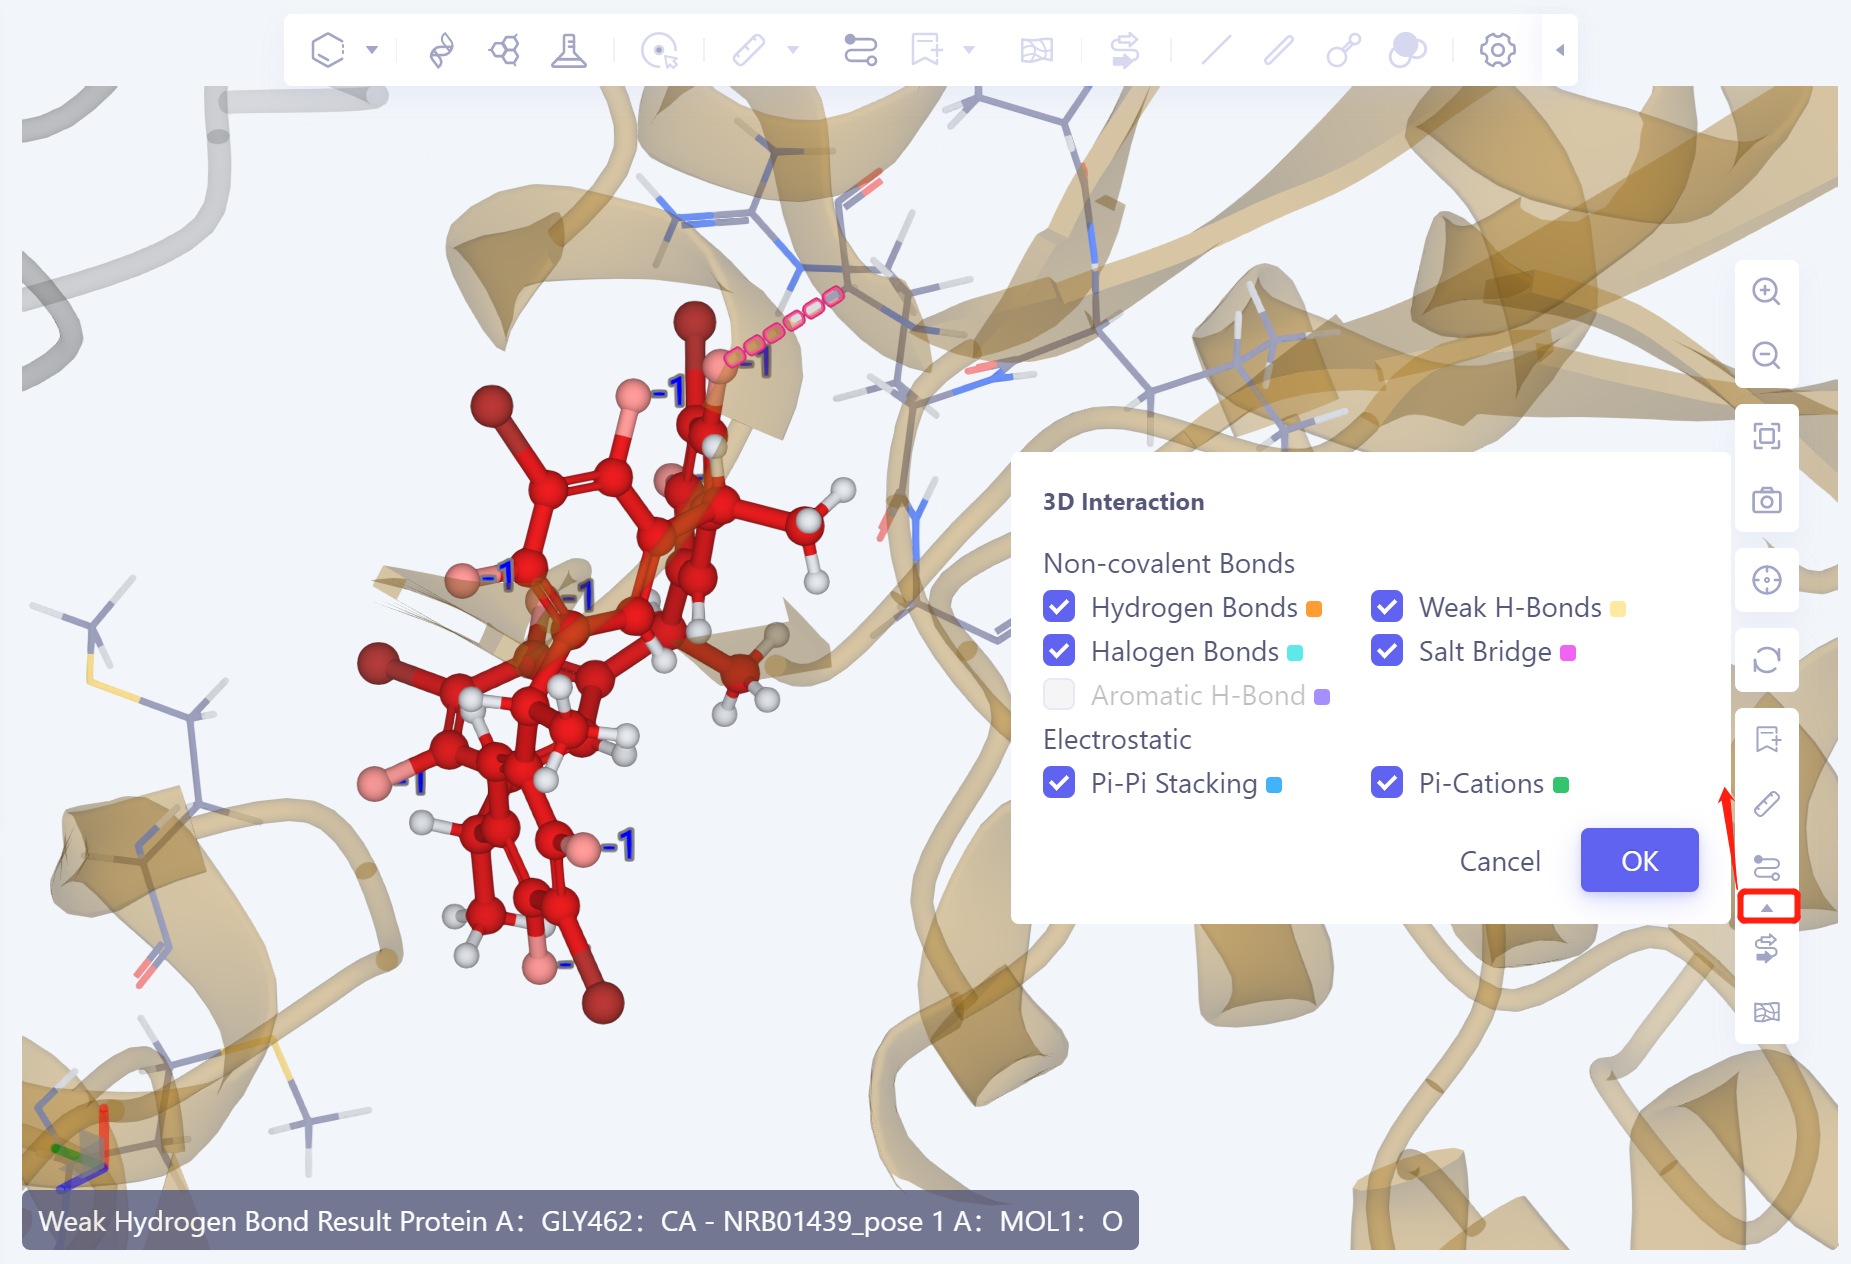
- The ligand is displayed in the ball and stick model. The amino acid residues that interact with the ligand are presented in the form of Lines. The dotted line indicates the interaction. Click or hover to the dotted line to display the interaction description in the lower left corner of the 3D Workspce window. Different interactions are represented in different colors.
3.3 MM PB/GBSA Structure Results Display
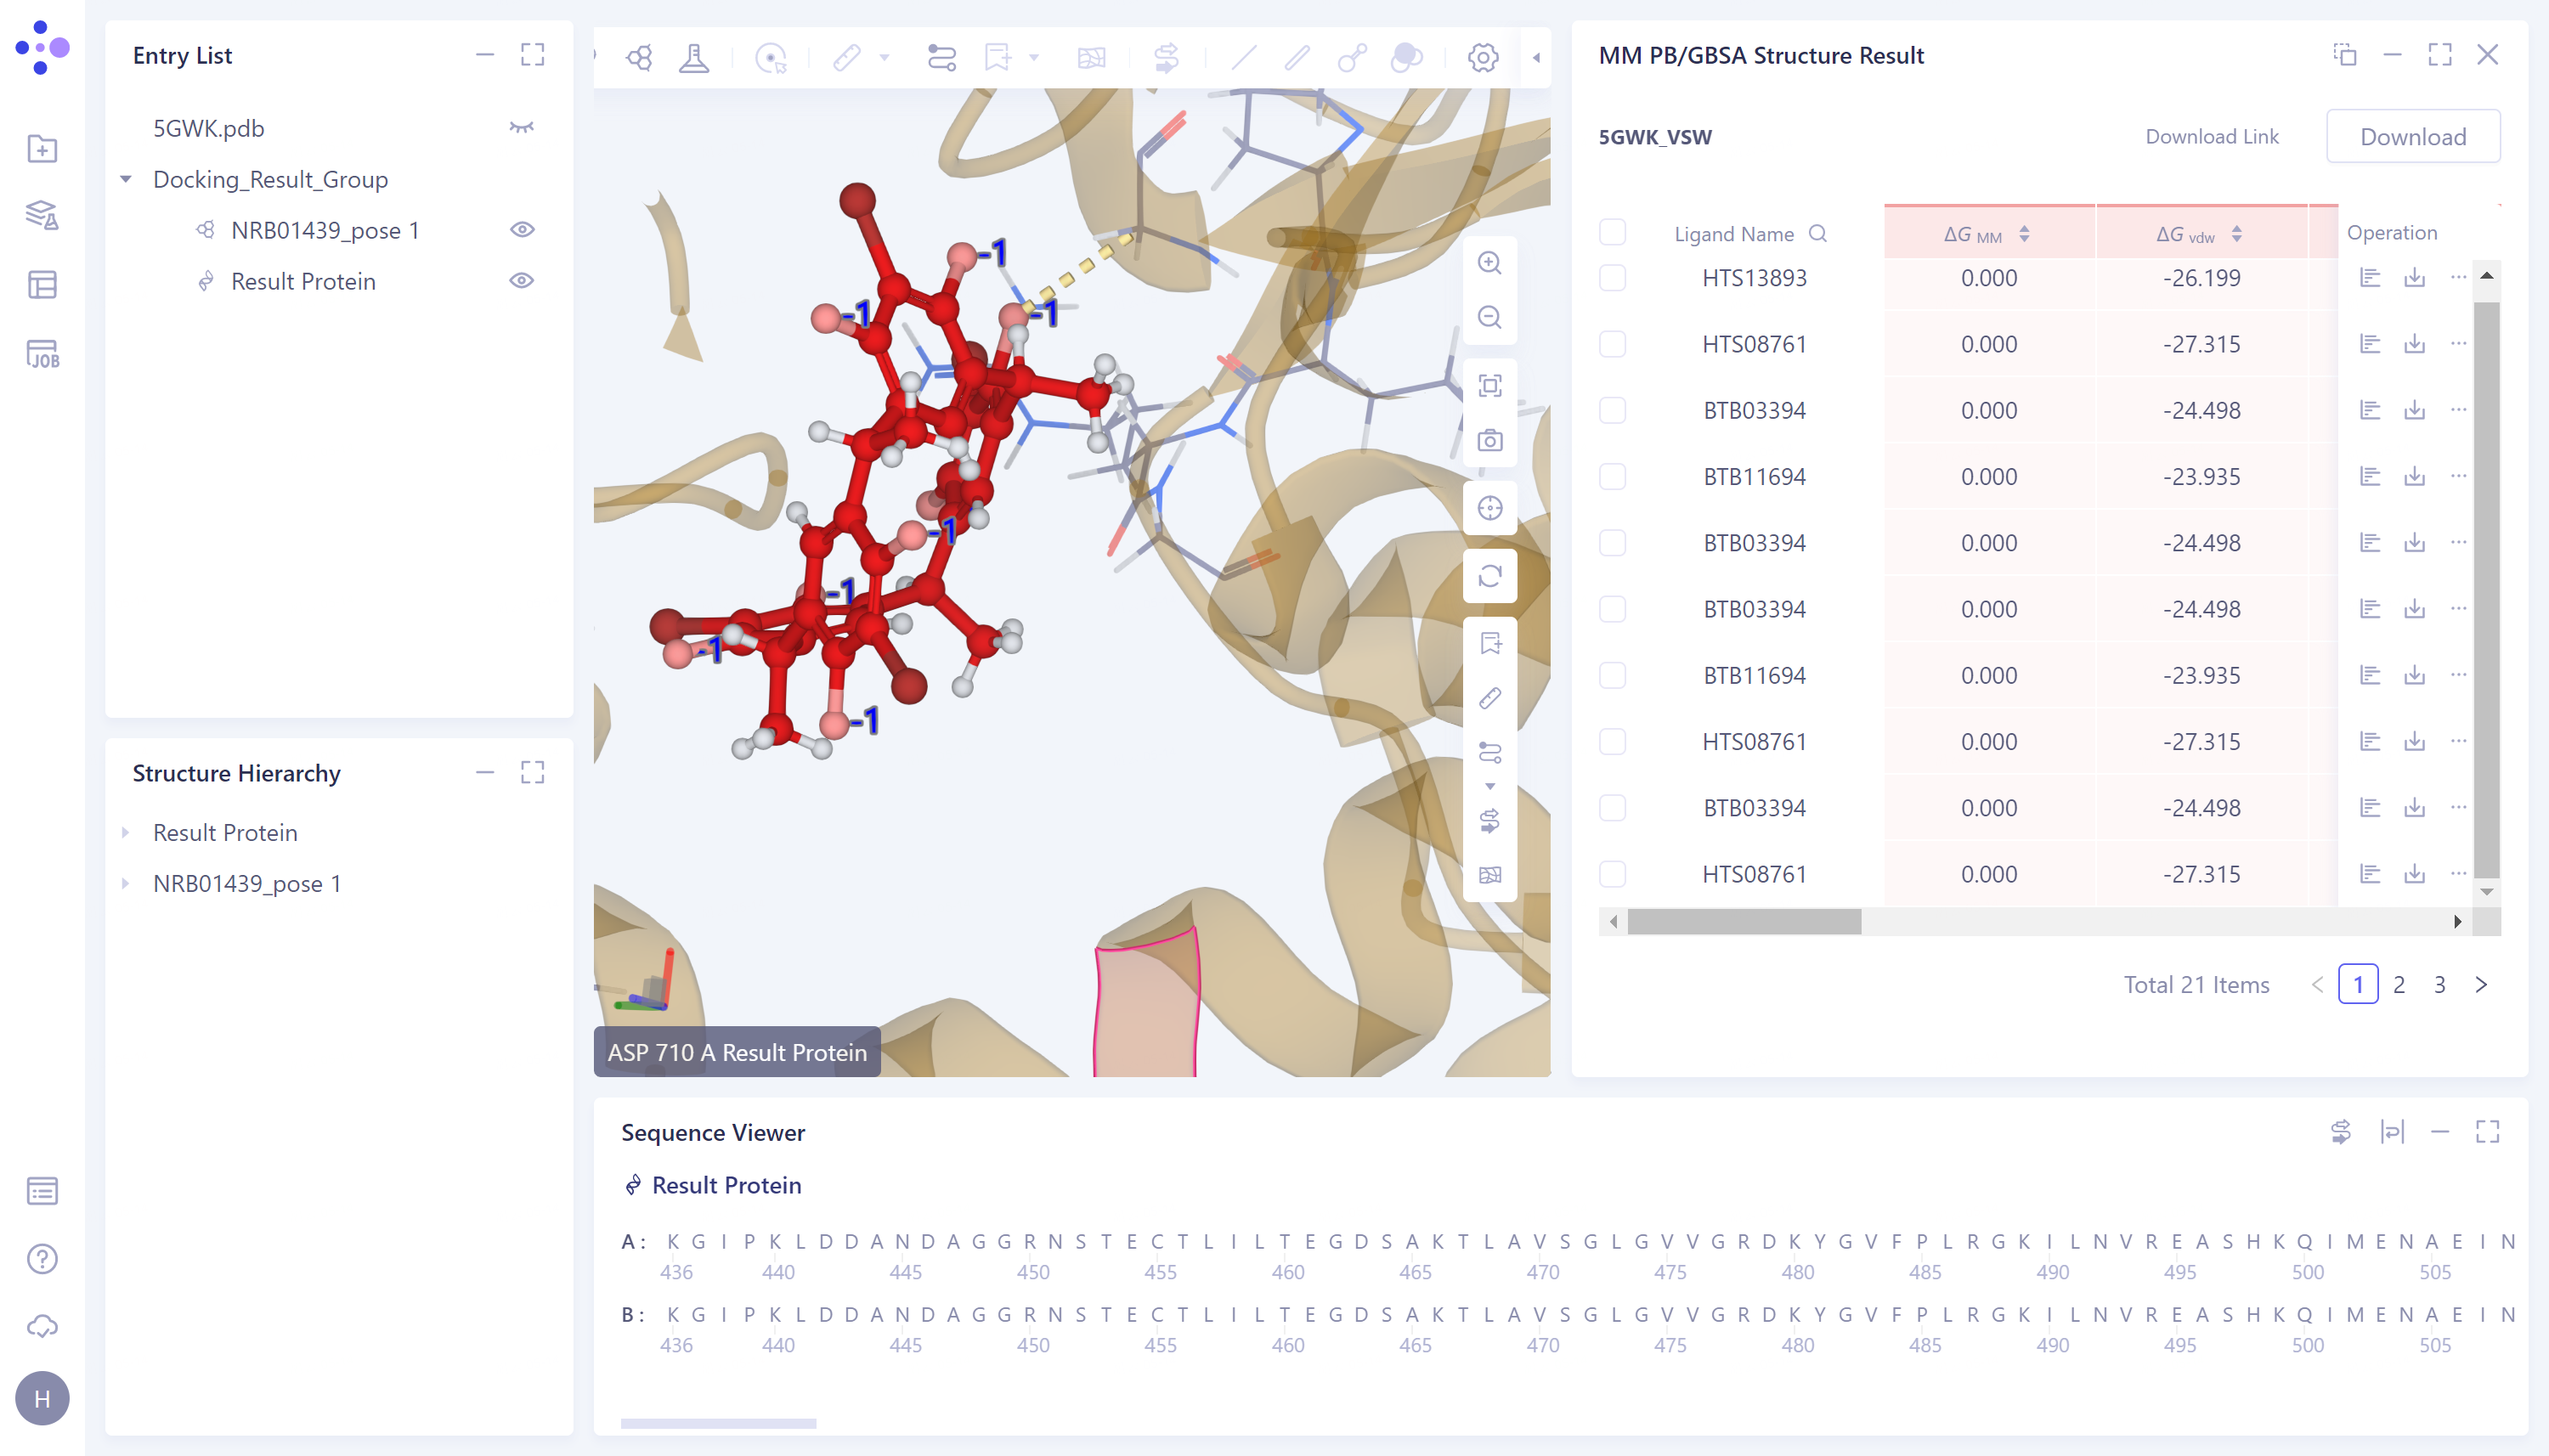
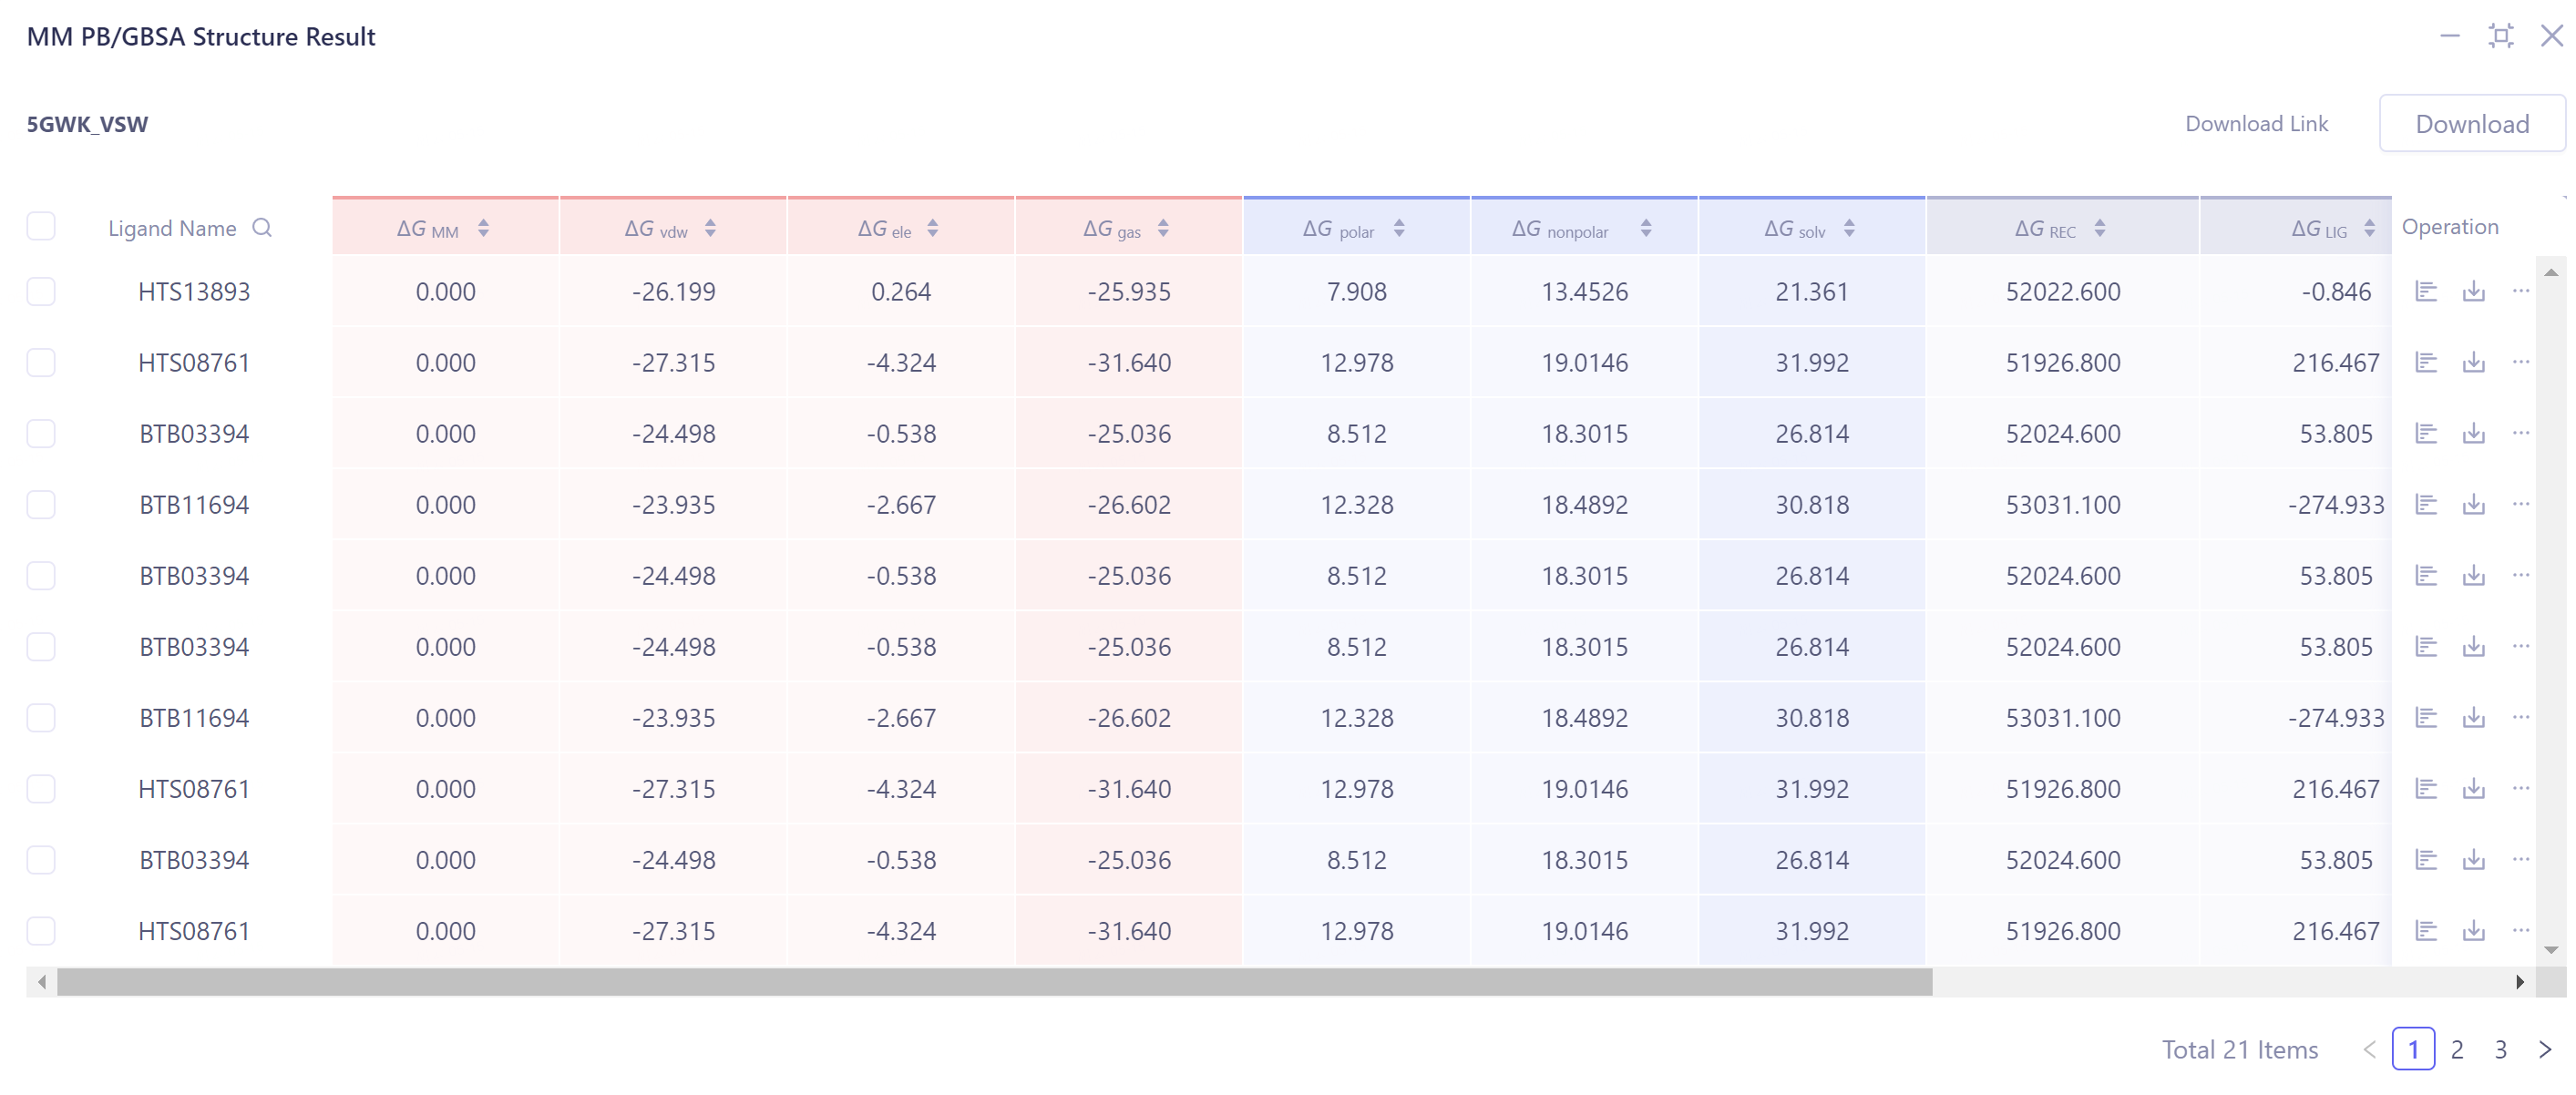
- The left general menu bar Menu Job → find the 5GWK_VSW MM PB/GBSA task → click show in the Operation column to display the result of the task → open the interface as shown in the right figure.
-
MM PB/GBSA calculation results display:
-
Provide ΔG data in three dimensions: solvent, gas and sum.
-
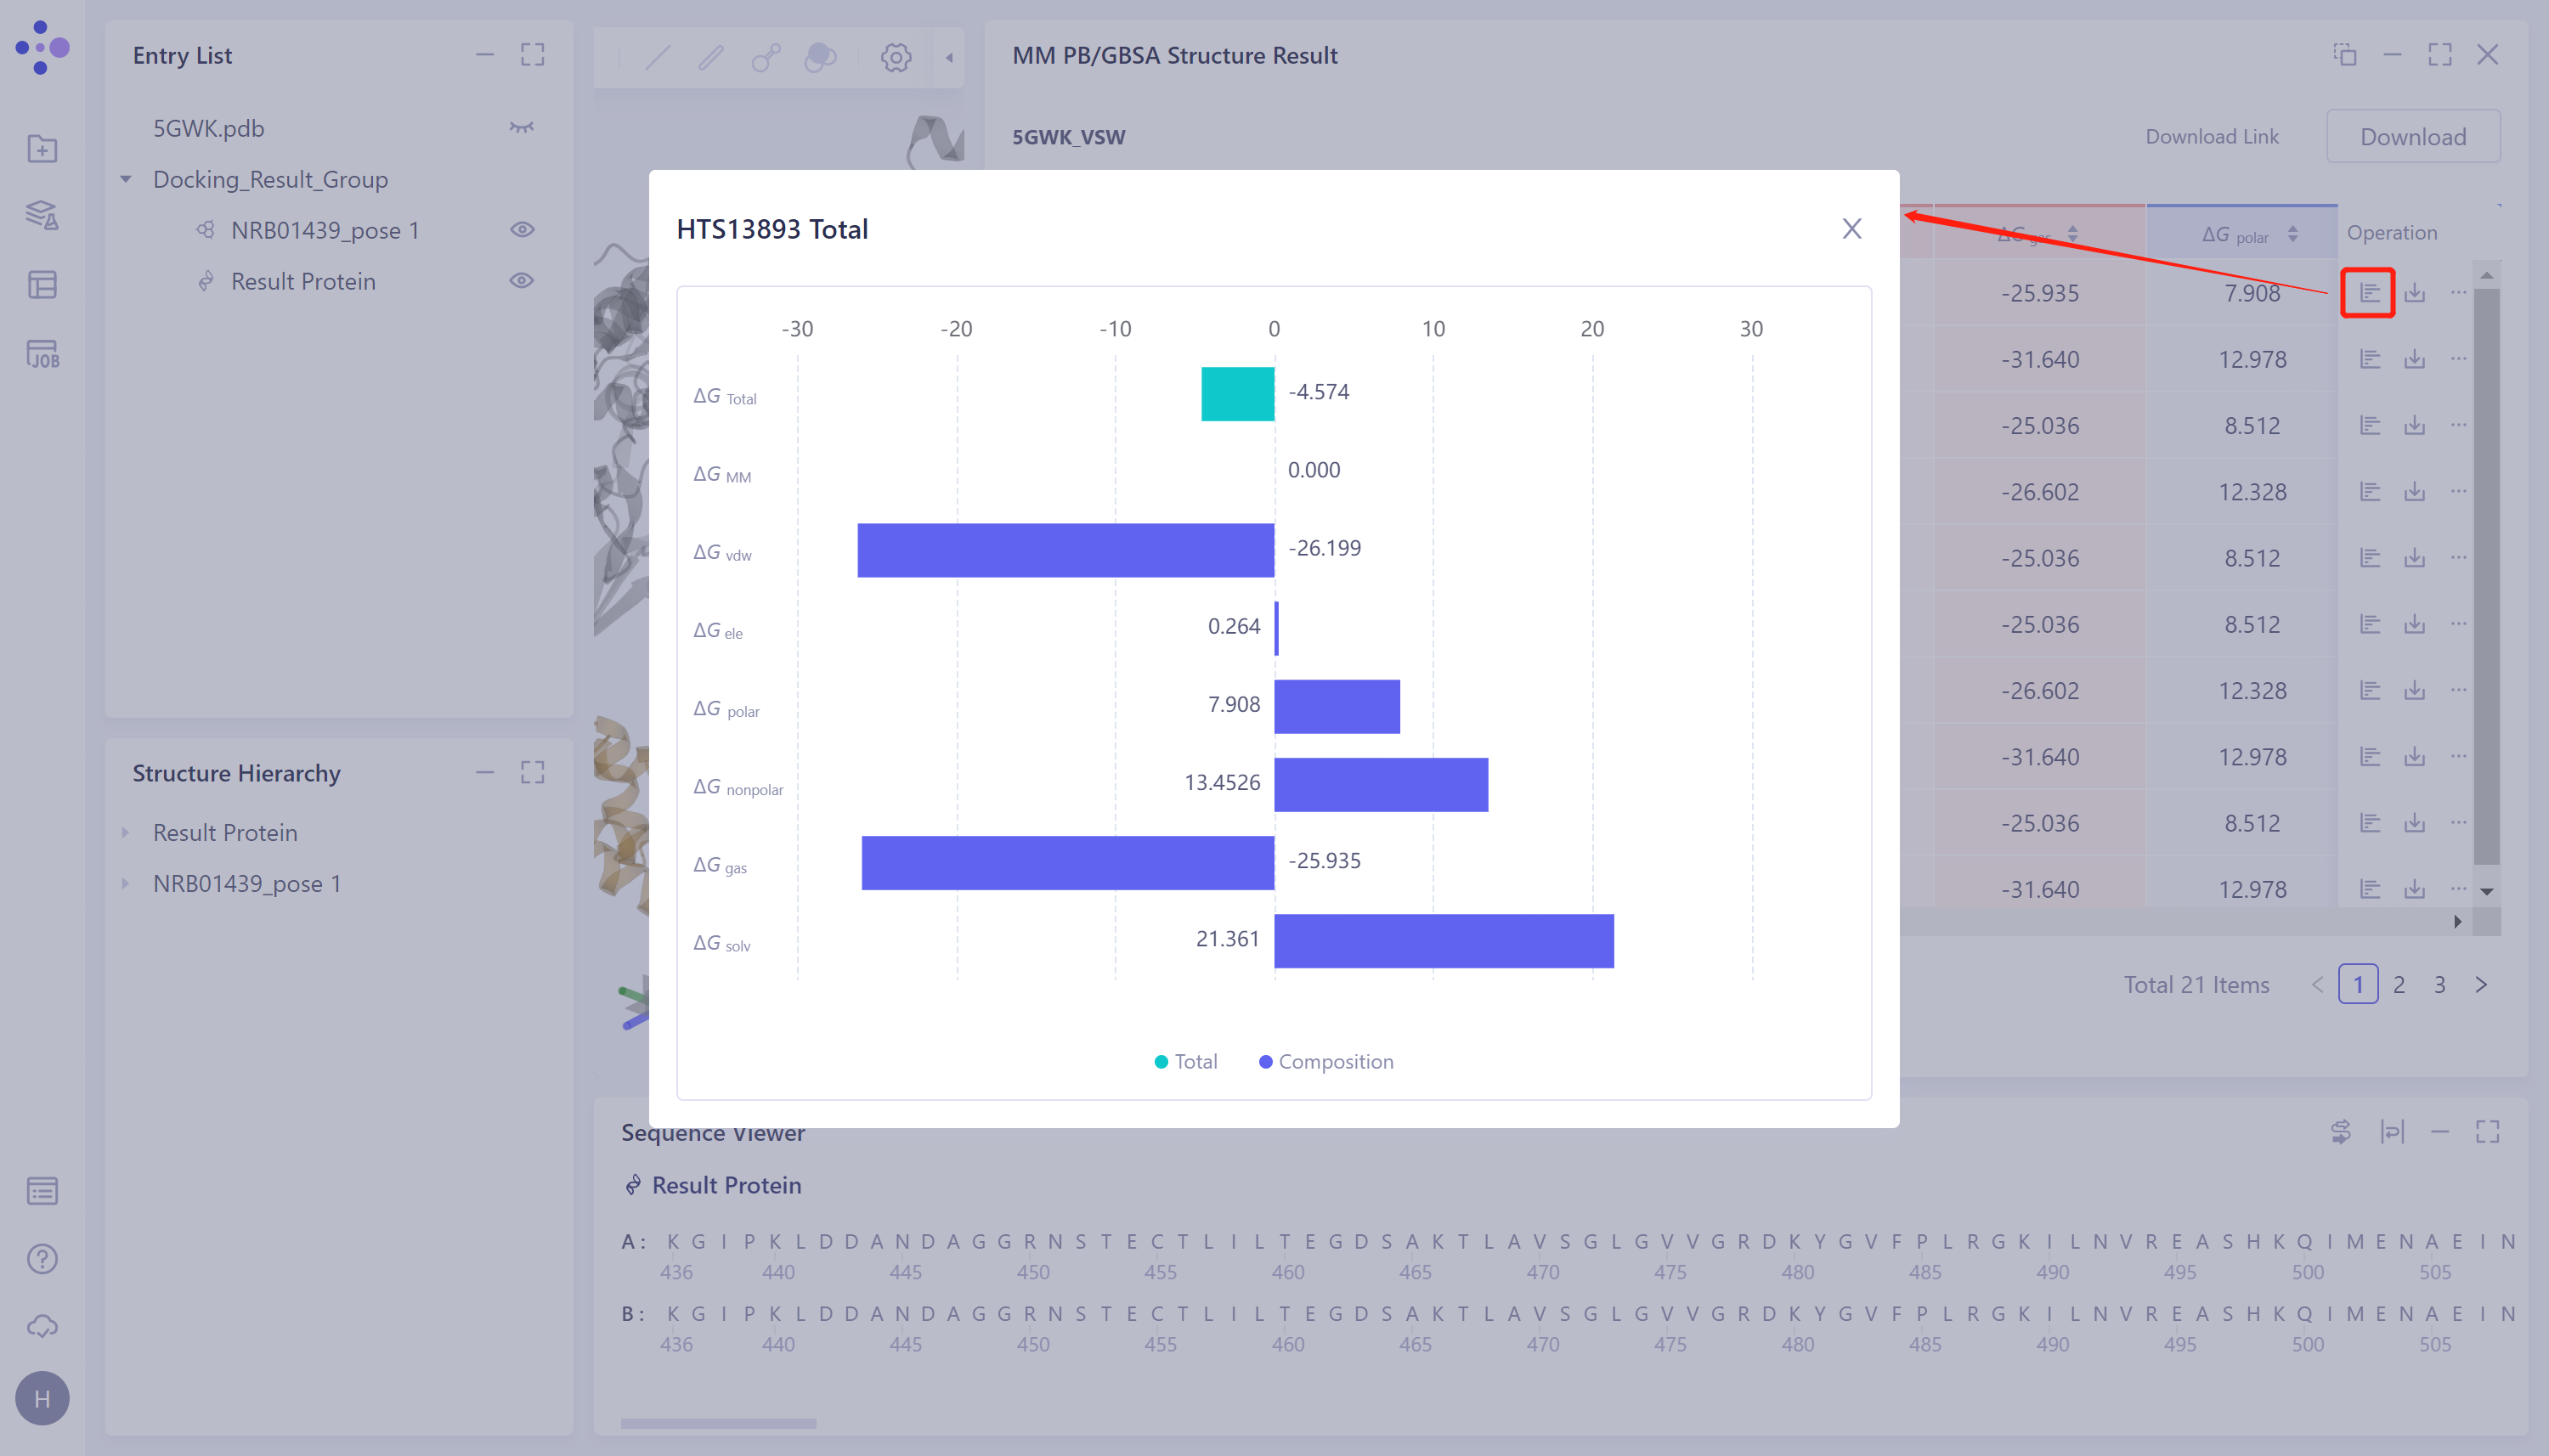
View the value of each energy item of ΔG:
- Click the button in the red box in the figure to see the breakdown of each ΔG under and .
-
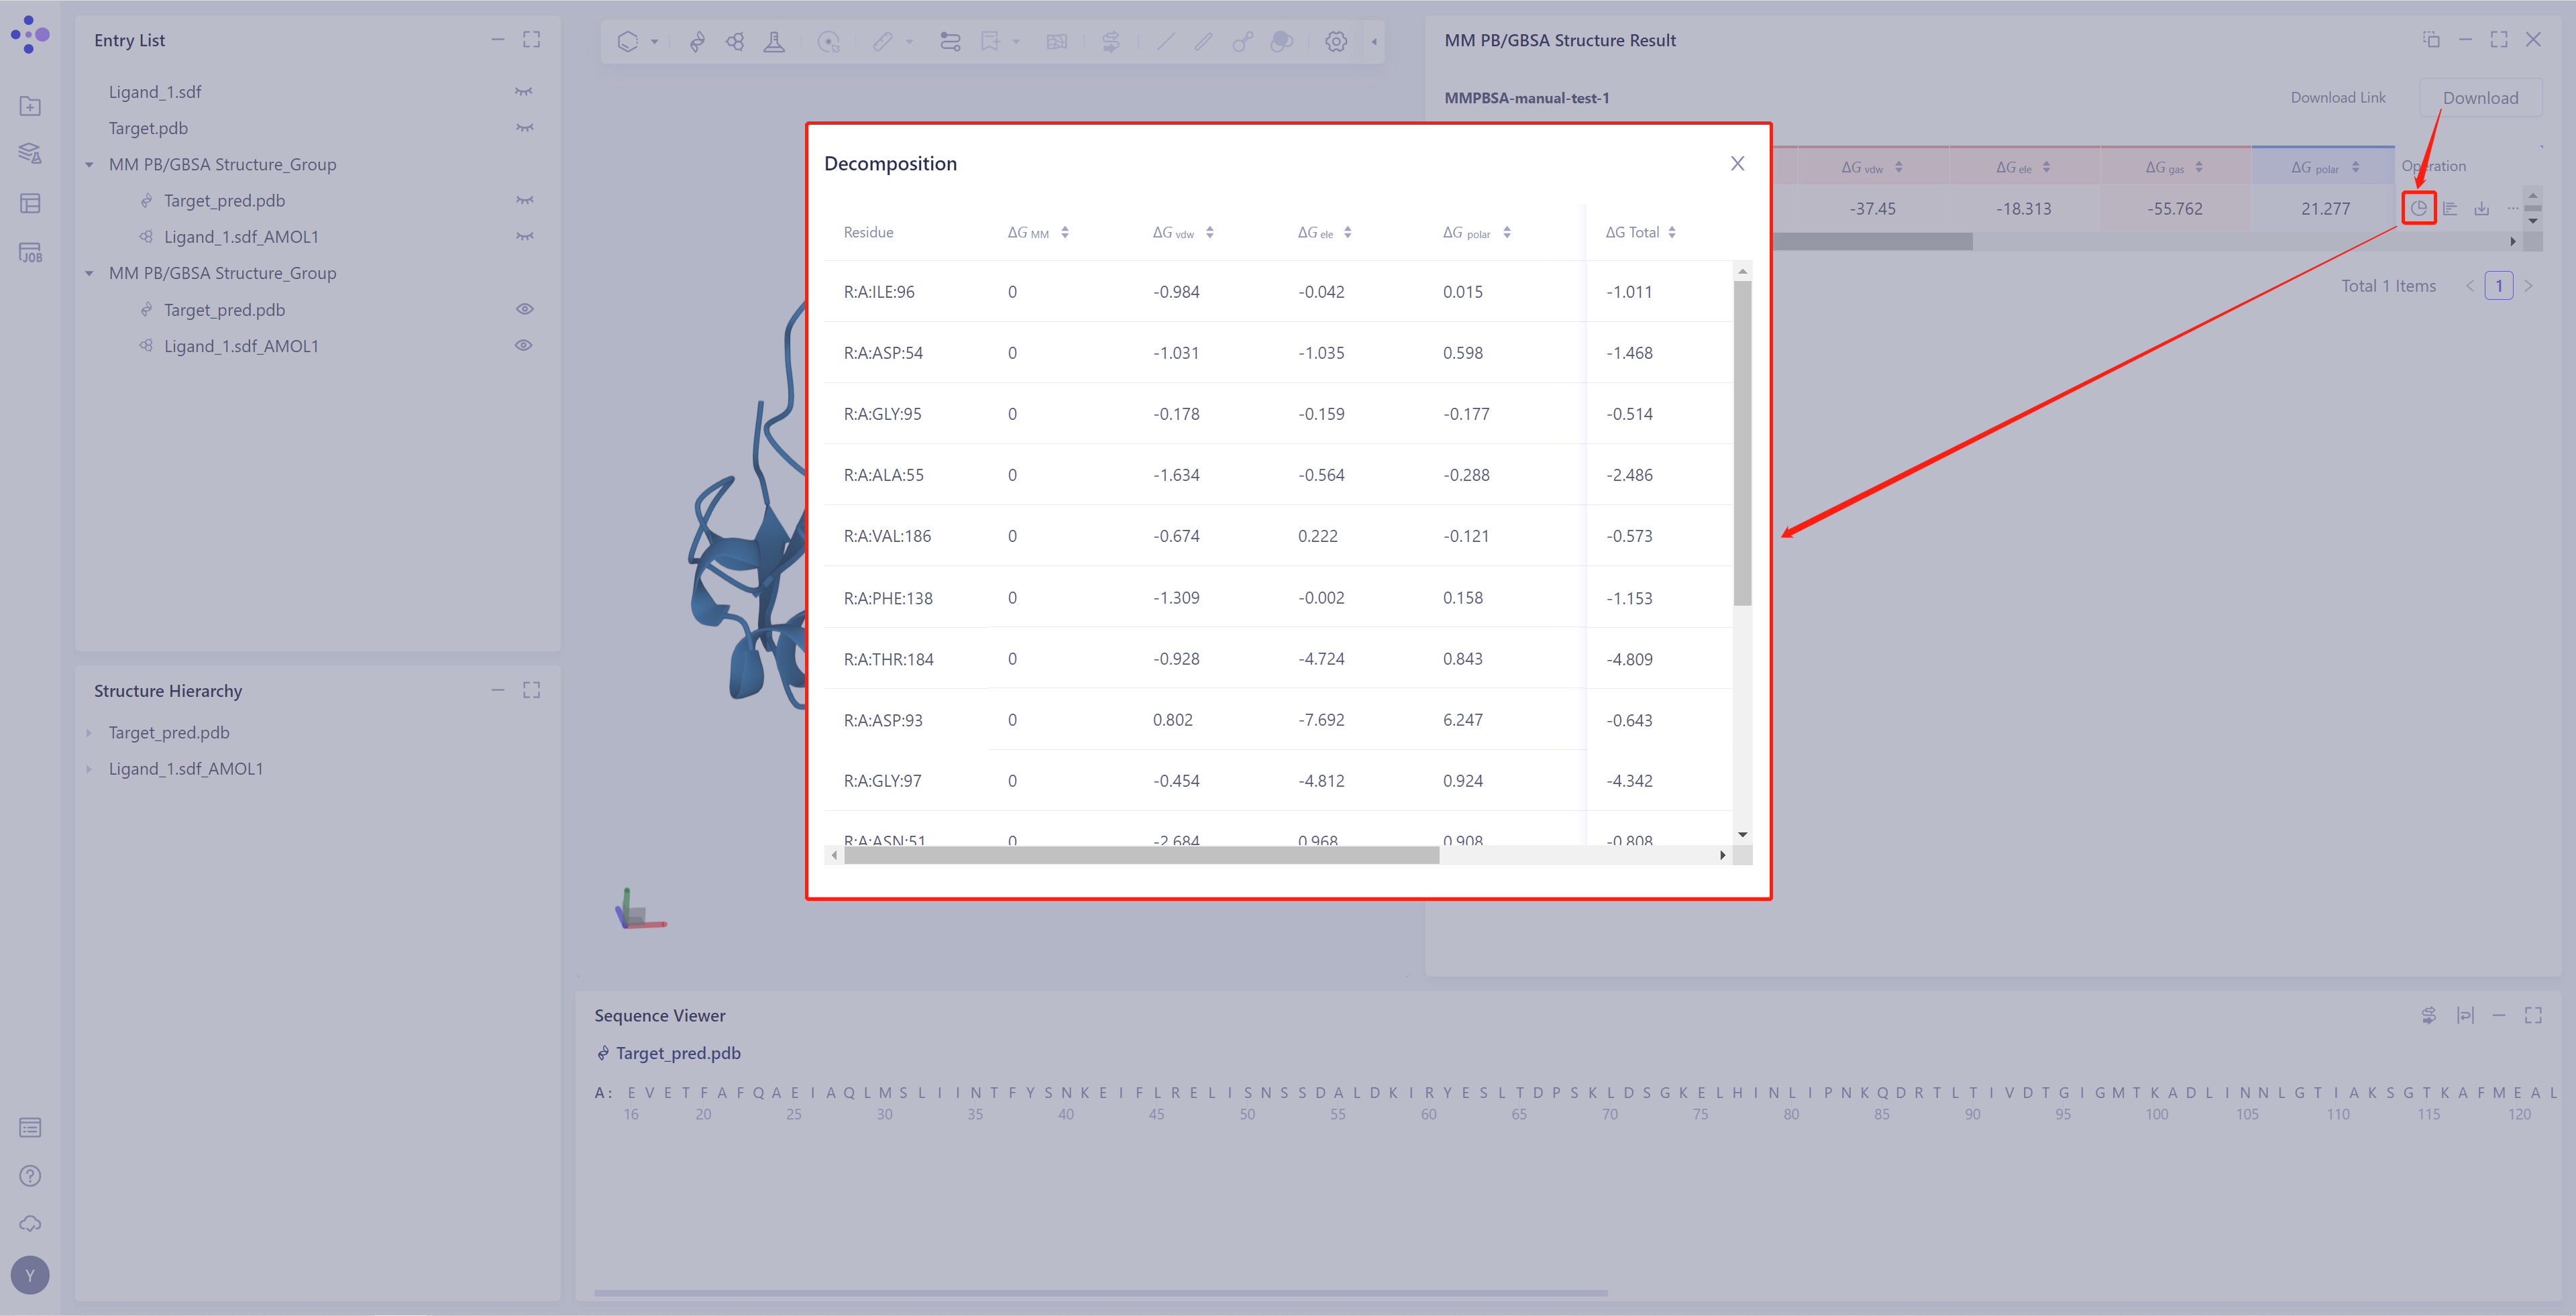
Residue Decomposition:
-
If "Total Decomposition Contribution Analysis" is selected during the calculation, the detail can be viewed
-
Click the button in the red box in the figure to decompose the energy by residue, and provide ΔG data for each dimension of the residue
-
-
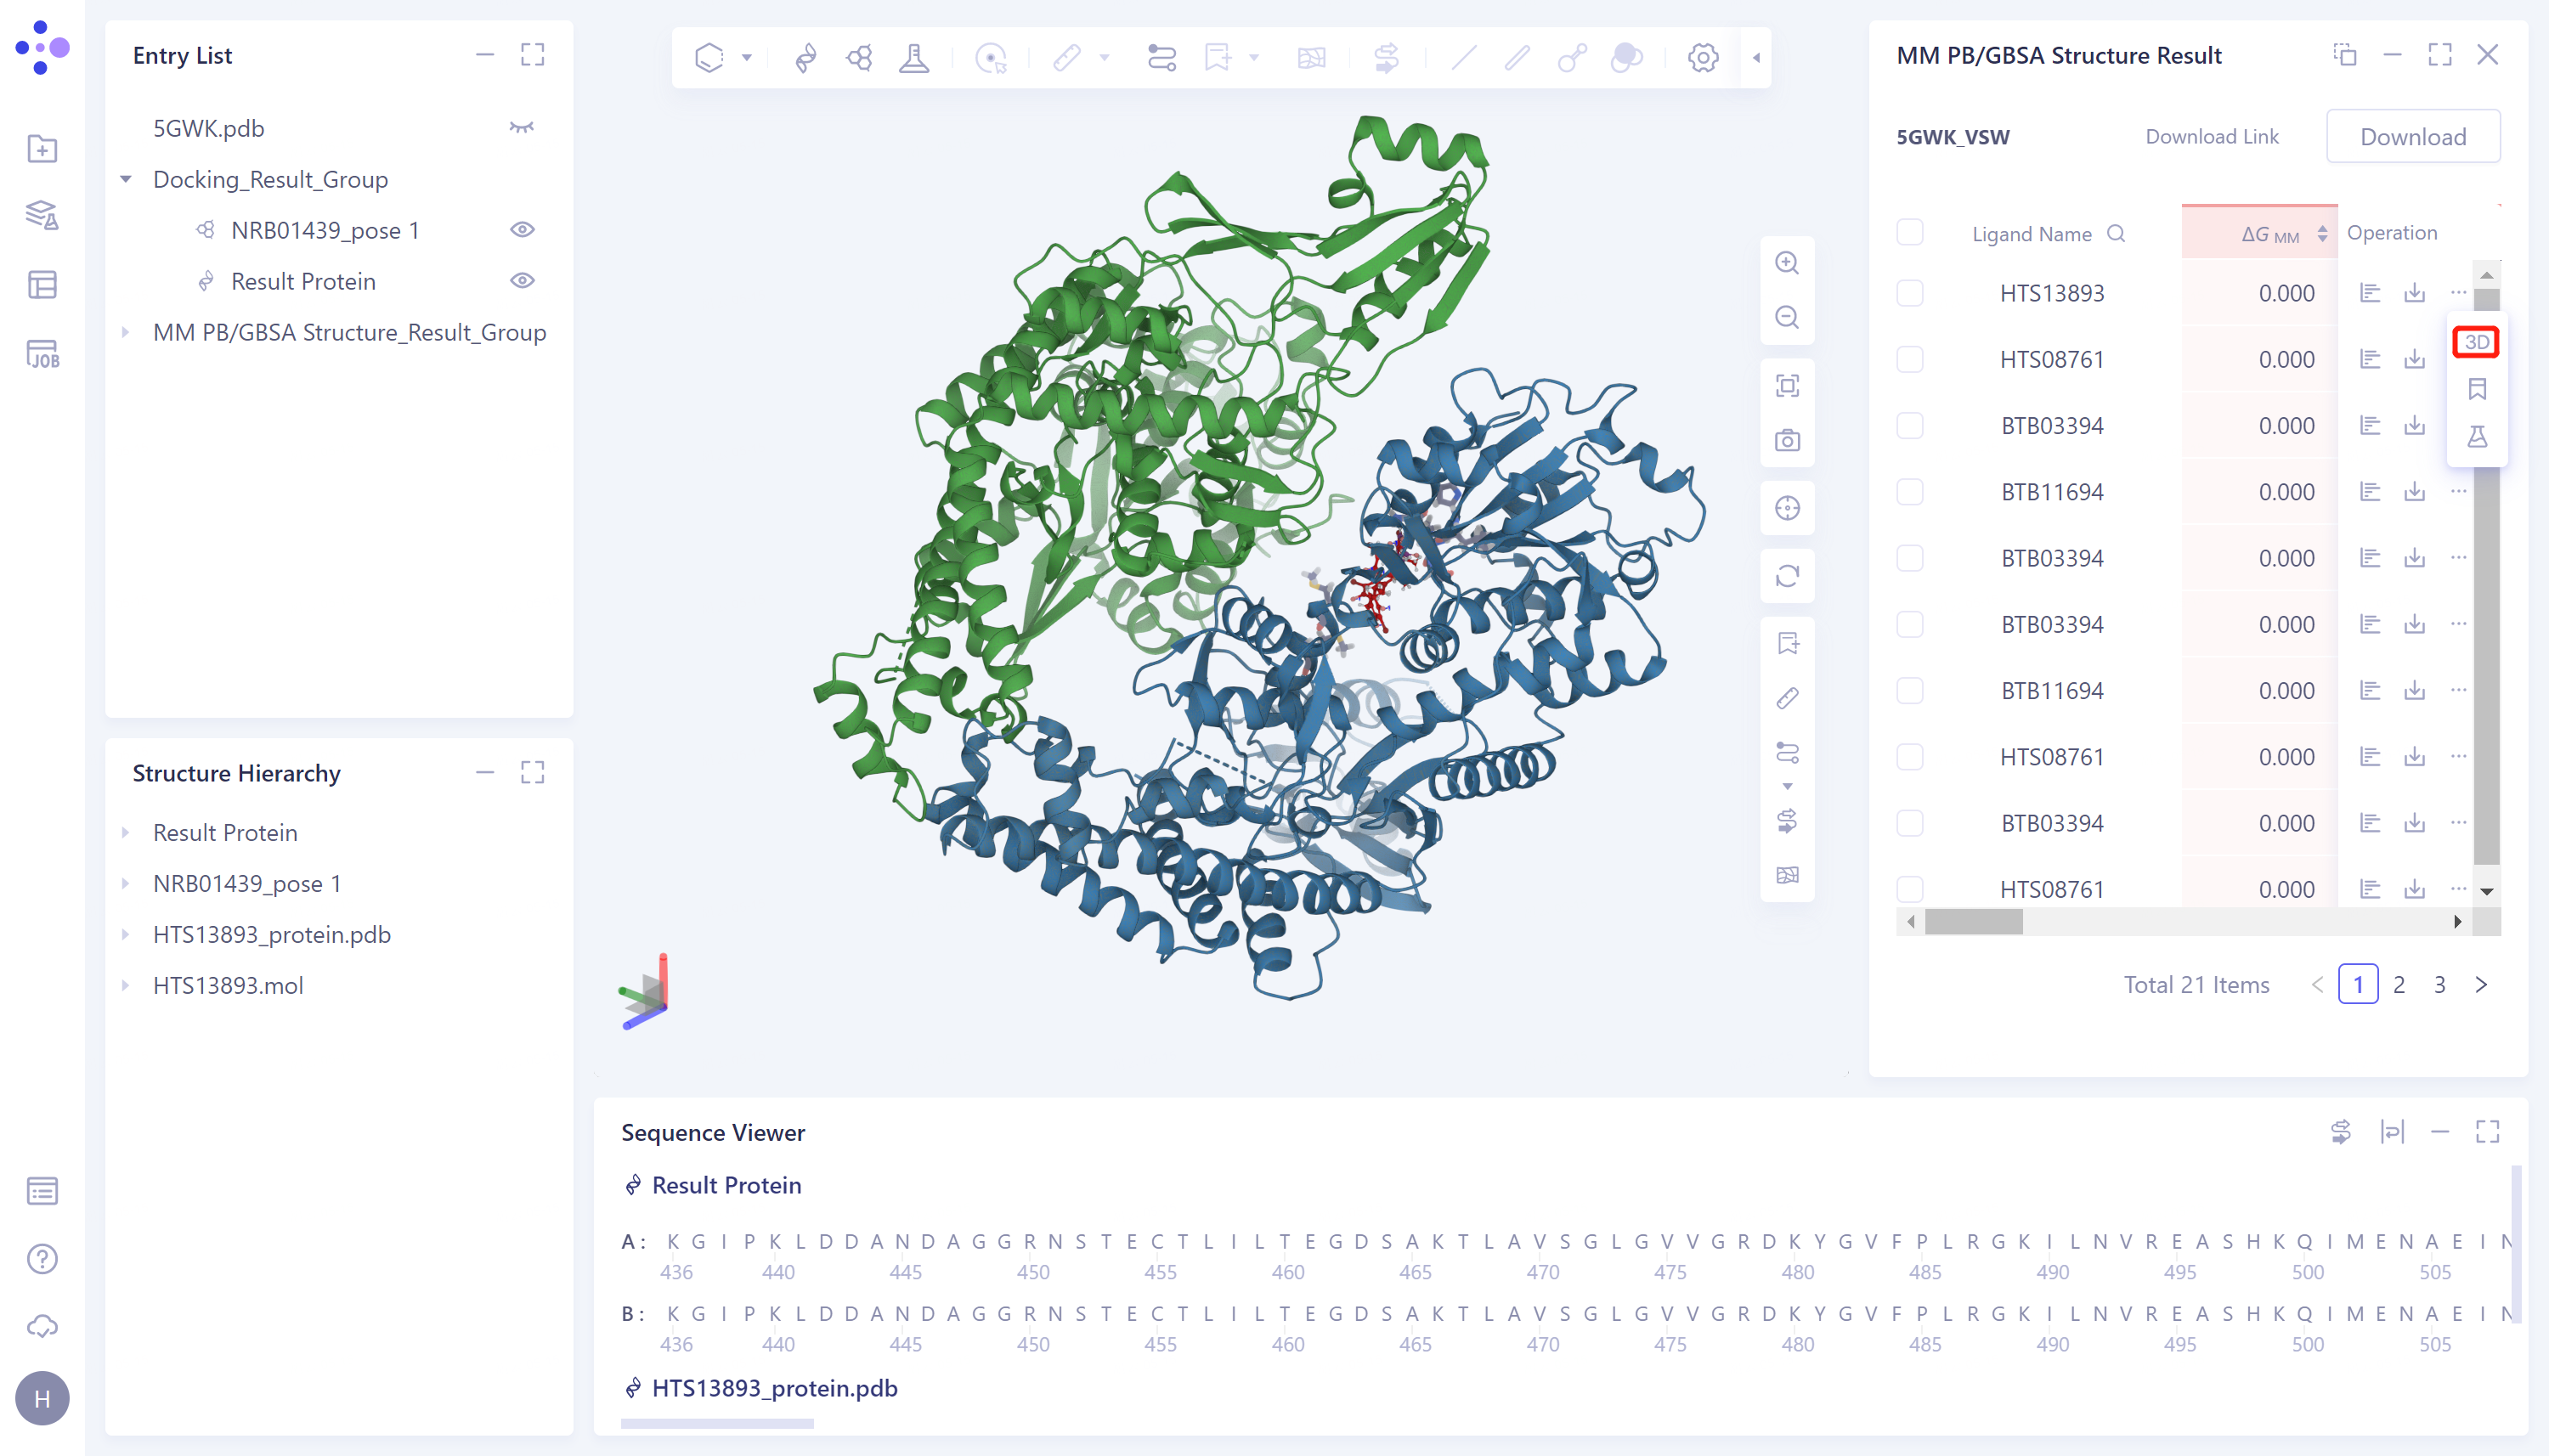
3D Workspace Display:
- Click the "3D" button in the red box in the figure to present the proteins and ligands corresponding to the data in the 3D Workspace
-
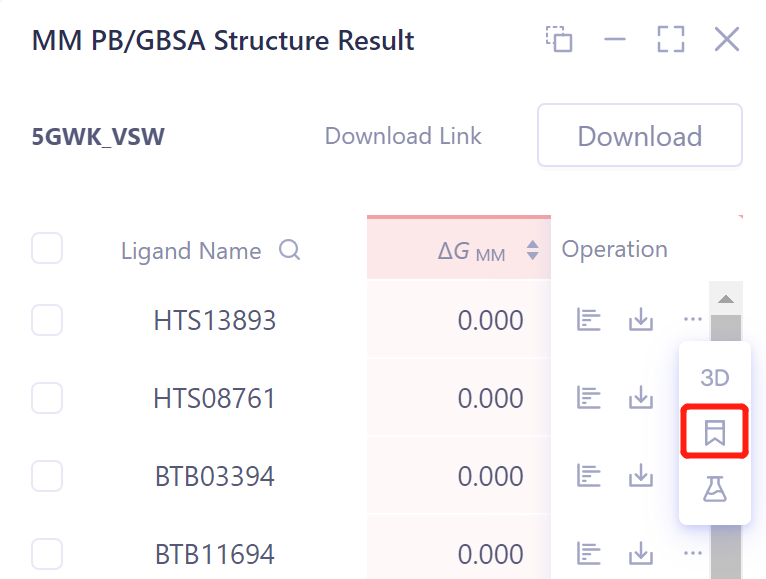
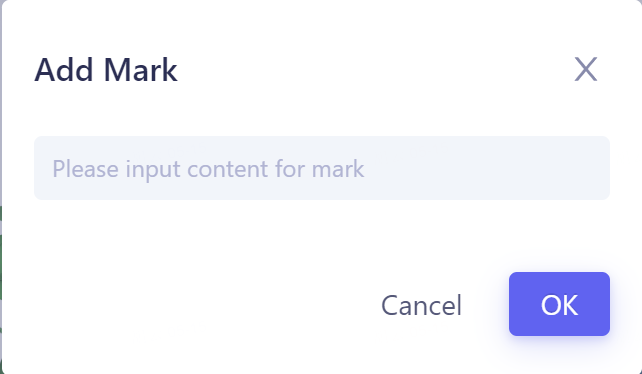
Calculation result Mark mark:
-
Support for labeling each row of data, and support for searching
-
Click Show in the Operation column to display the result of the task → The interface opens as shown in the figure on the right.
-
-
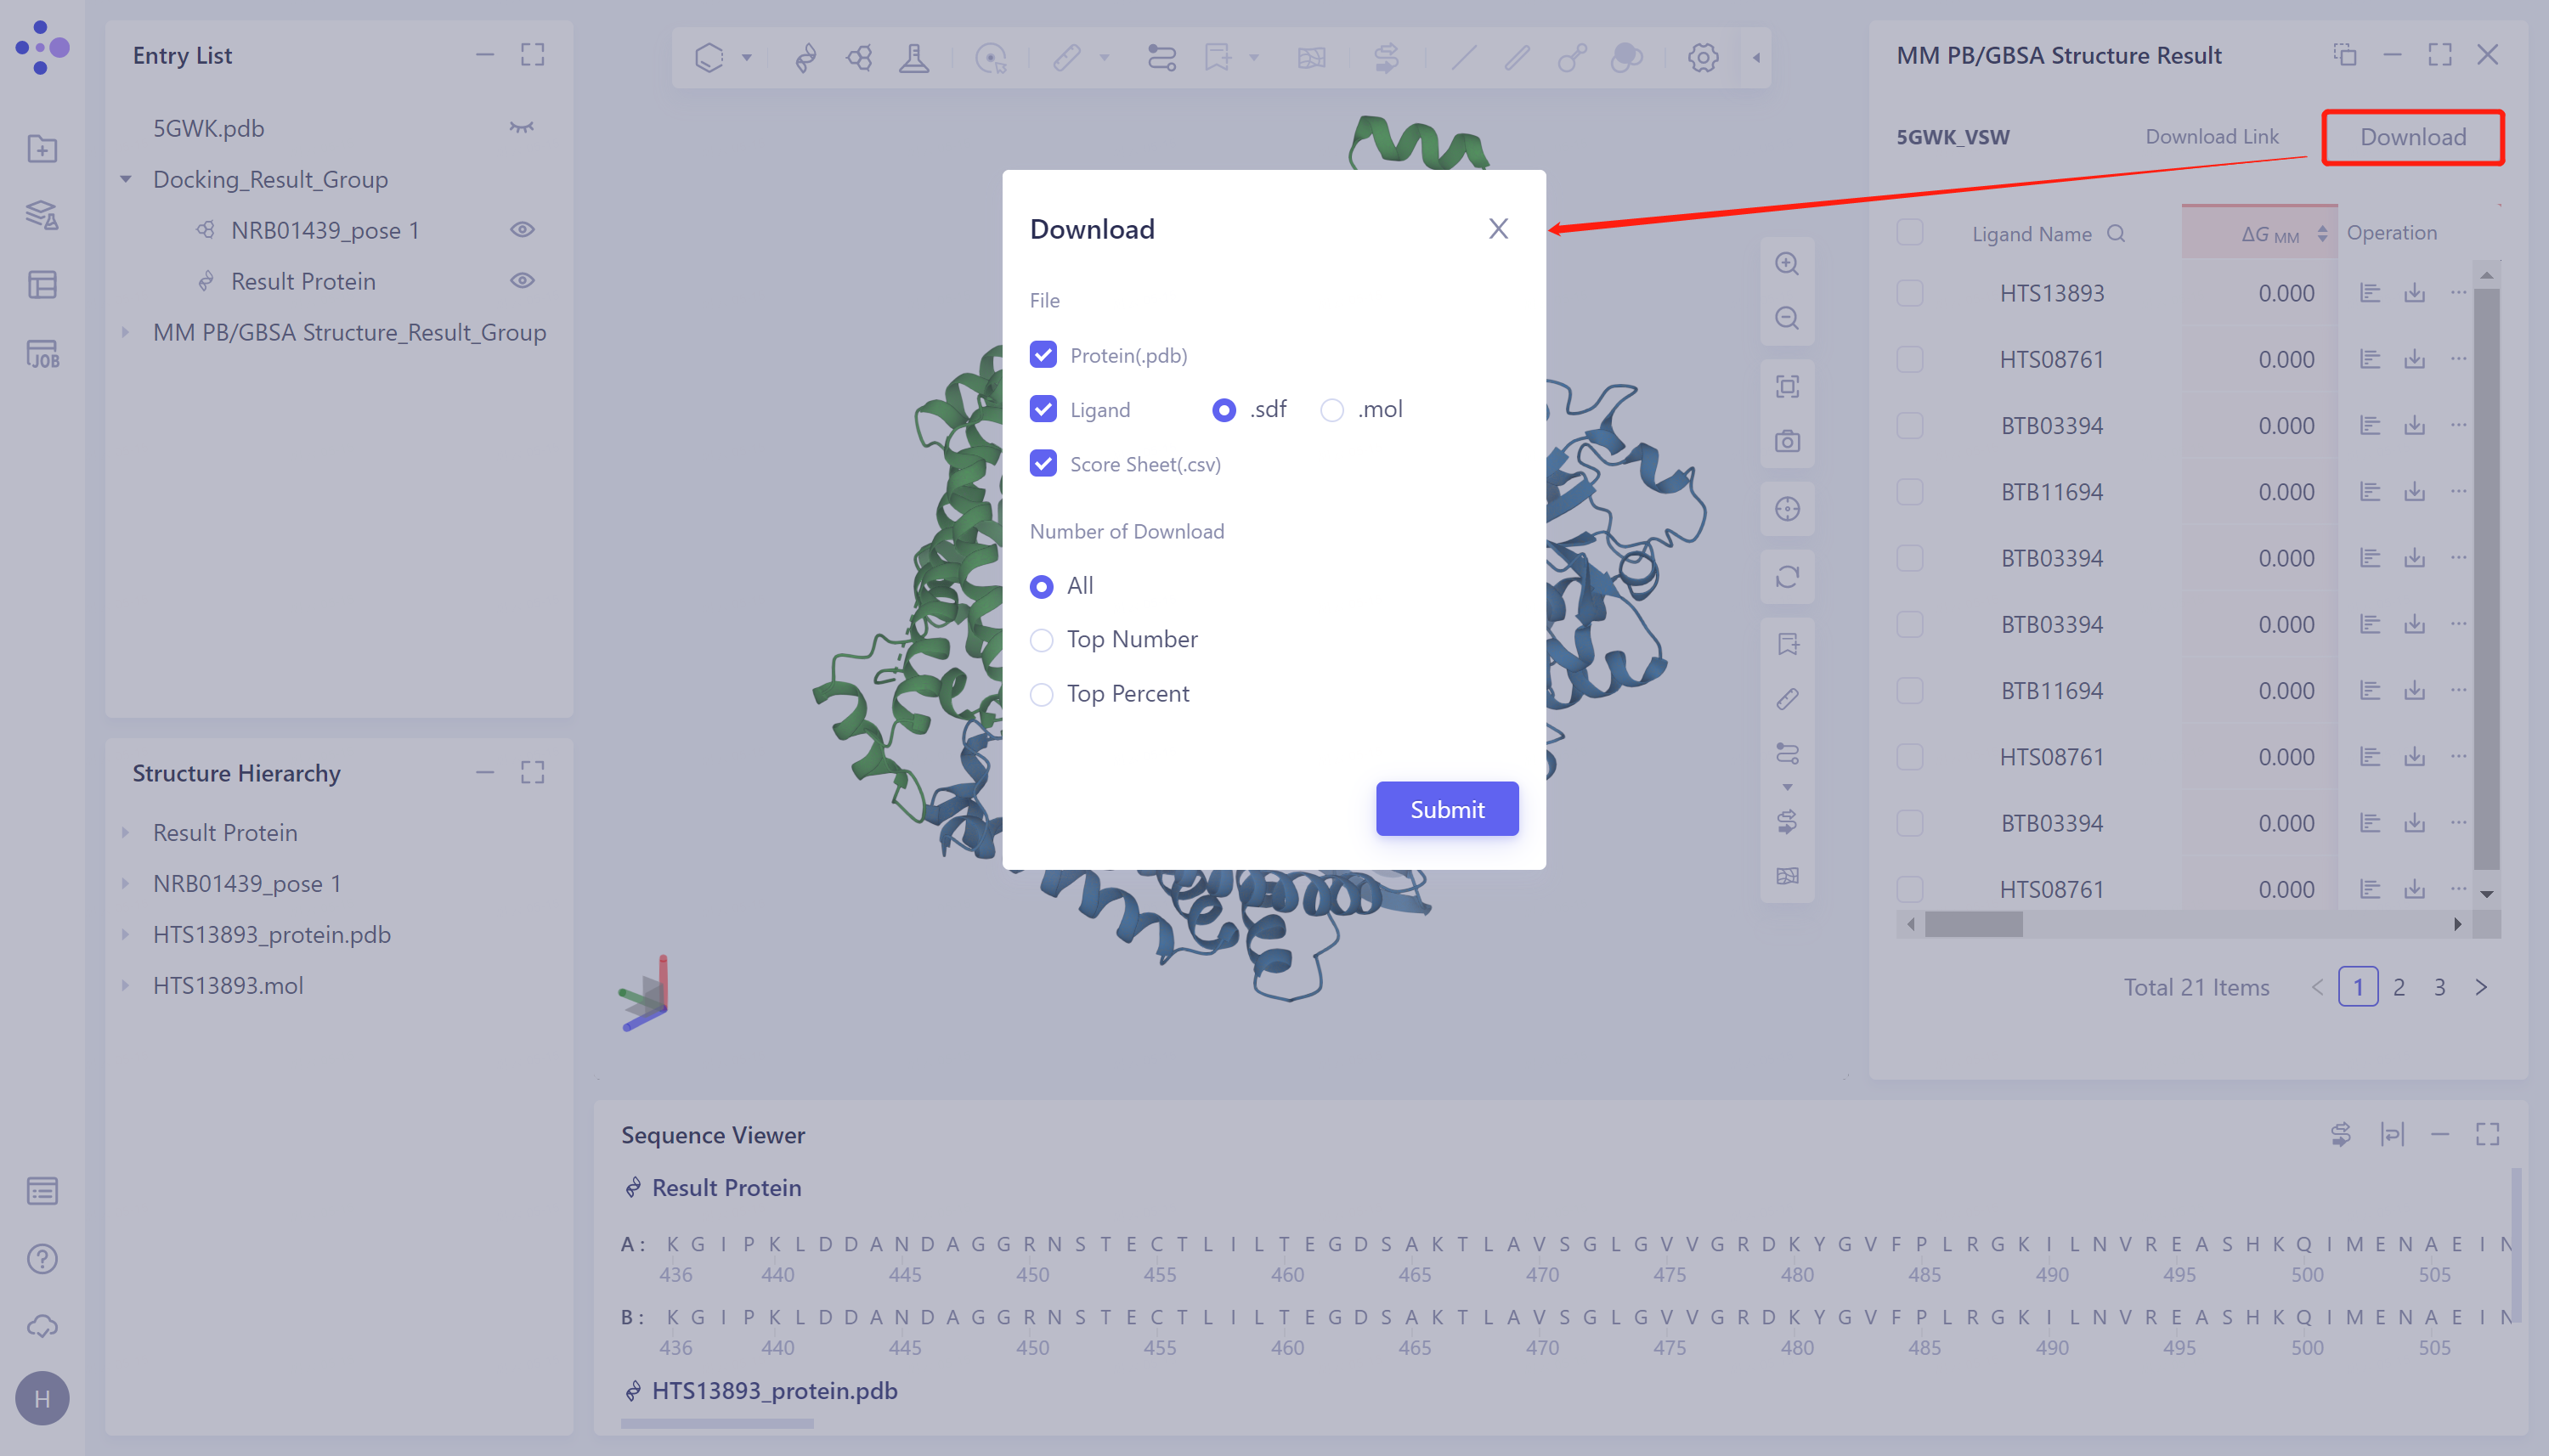
Download the calculation results:
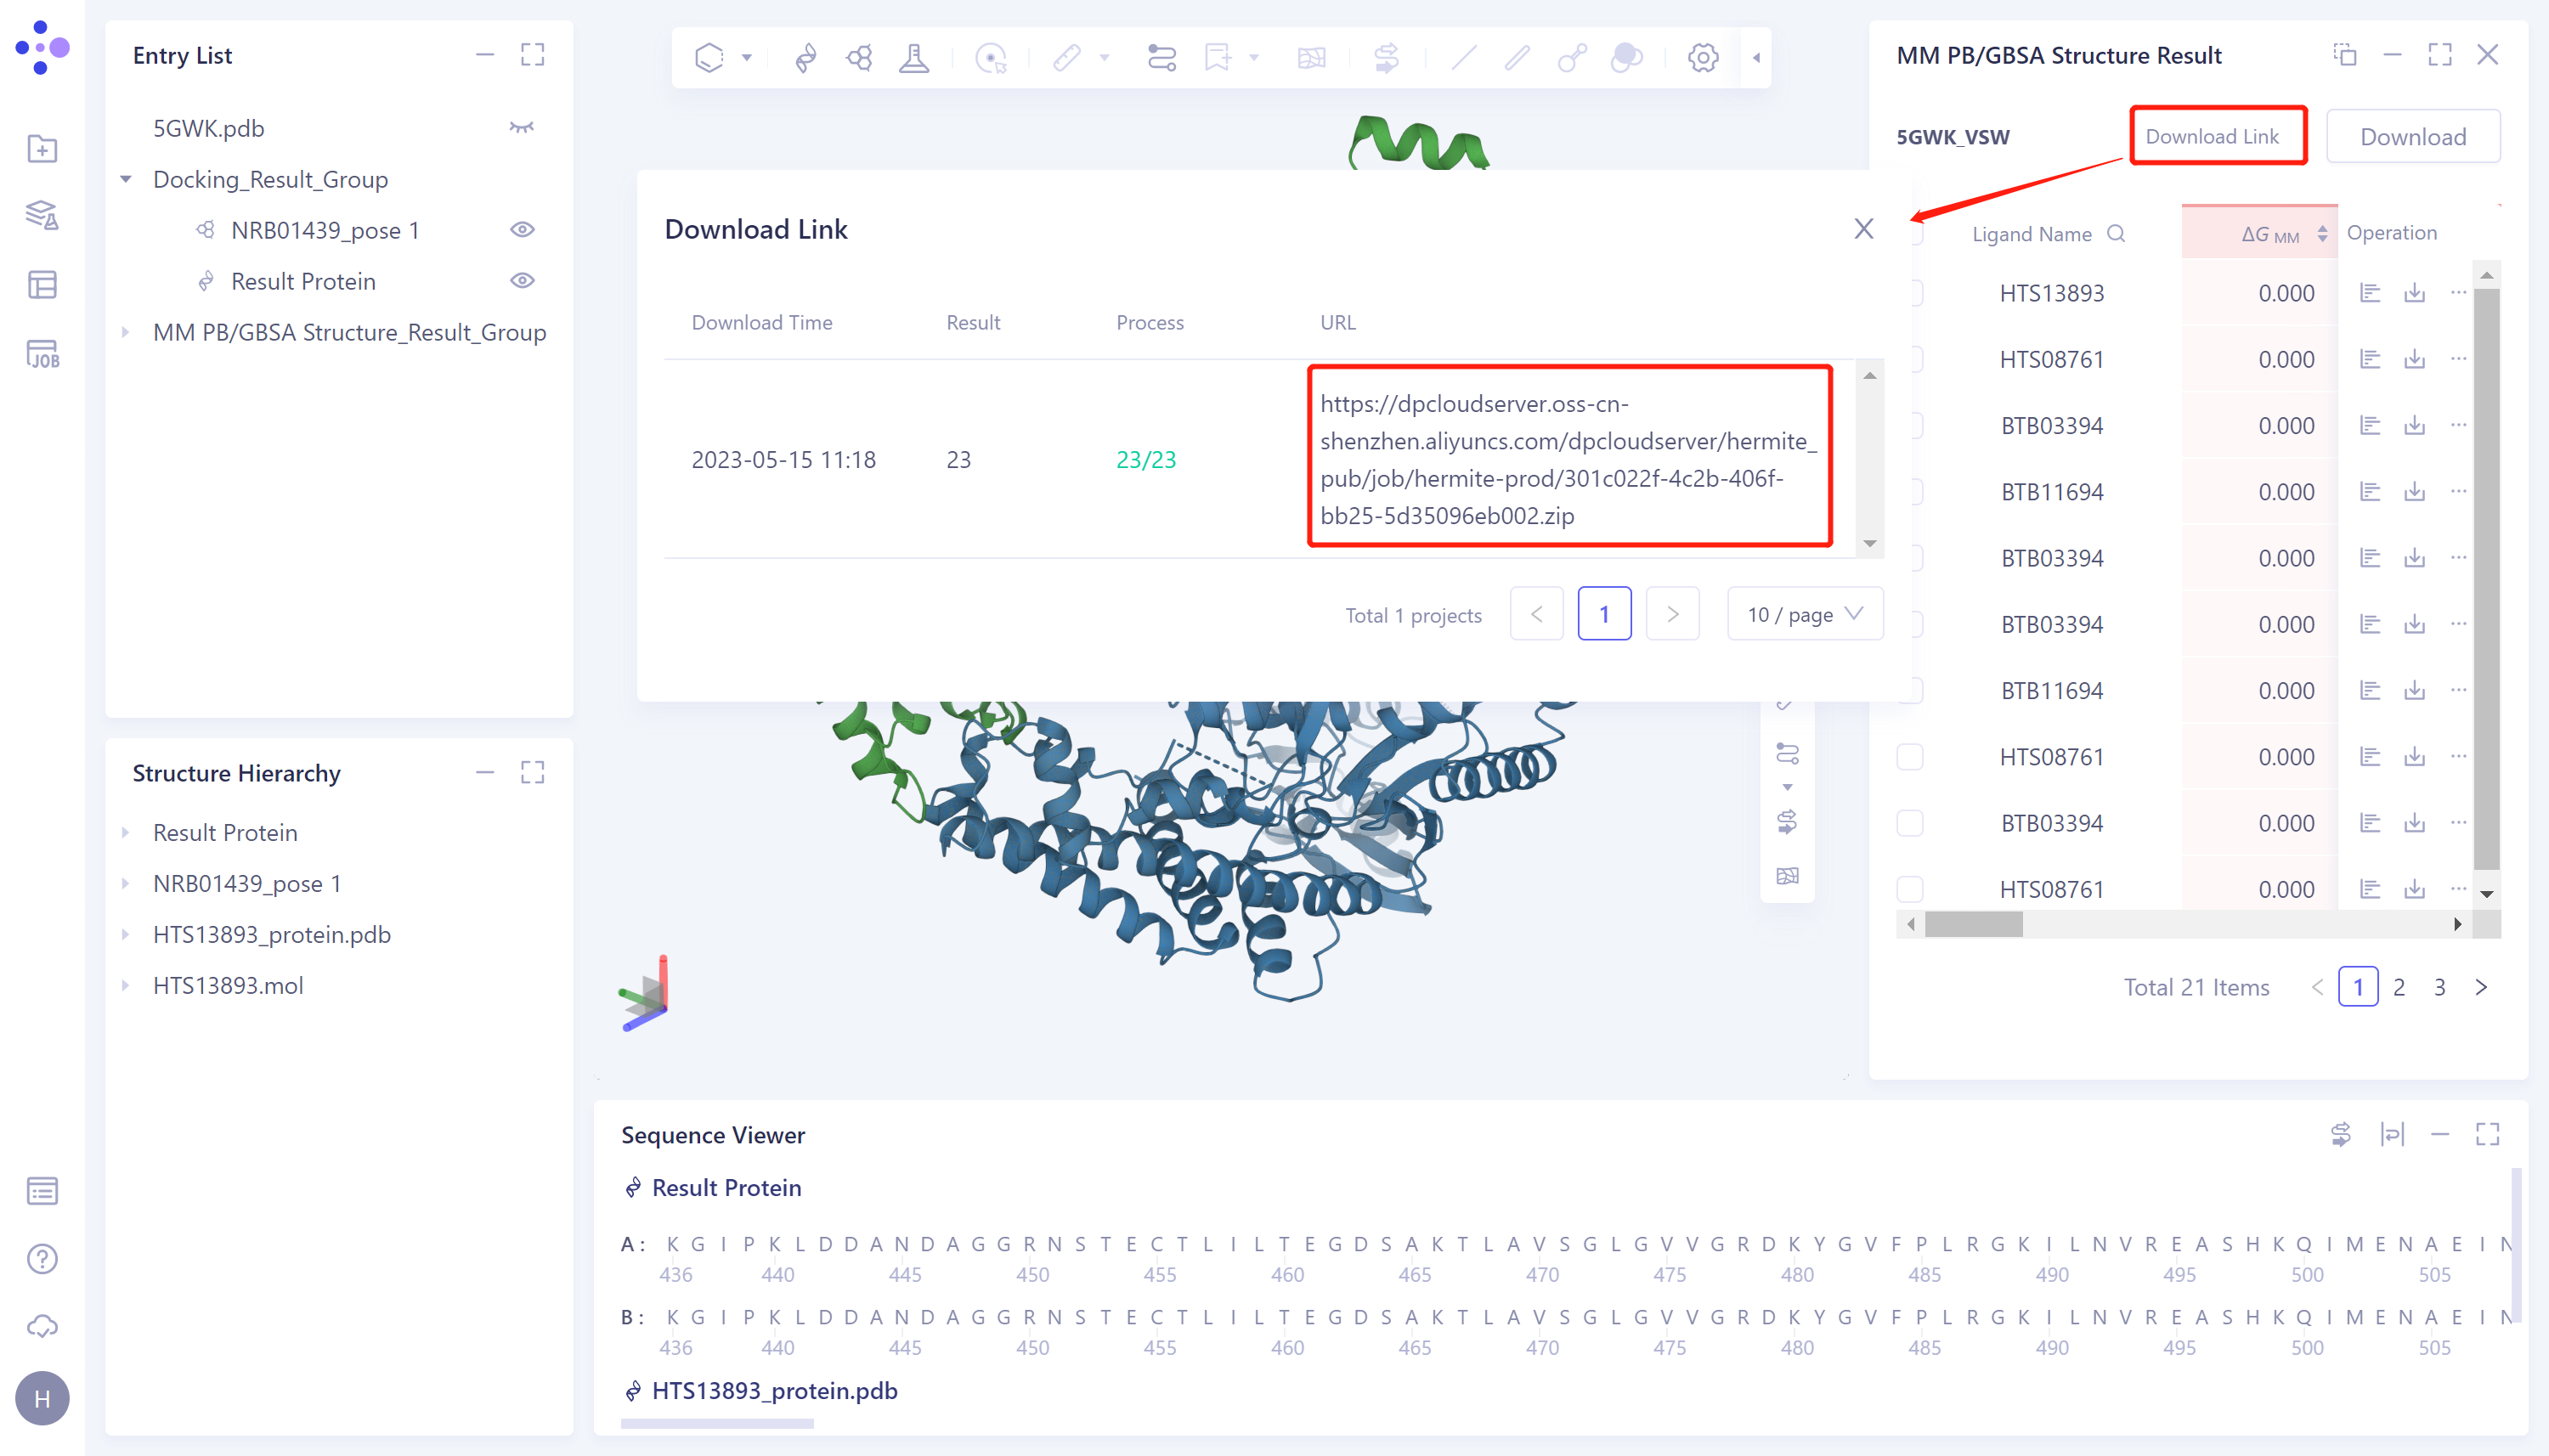
- Click the "Download" button at the red arrow in the figure and select the parameters of the download output
- Show "Link is preparing", wait for loading to finish
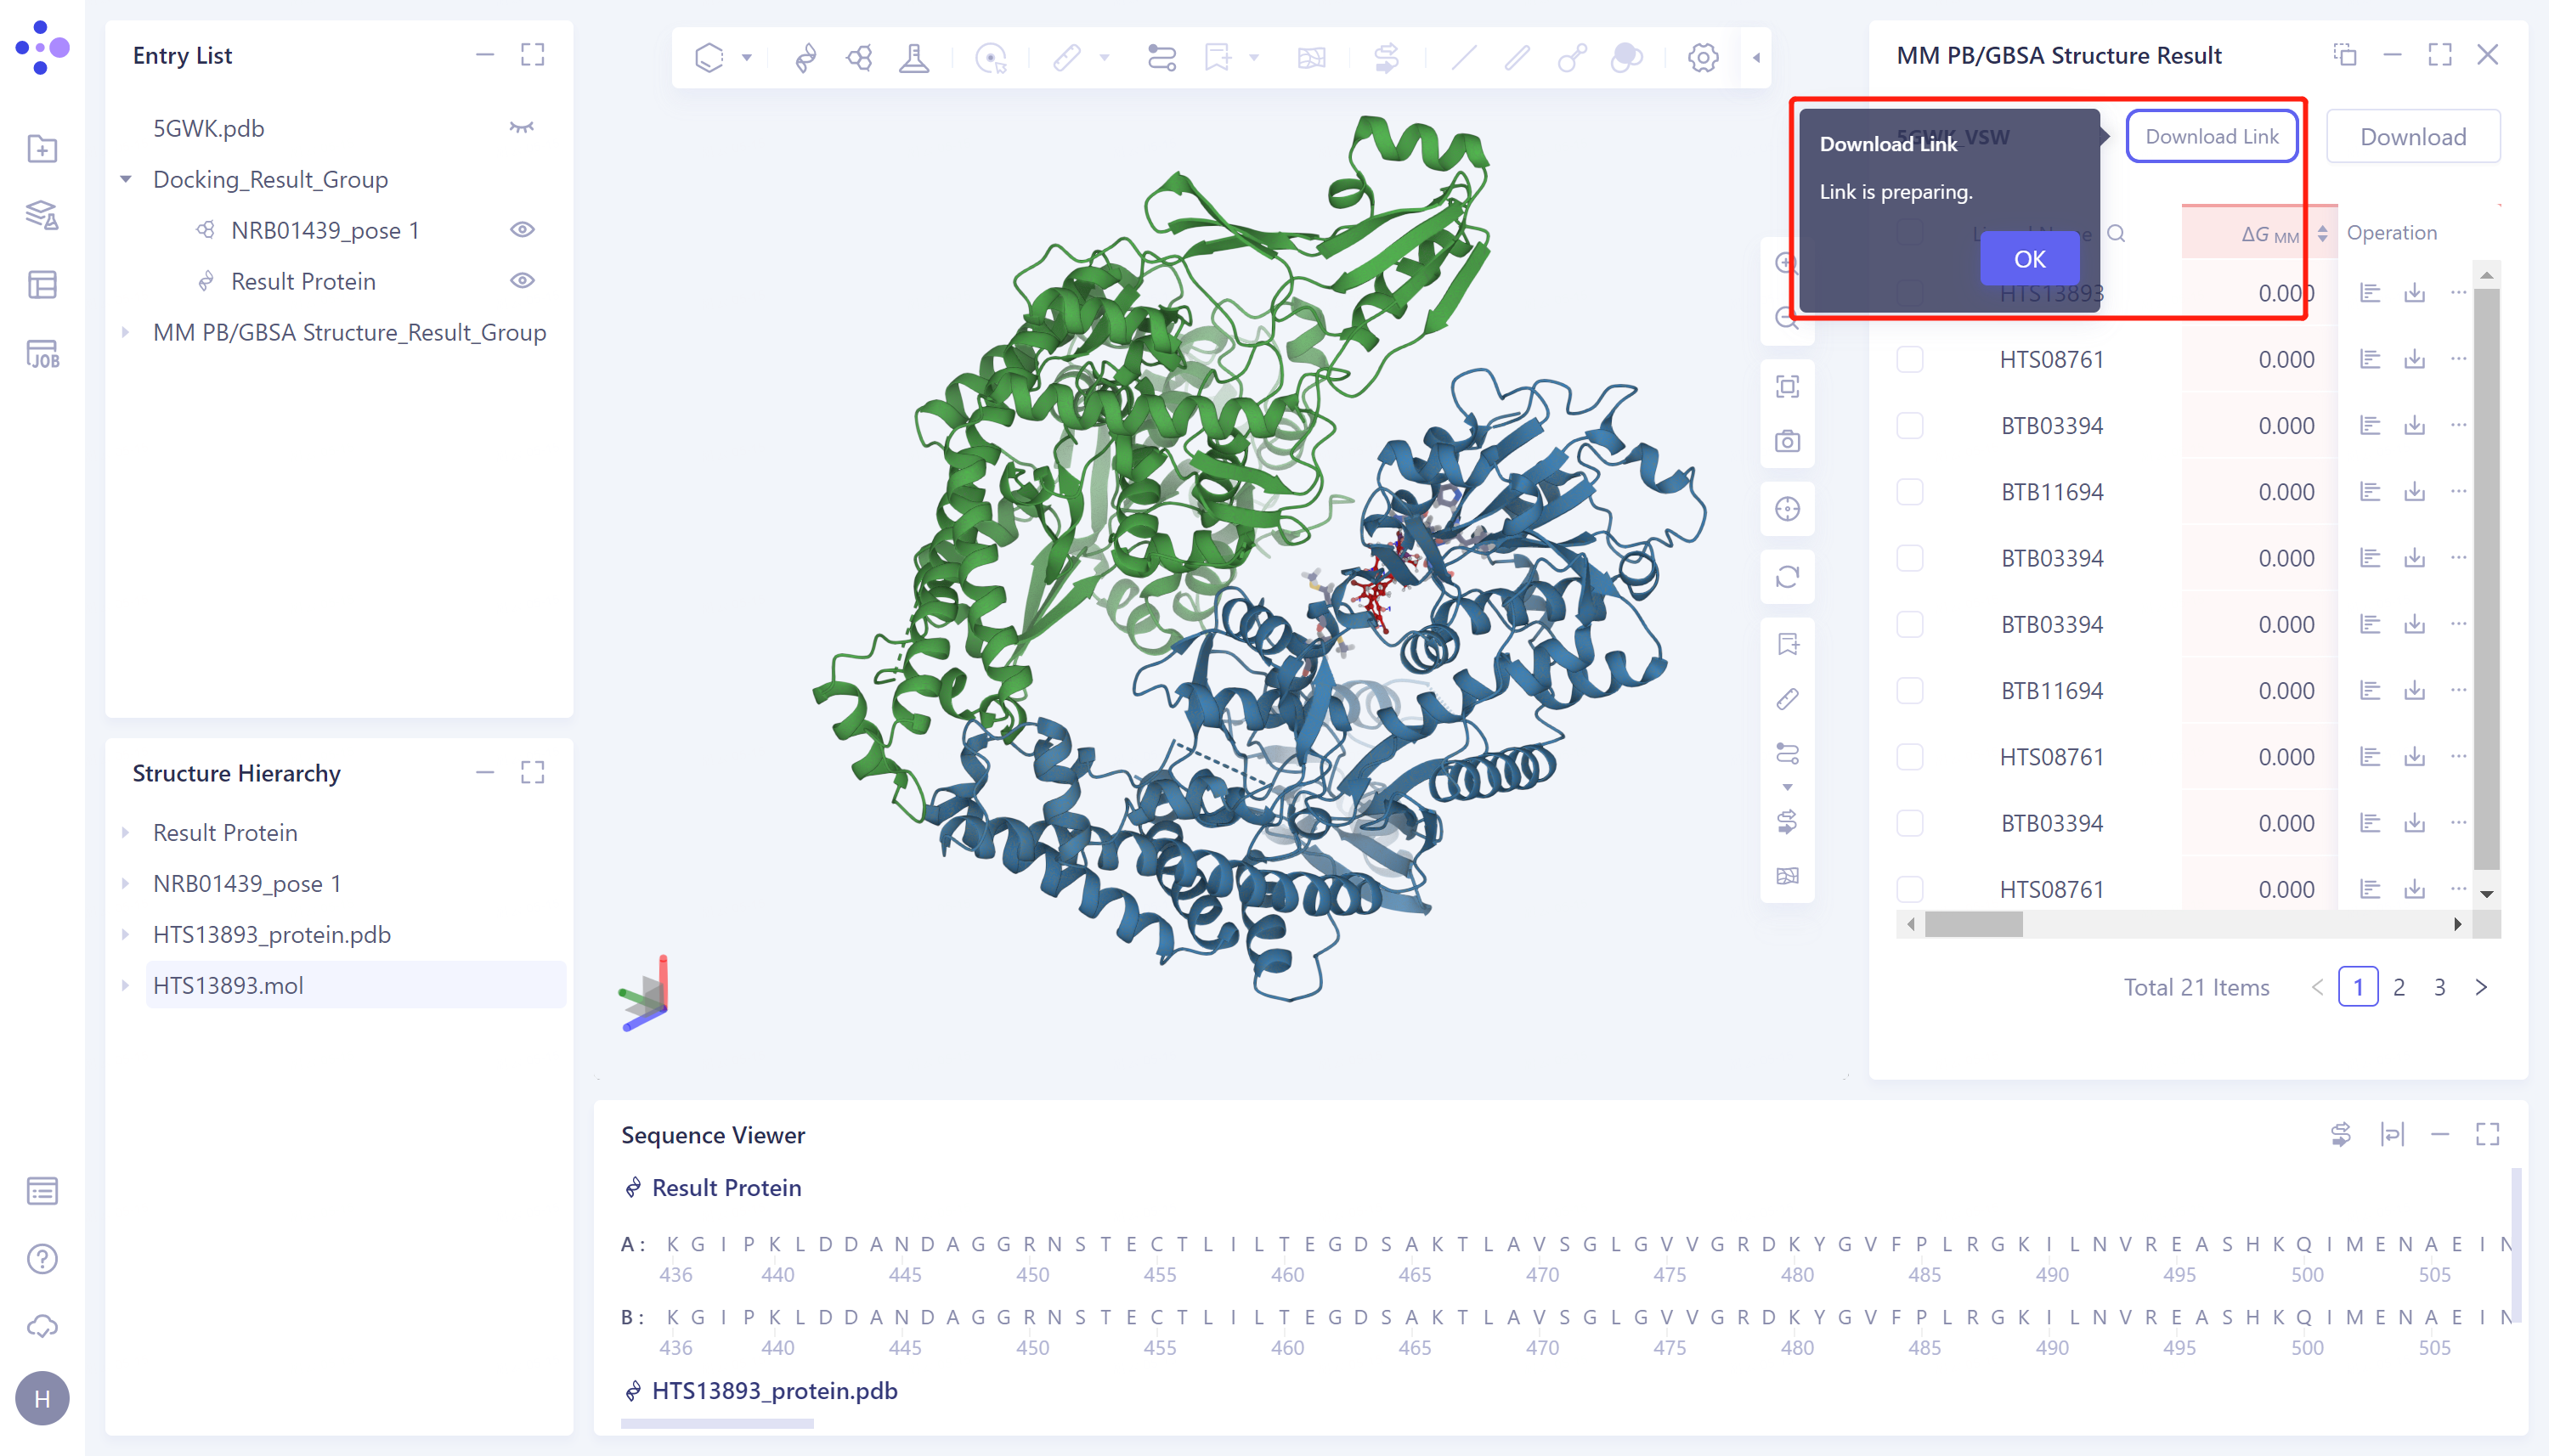
- After loading, click the "Download Link" button and click the URL link to download the calculation results.