Protein-Protein Docking
1. Introduction
Protein docking is a technique to predict the recognition and interaction between proteins. In Hermite, protein-protein Docking can be used to realize the docking calculation of protein. Protein-Protein Docking is a rigid protein docking algorithm based on the Fast Fourier Transform Correlation technique, which is used to search the translational and rotational space of the protein-protein system.
2. How to use
2.1 Entrance
- The left general menu bar Function → Biomacromolecule → Protein-Protein Docking.

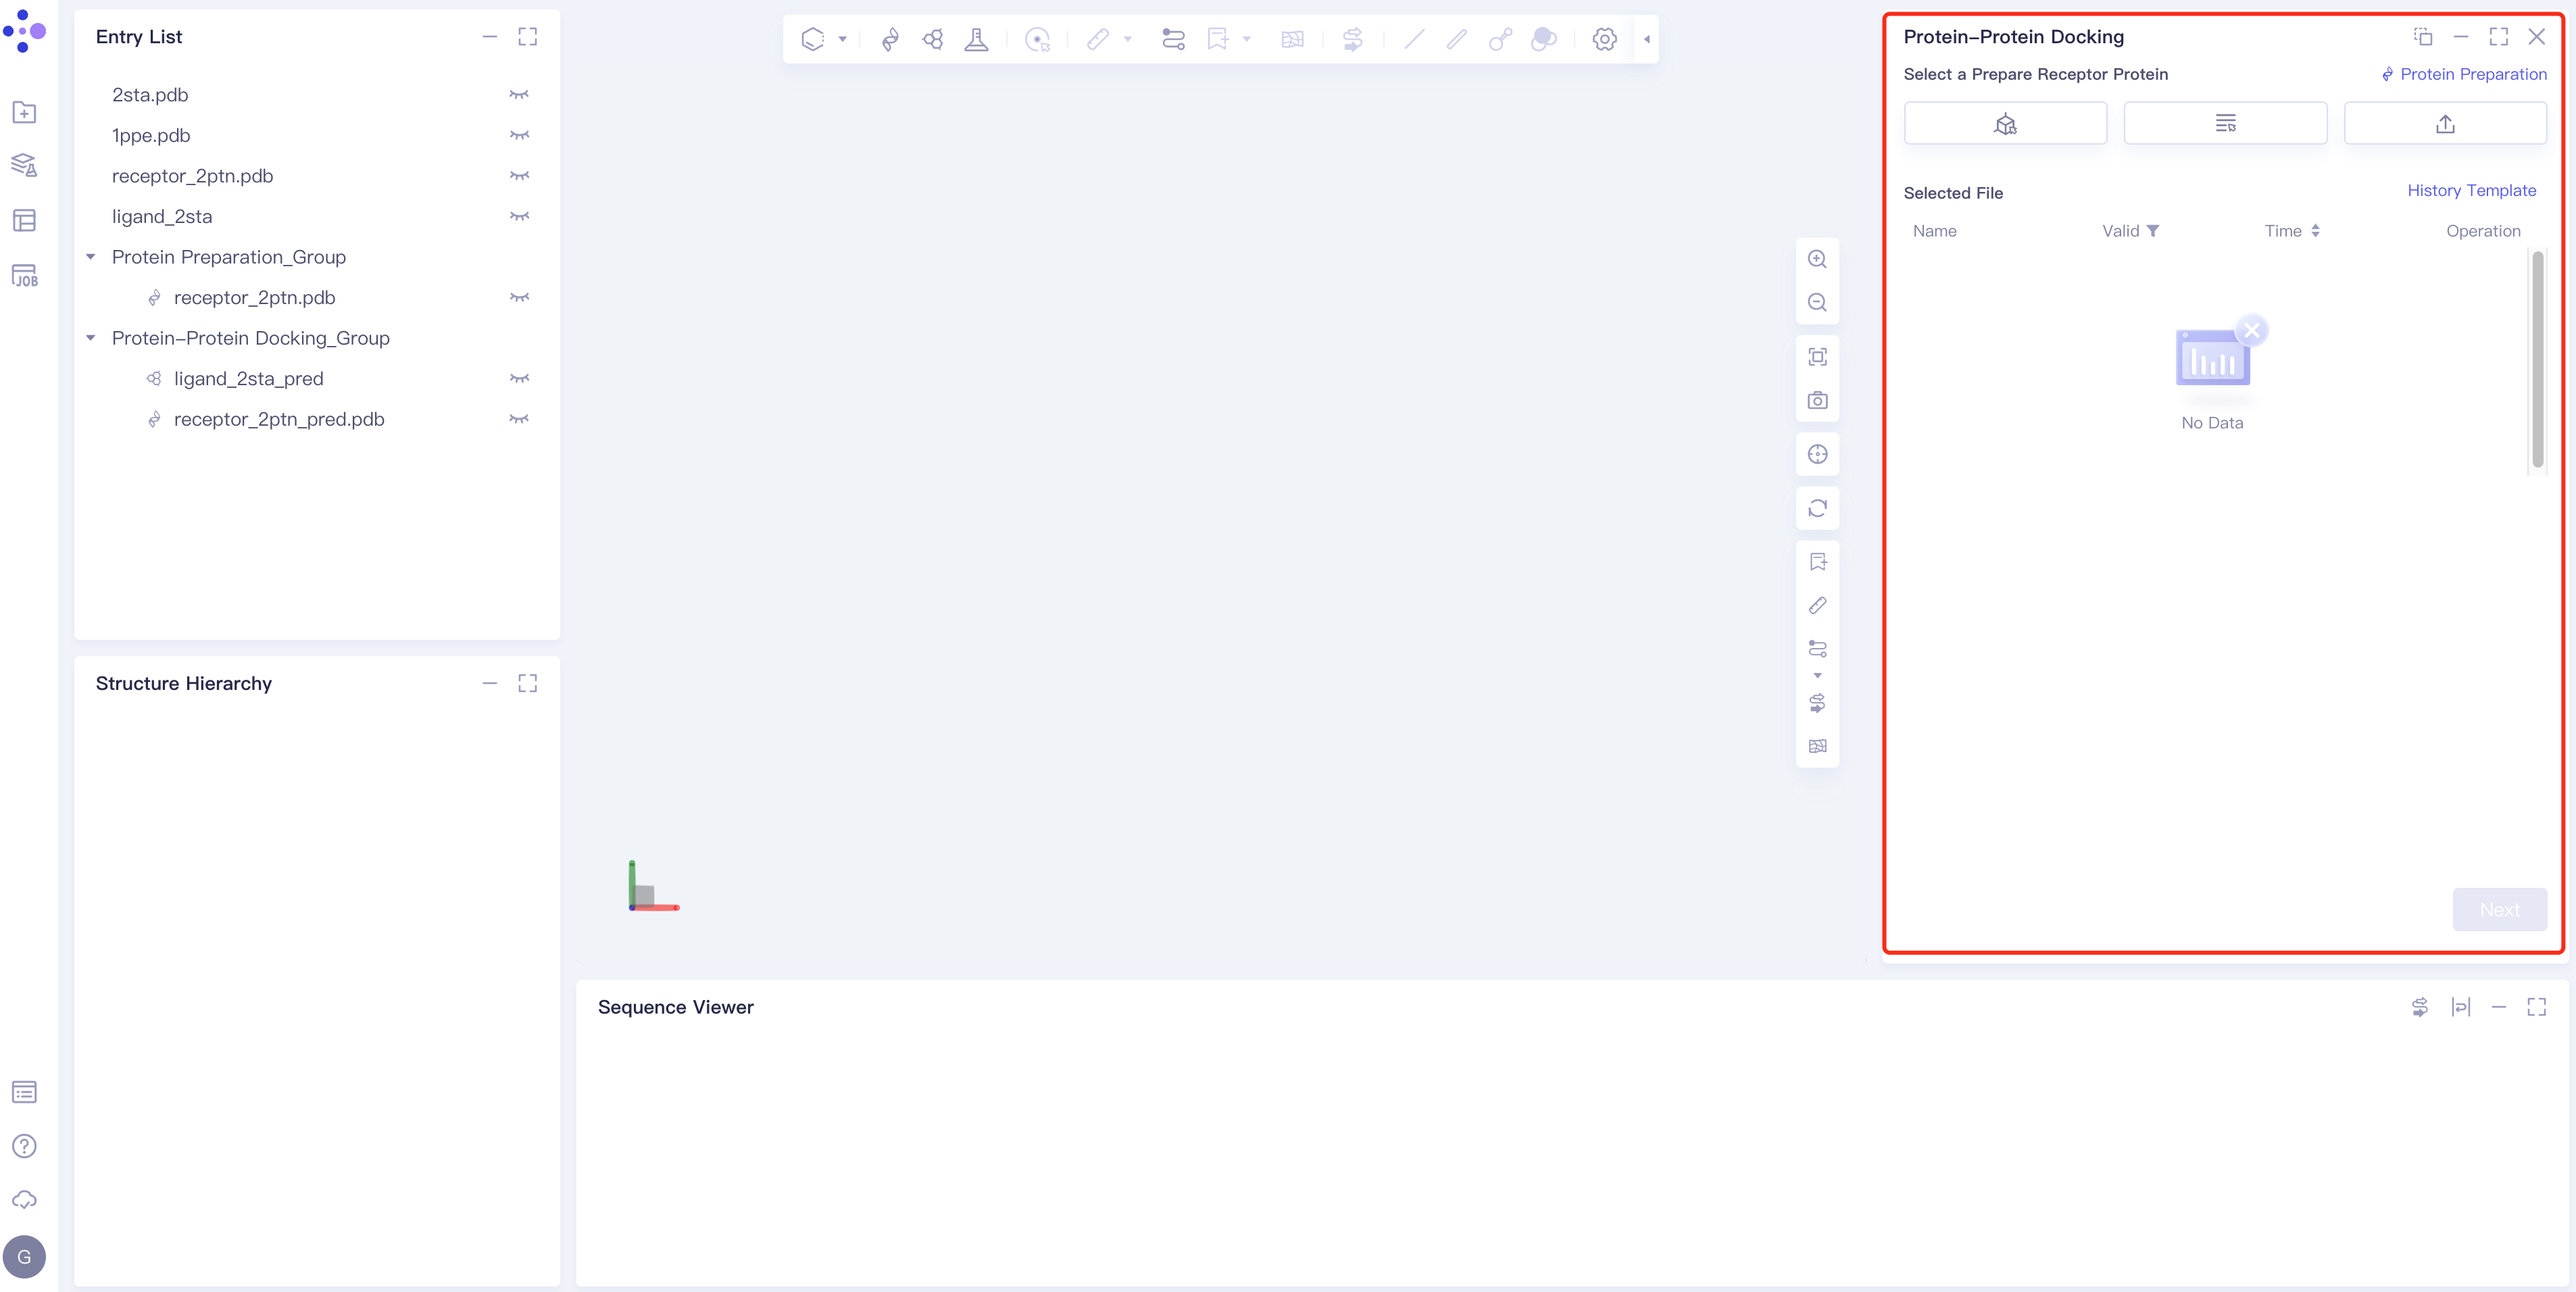
- The operation box of Protein-Protein Docking (shown in the red box) appears on the right side, and the overall interface is as follows:
2.2 Operation
2.2.1 Recipient File Input
- There are three ways of receptor structure input:
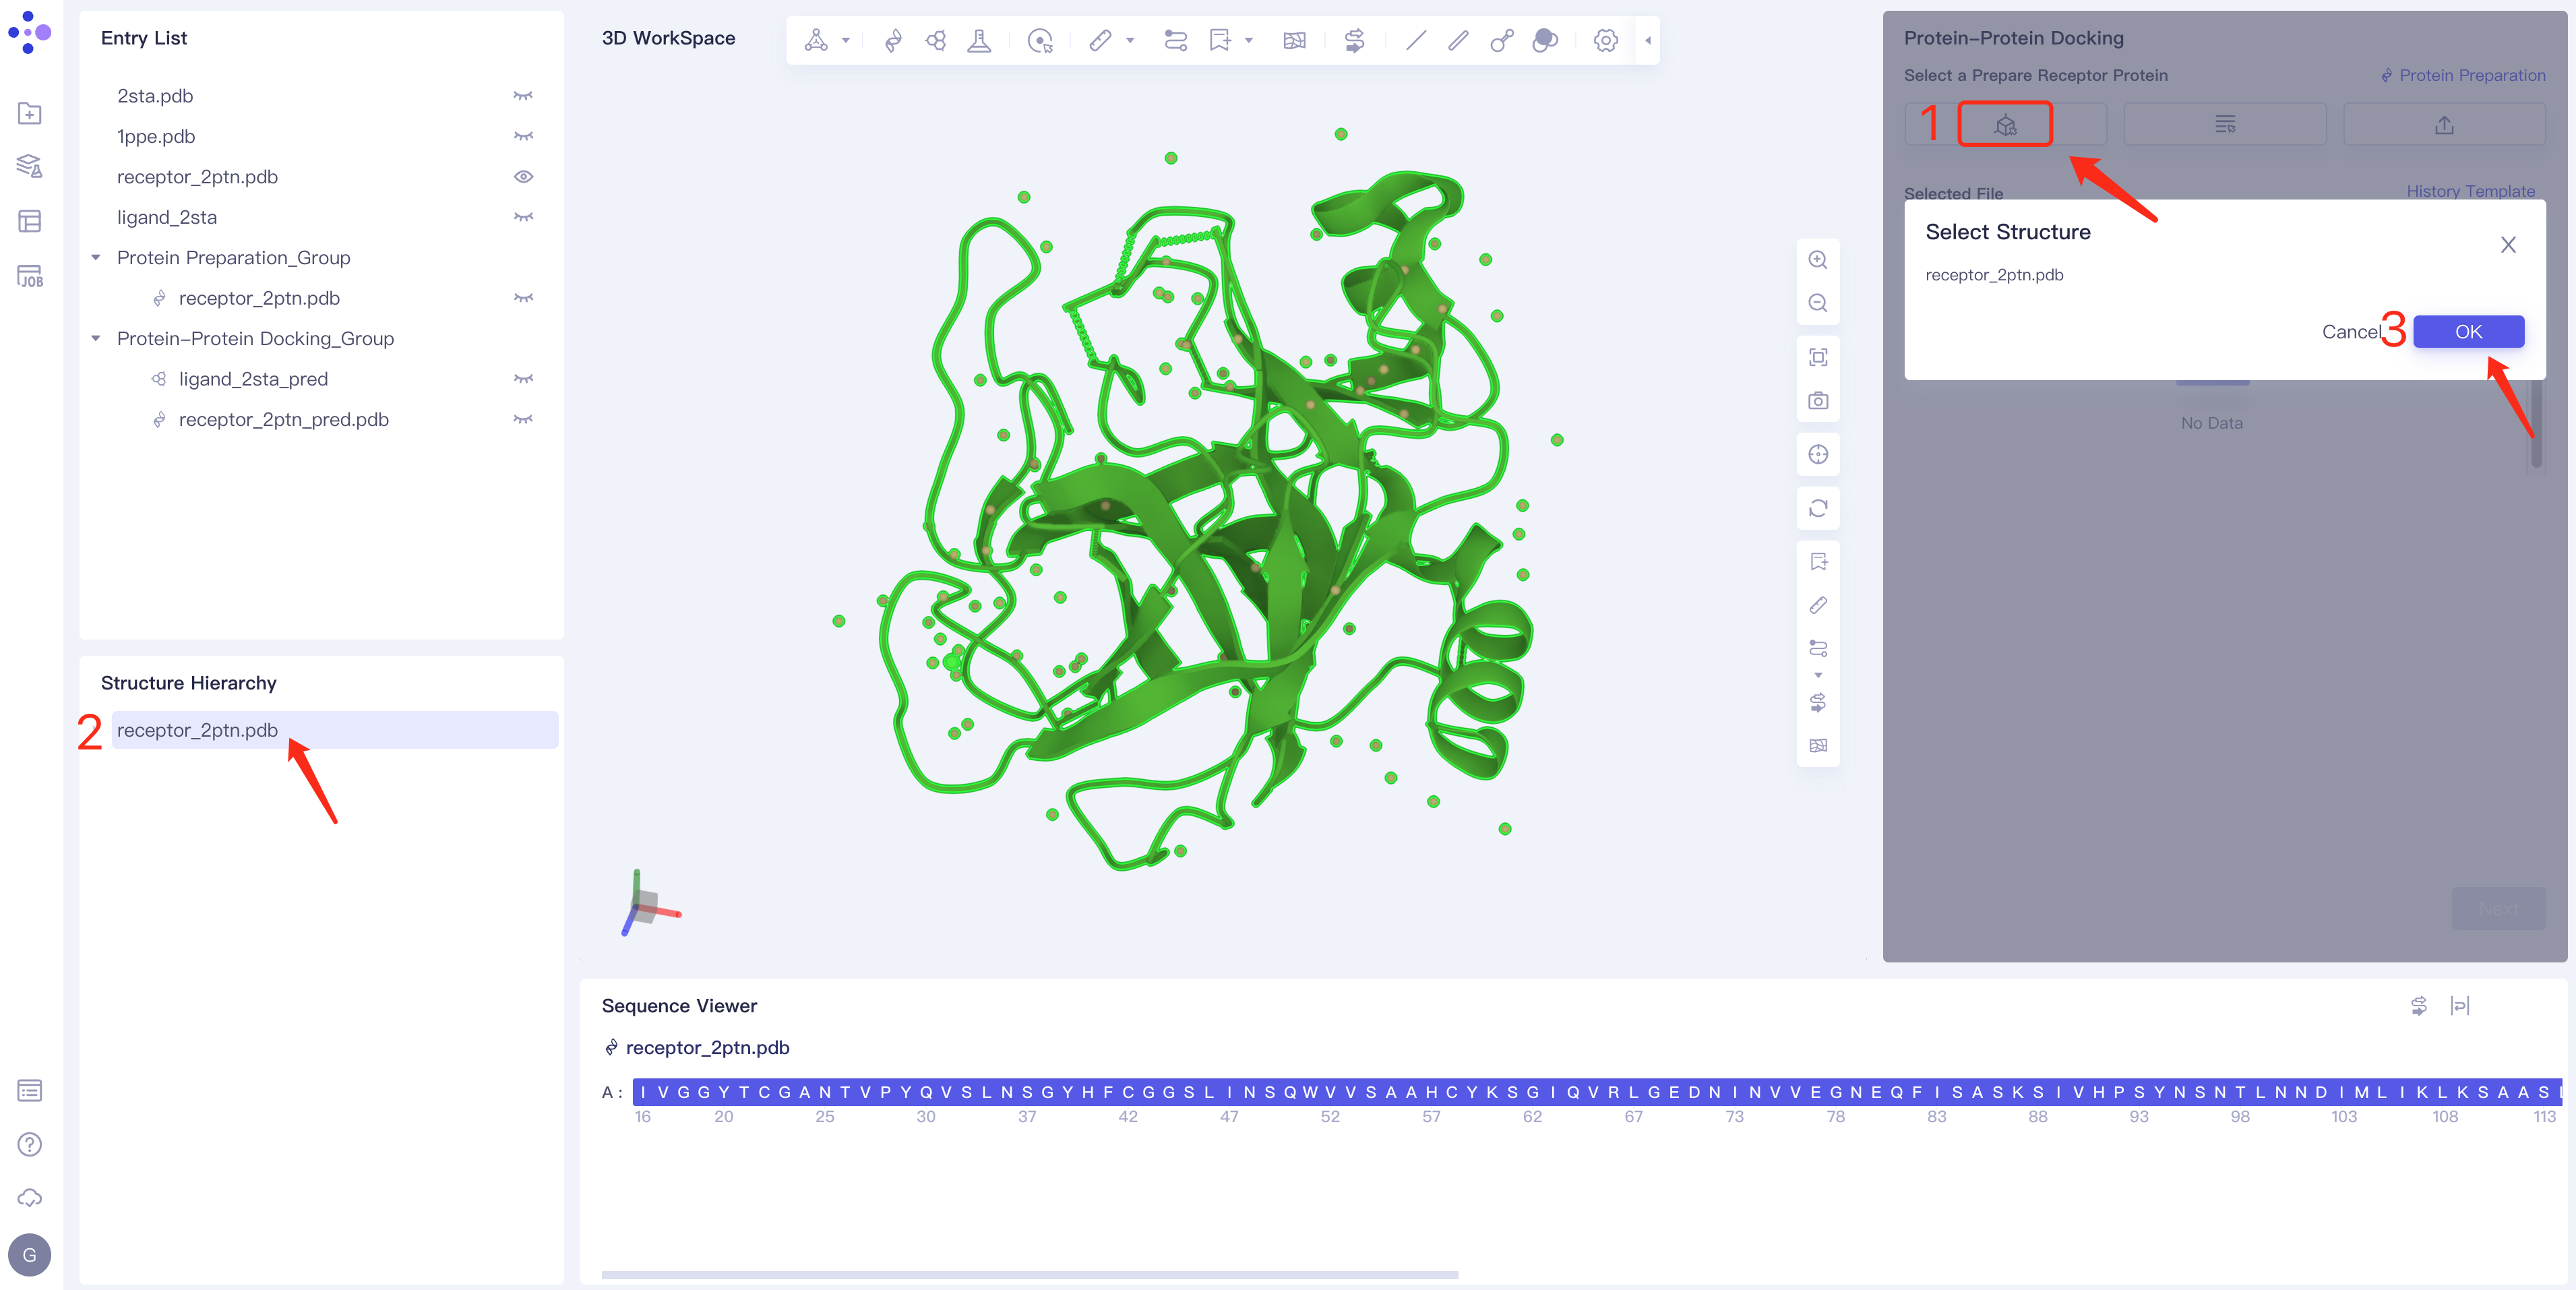
- Method 1 Select from 3D Works pace: Click the Select from 3D Workspace box → Select Structure box pops up → Structure Hierarchy box on the left side of the interface or 3D Select the desired protein structure in Workspace → The name of the selected protein is displayed in the Select Structure box, and click OK.
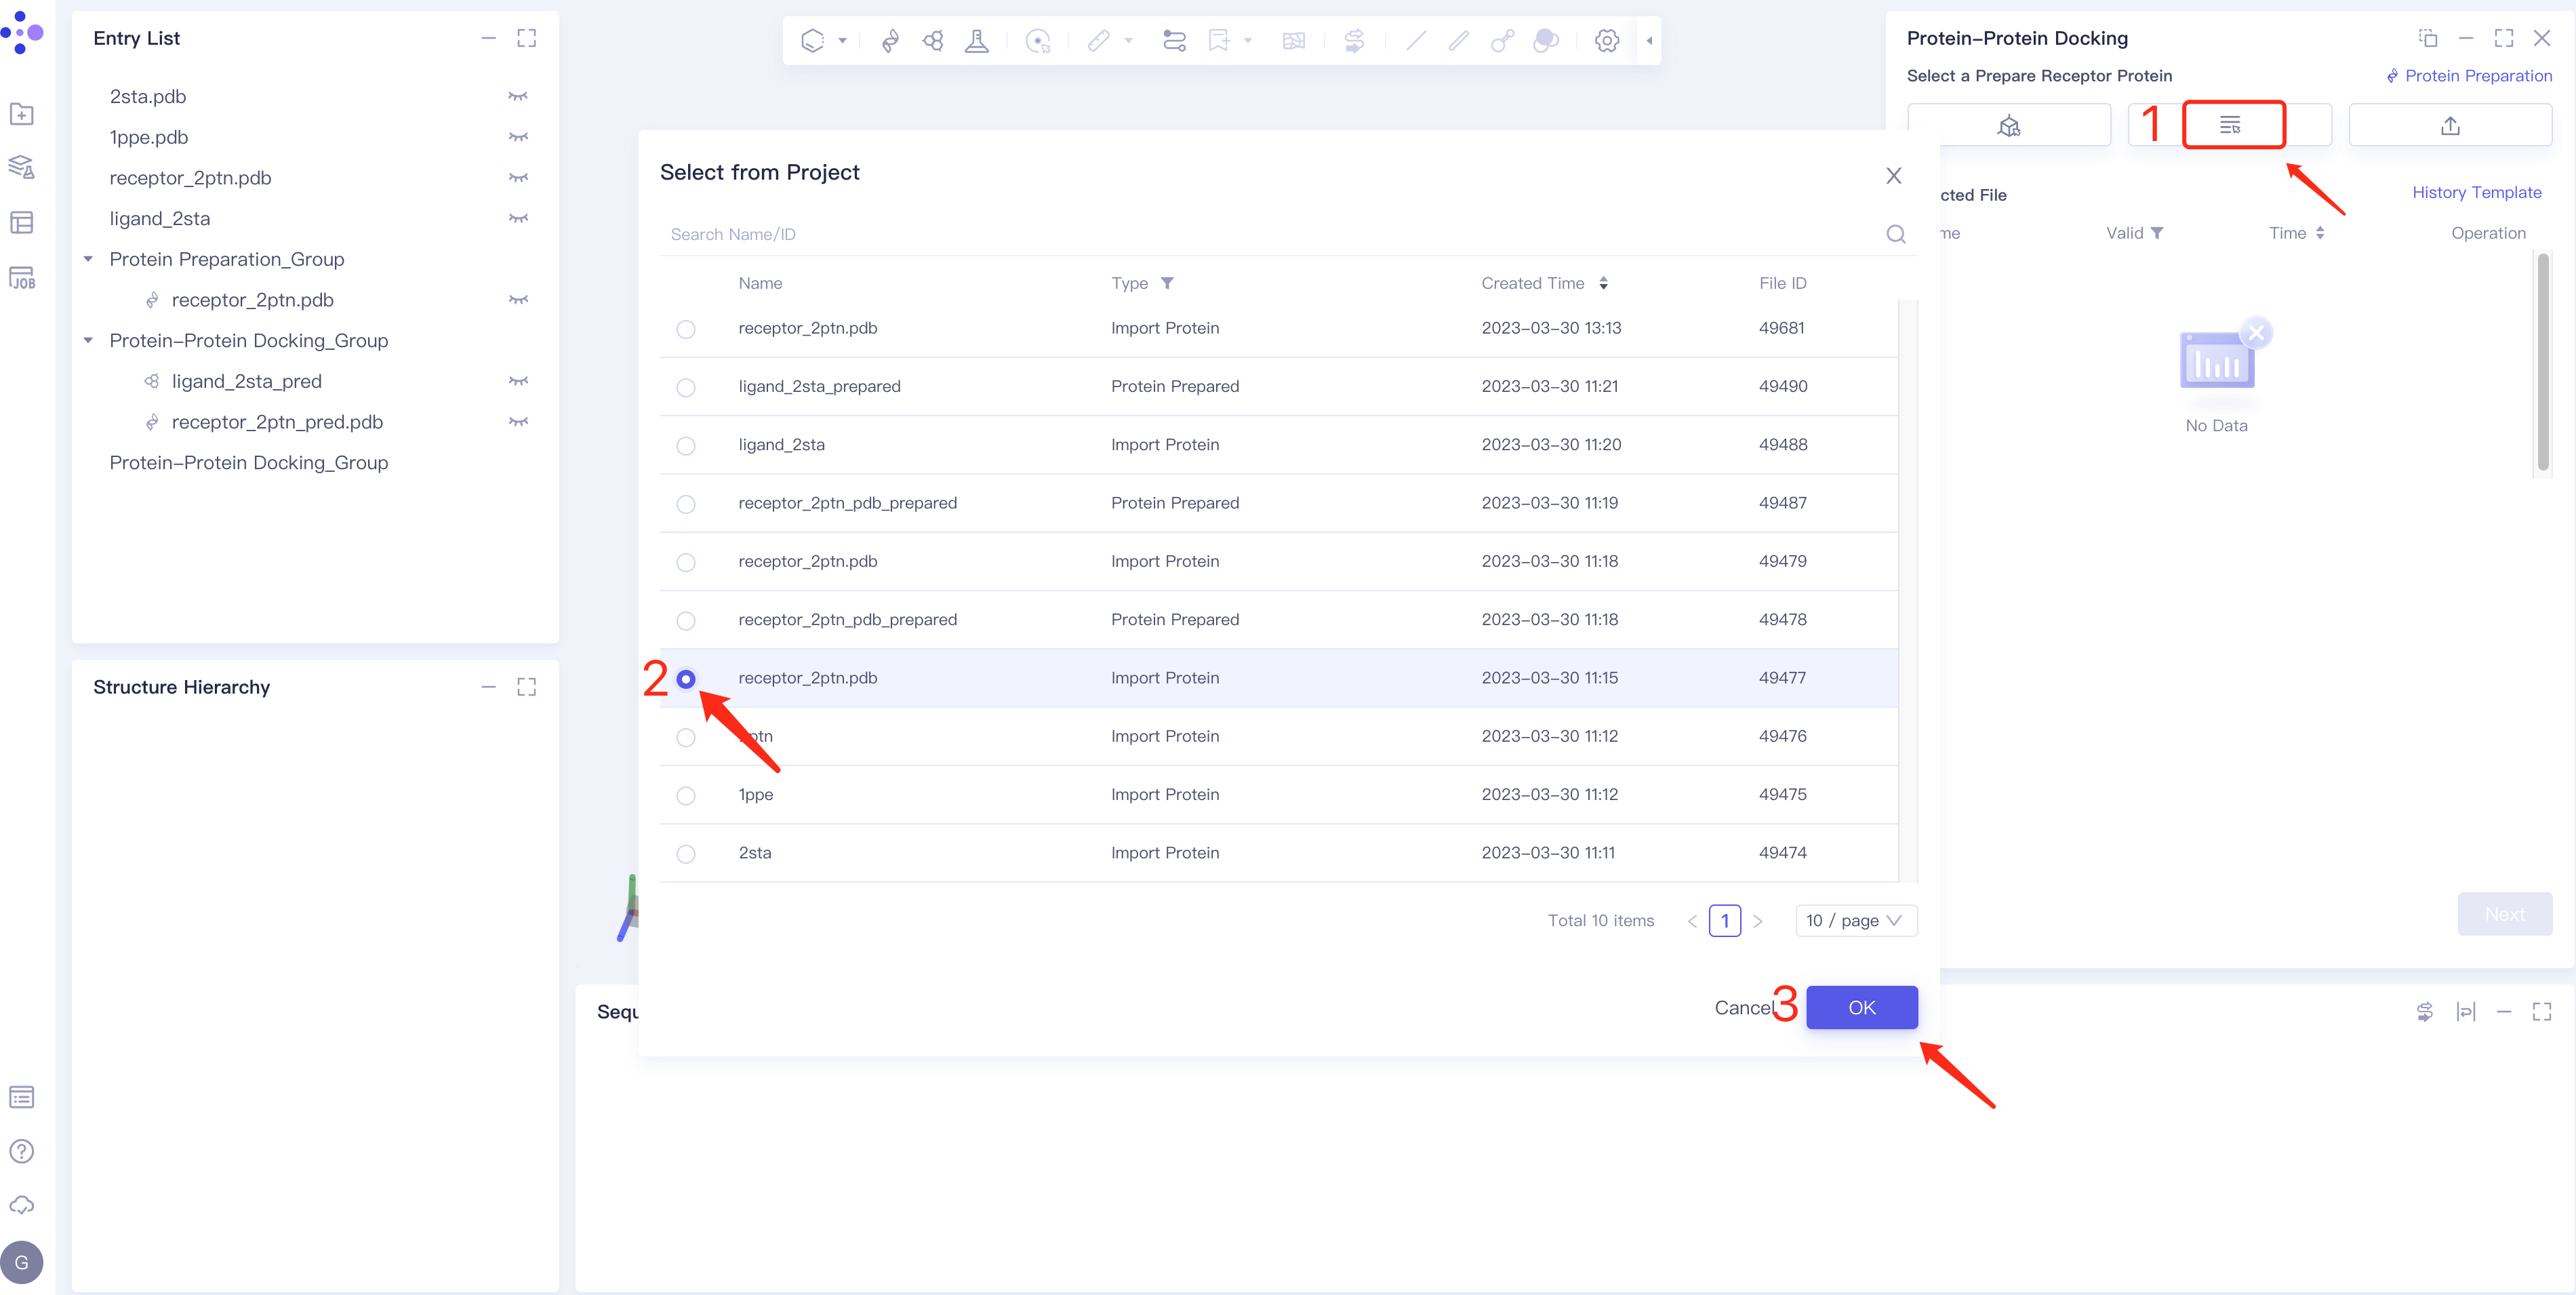
- Method 2 Select from Project: click the Select from Project box → the Select from Project box pops up in the middle of the interface → select the required protein structure → click OK.
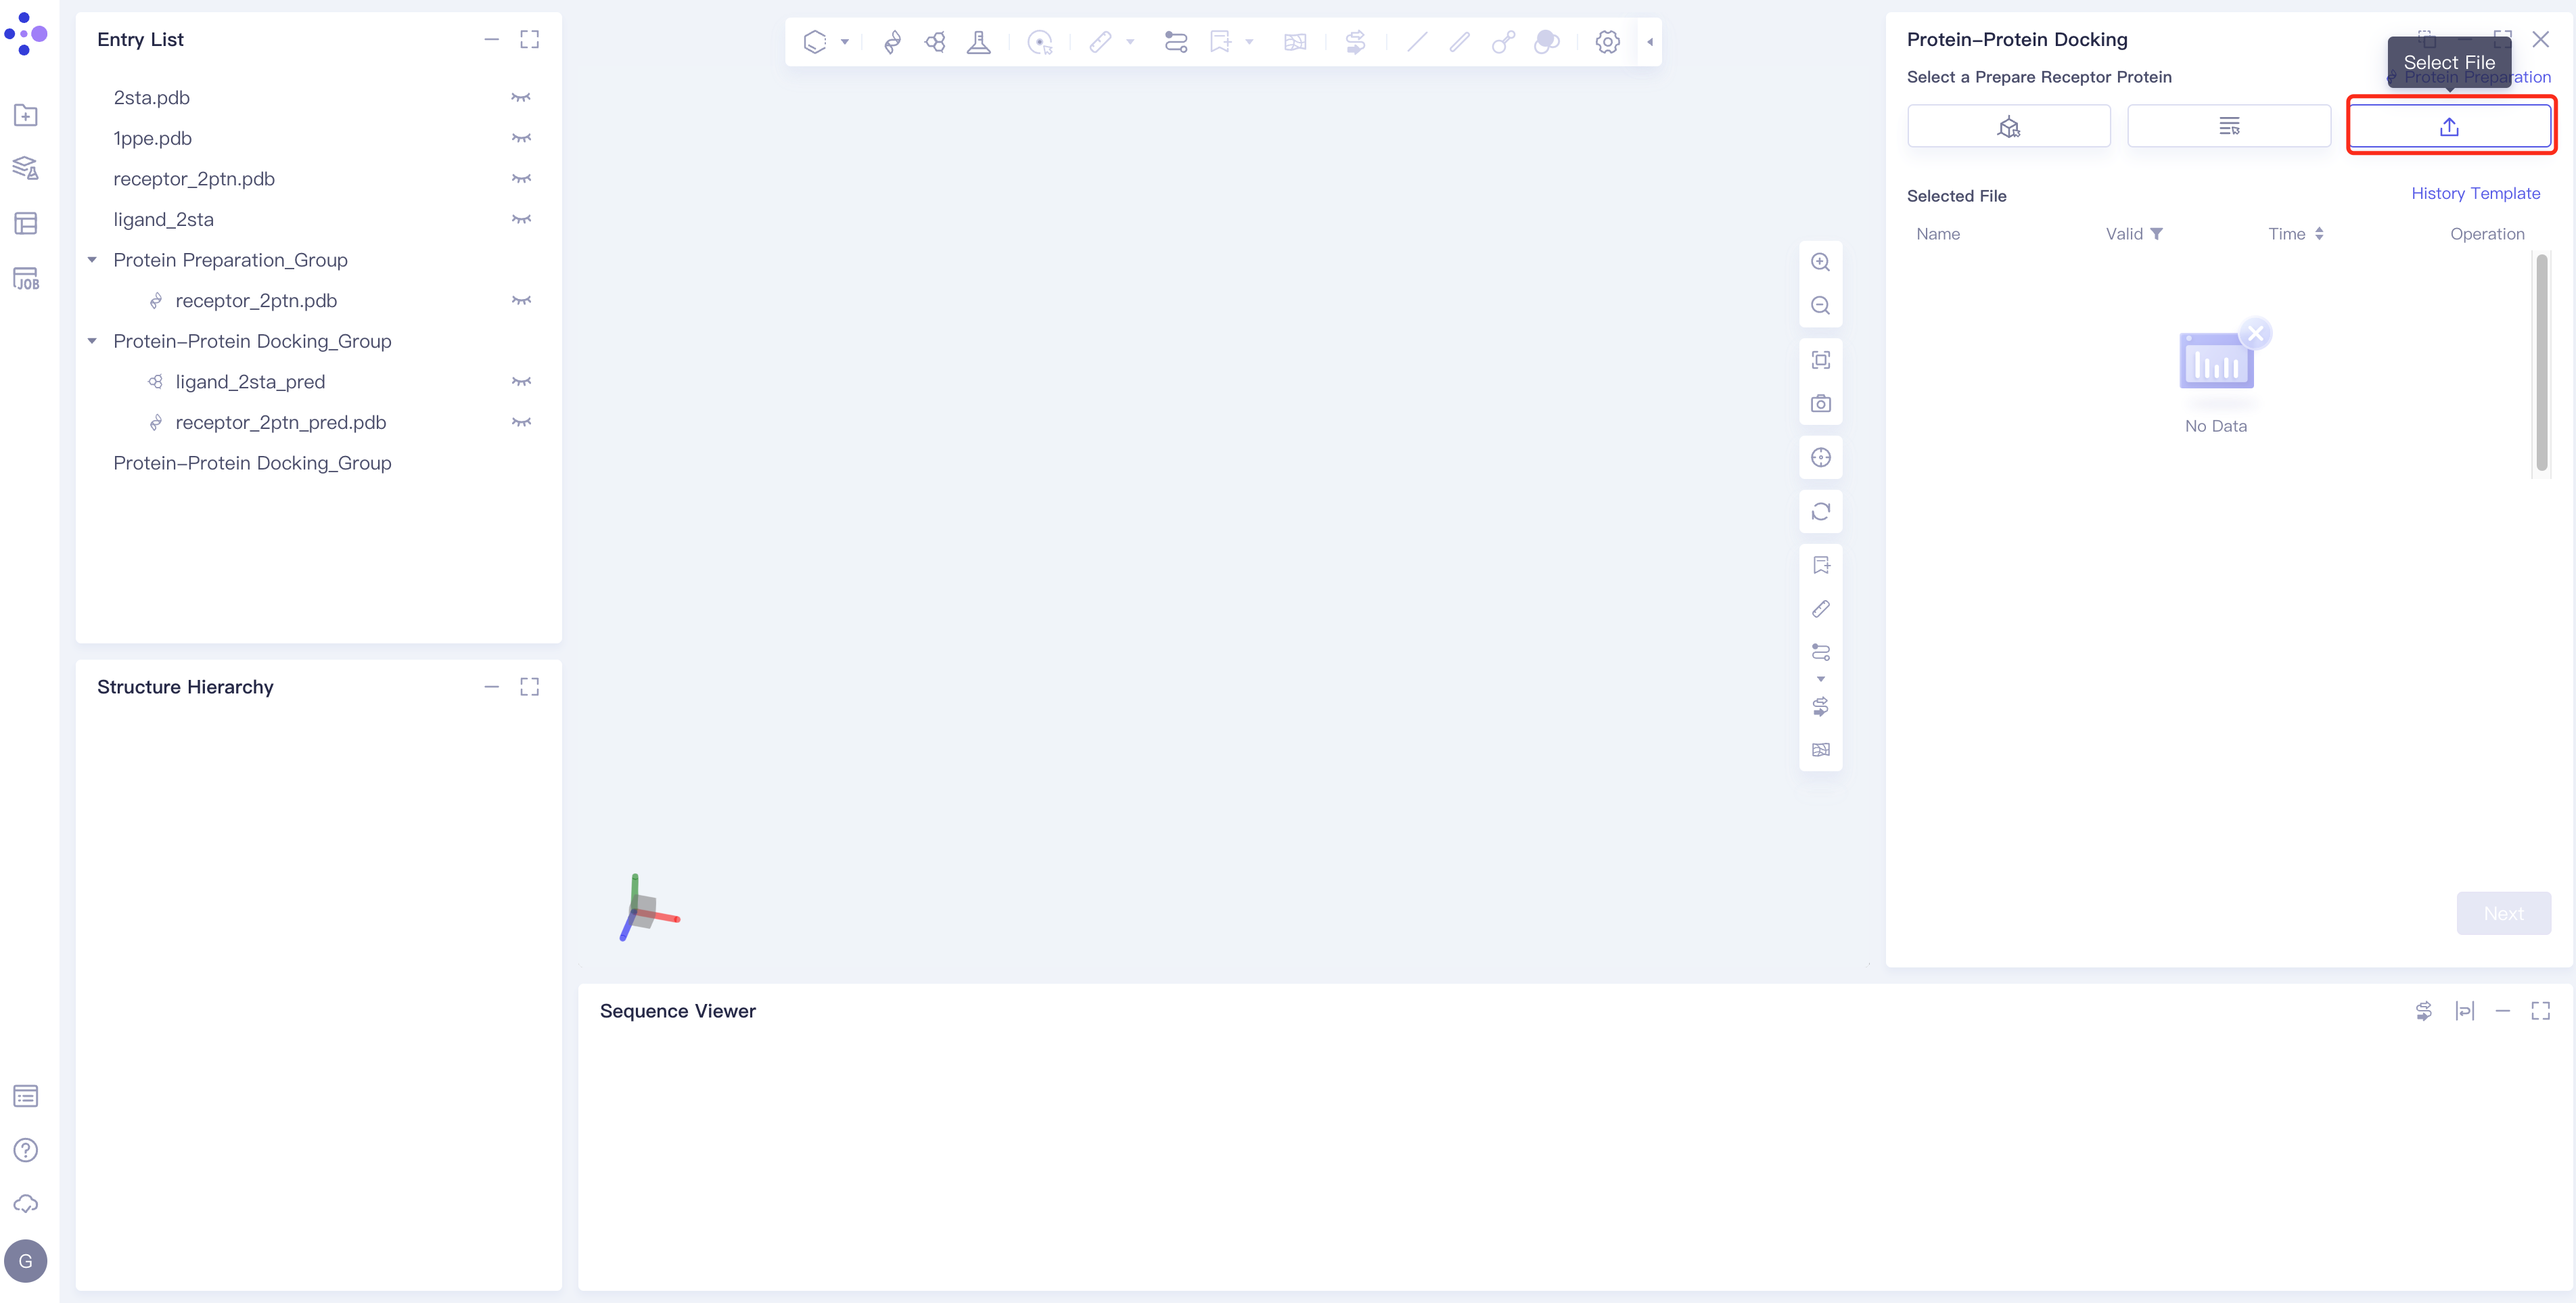
- Method 3 Select File: Select the required protein structure (.pdb format) from the local folder and upload it.
2.2.2 Treatment of receptor structures
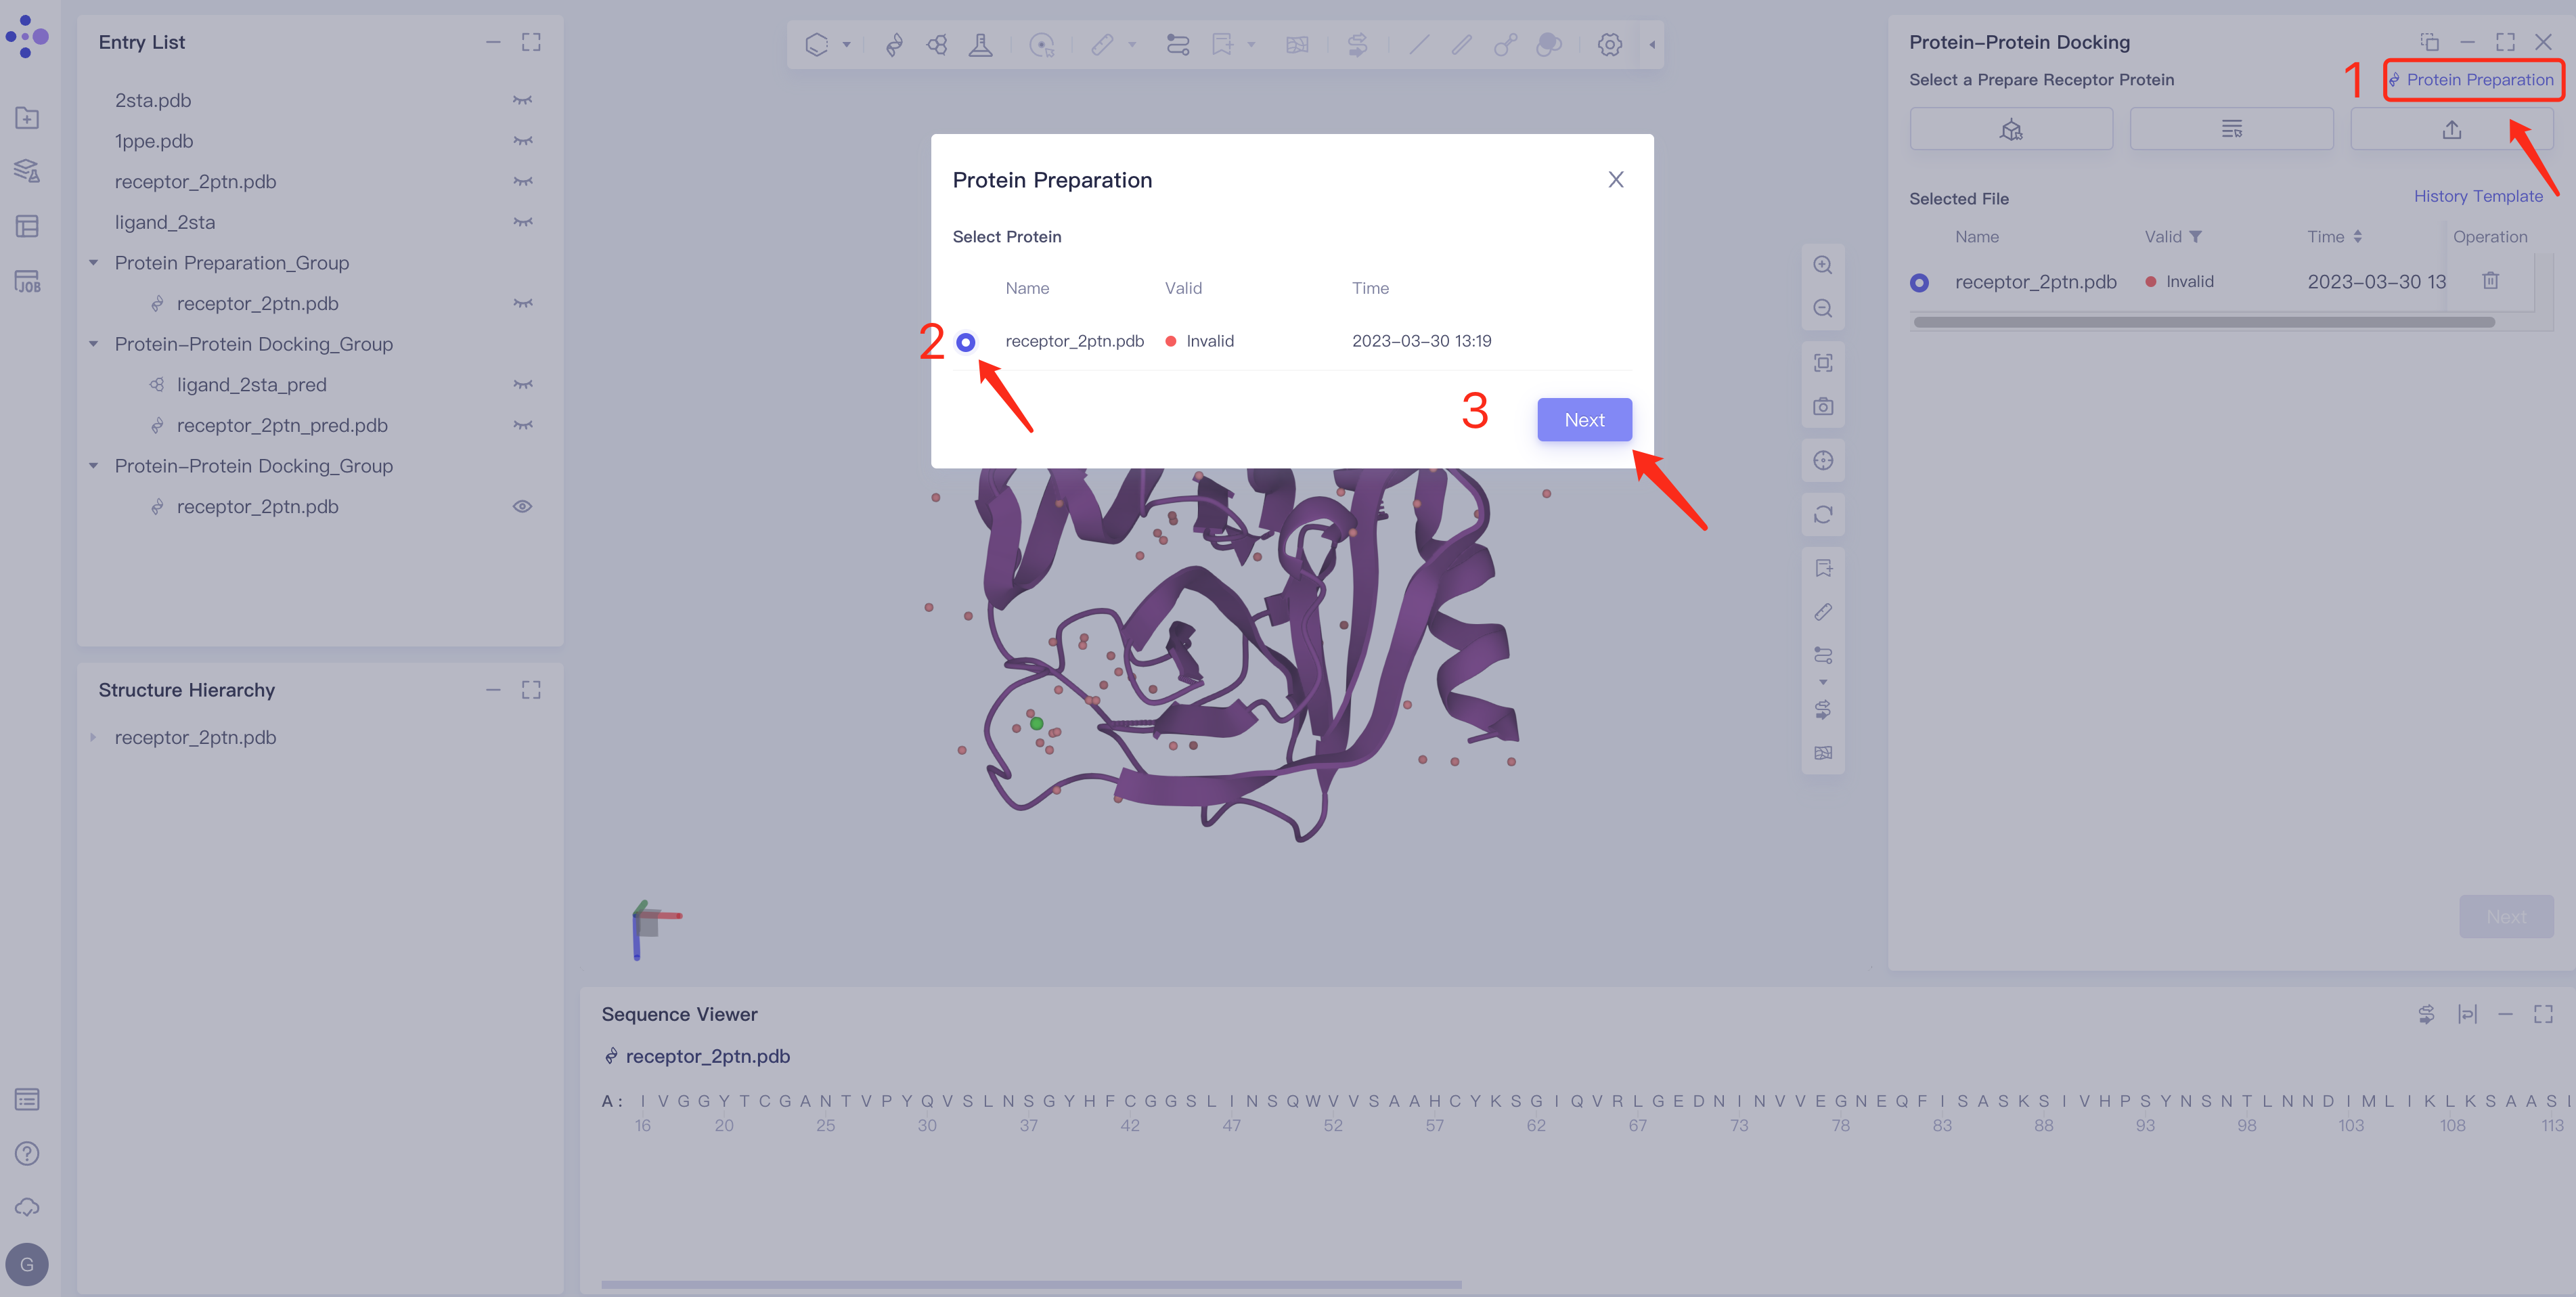
- Click Protein Preparation → the Protein Preparation box pops up in the middle of the interface → select the receptor structure to be processed → click Next.
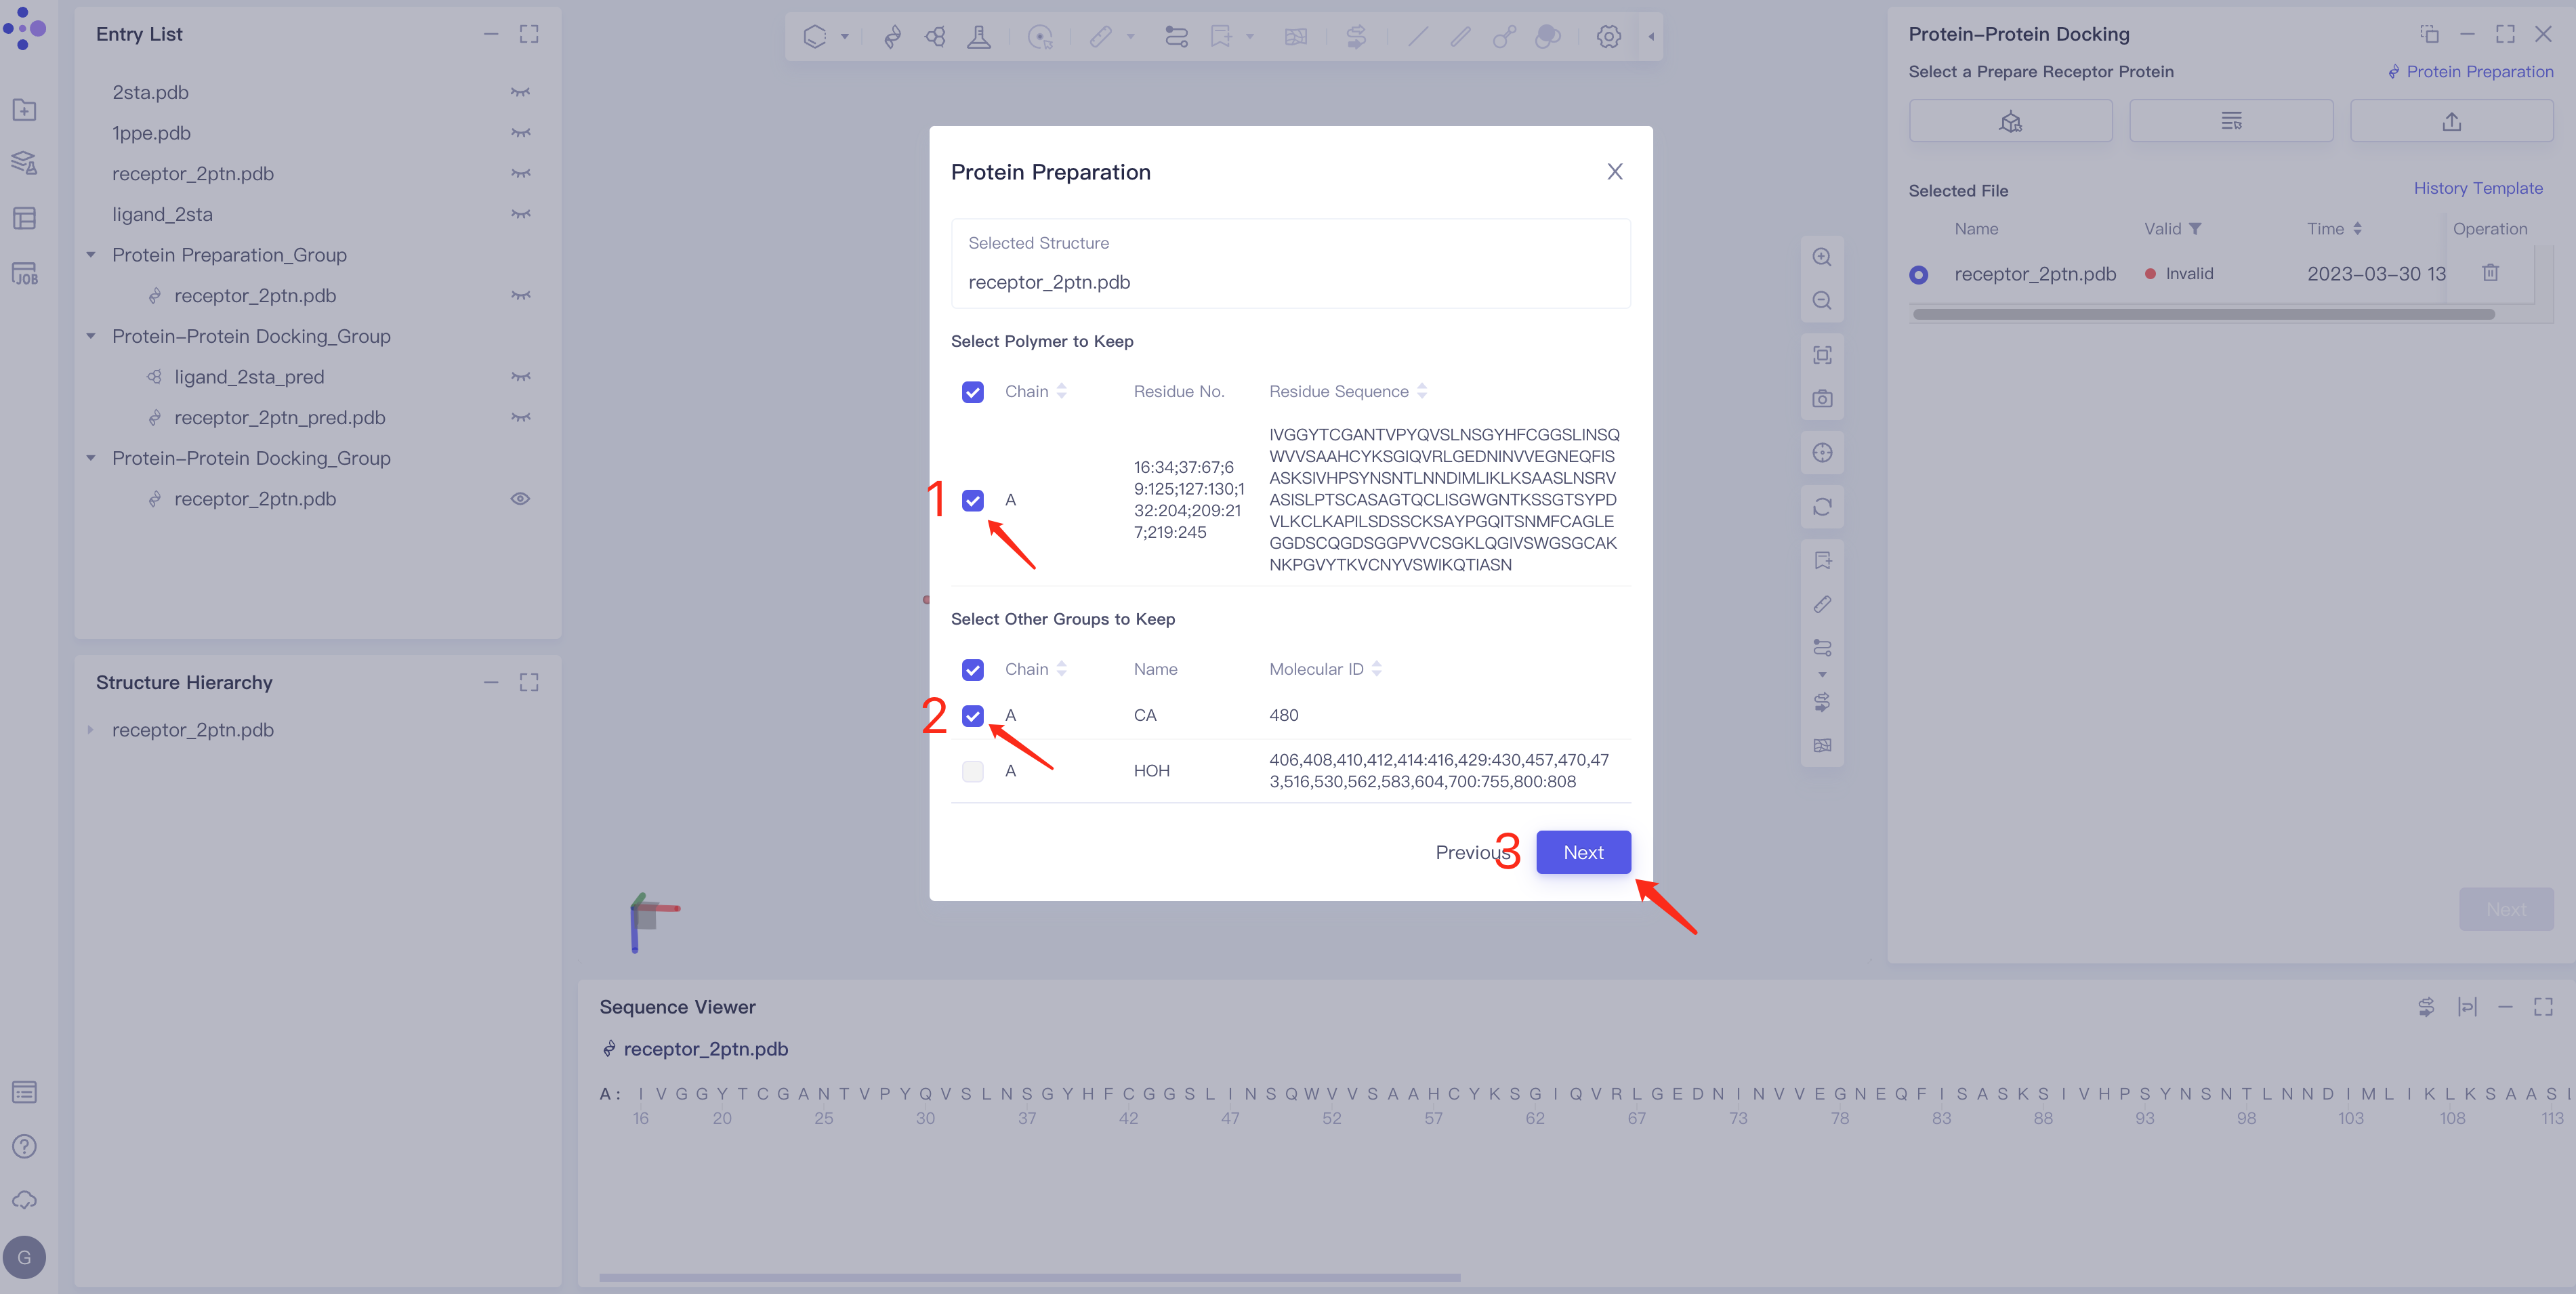
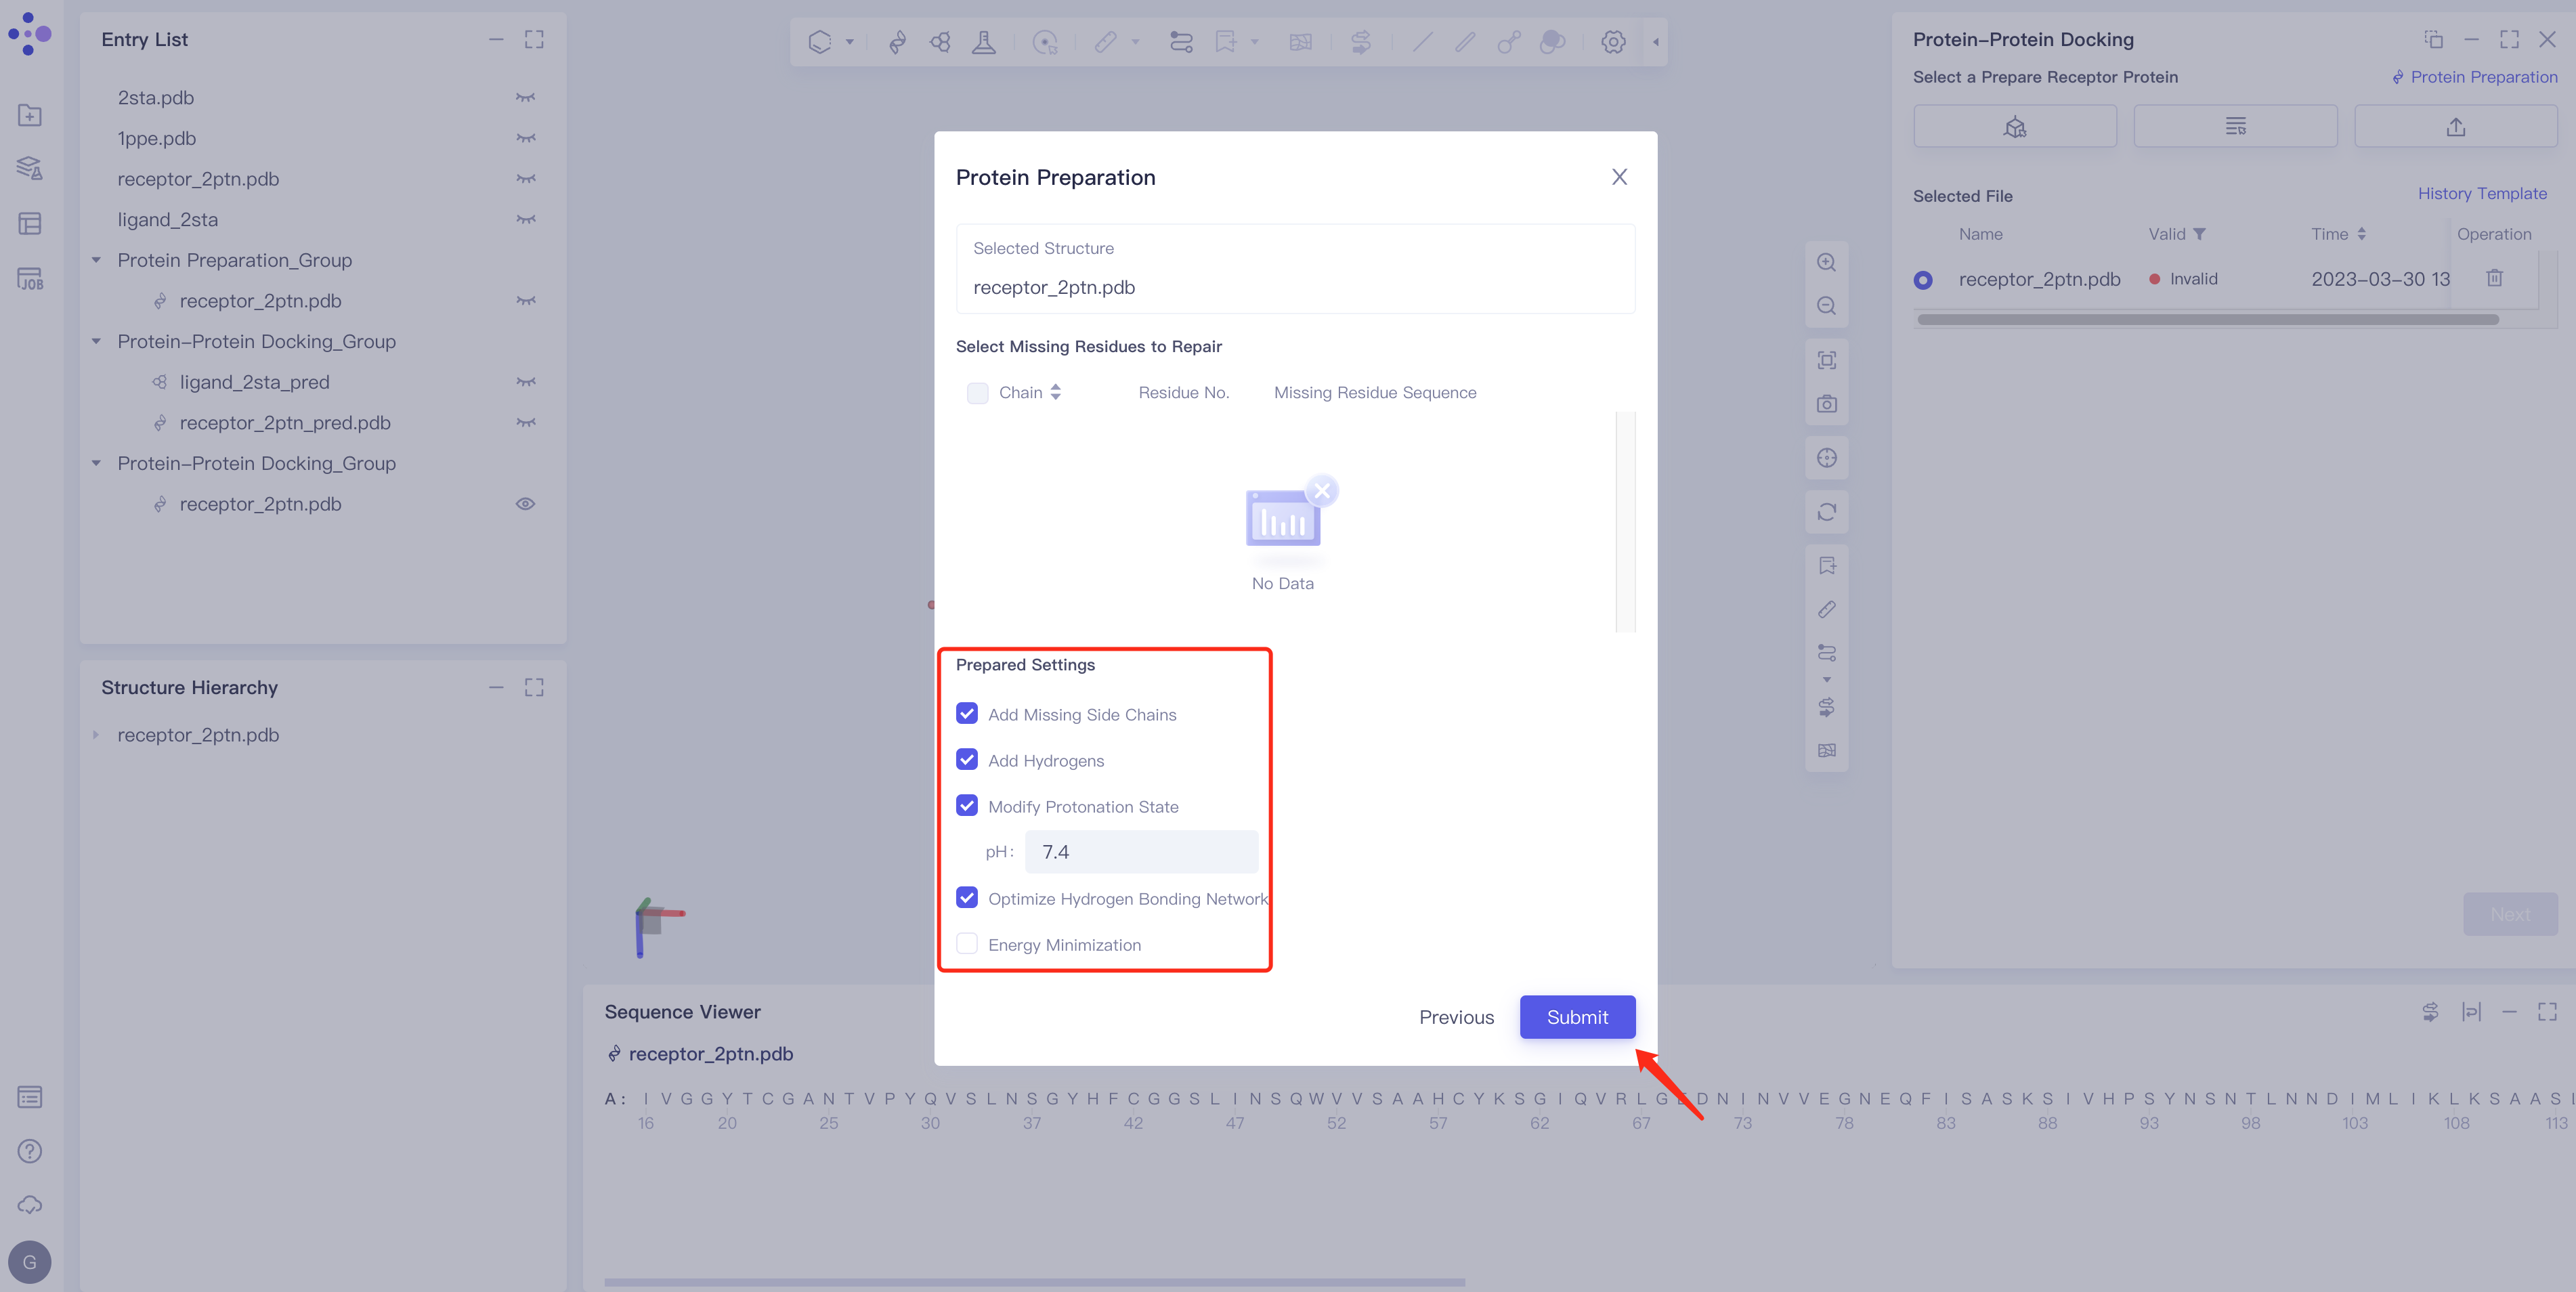
- Parameter setting: Select the ingredient to be reserved, click Next → Submit according to the default parameters, and then submit the task.
 |  |
2.2.3 Ligand type determination, input and processing
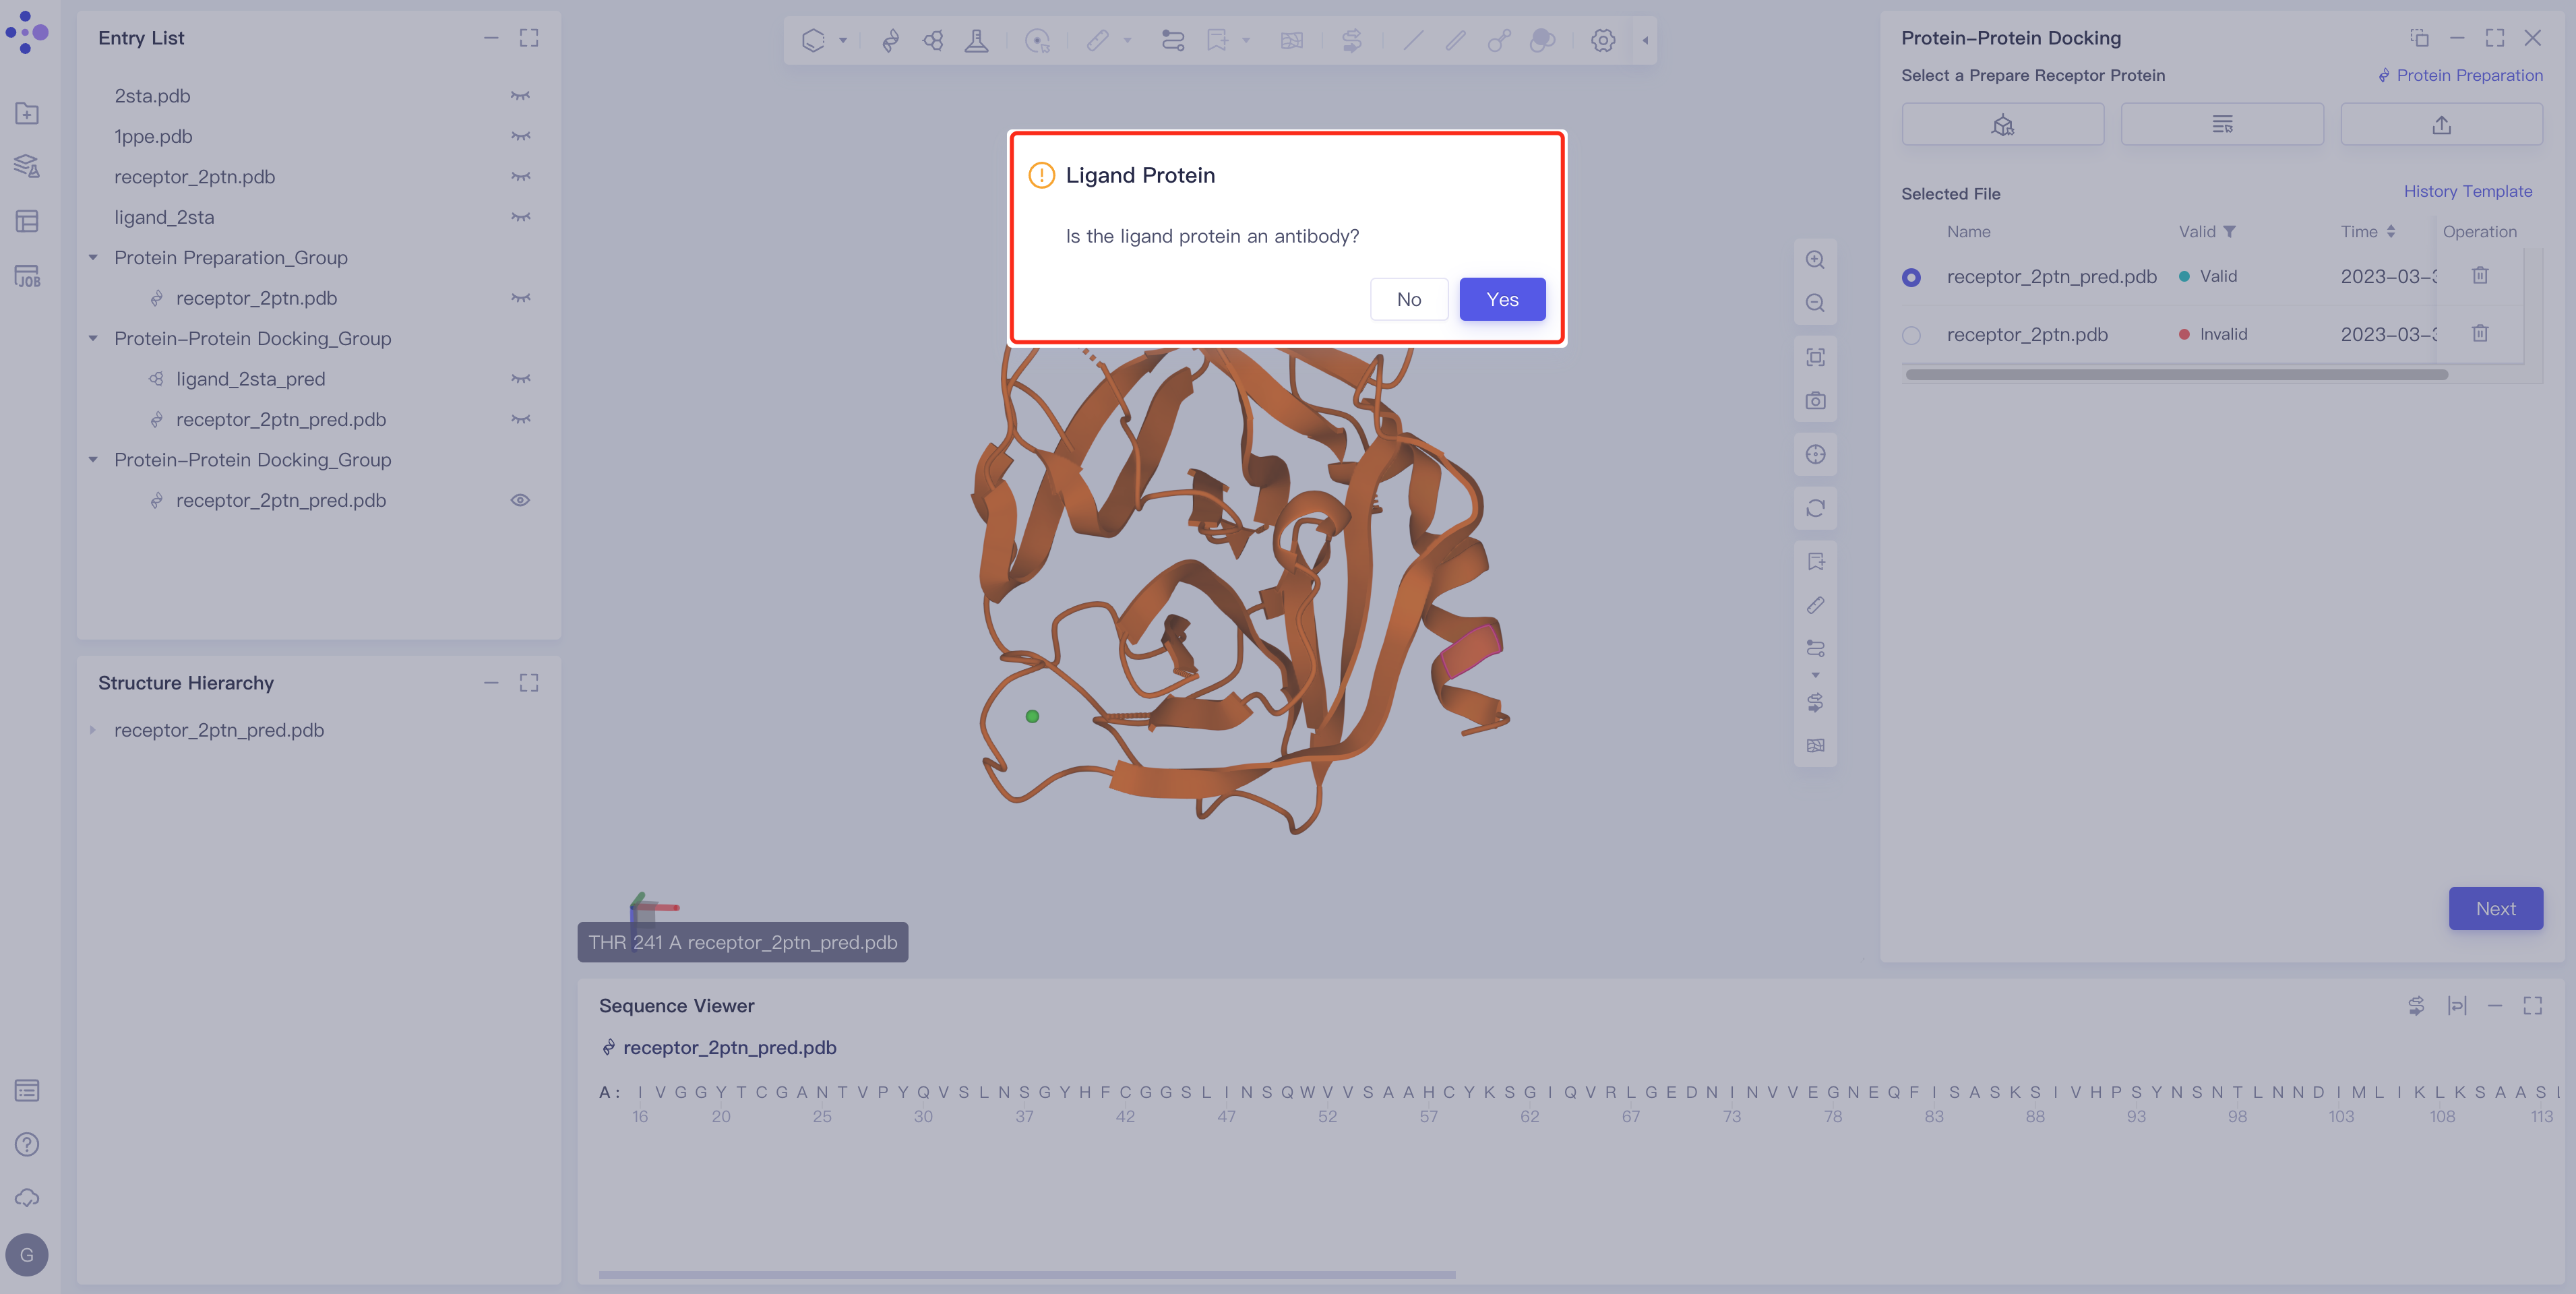
- Click Yes if the ligand is an antibody and click No if the ligand is a common protein or enzyme.
2.2.3.1 The ligand is a common protein or enzyme.
Input of Ligand Structure
- There are three input methods:
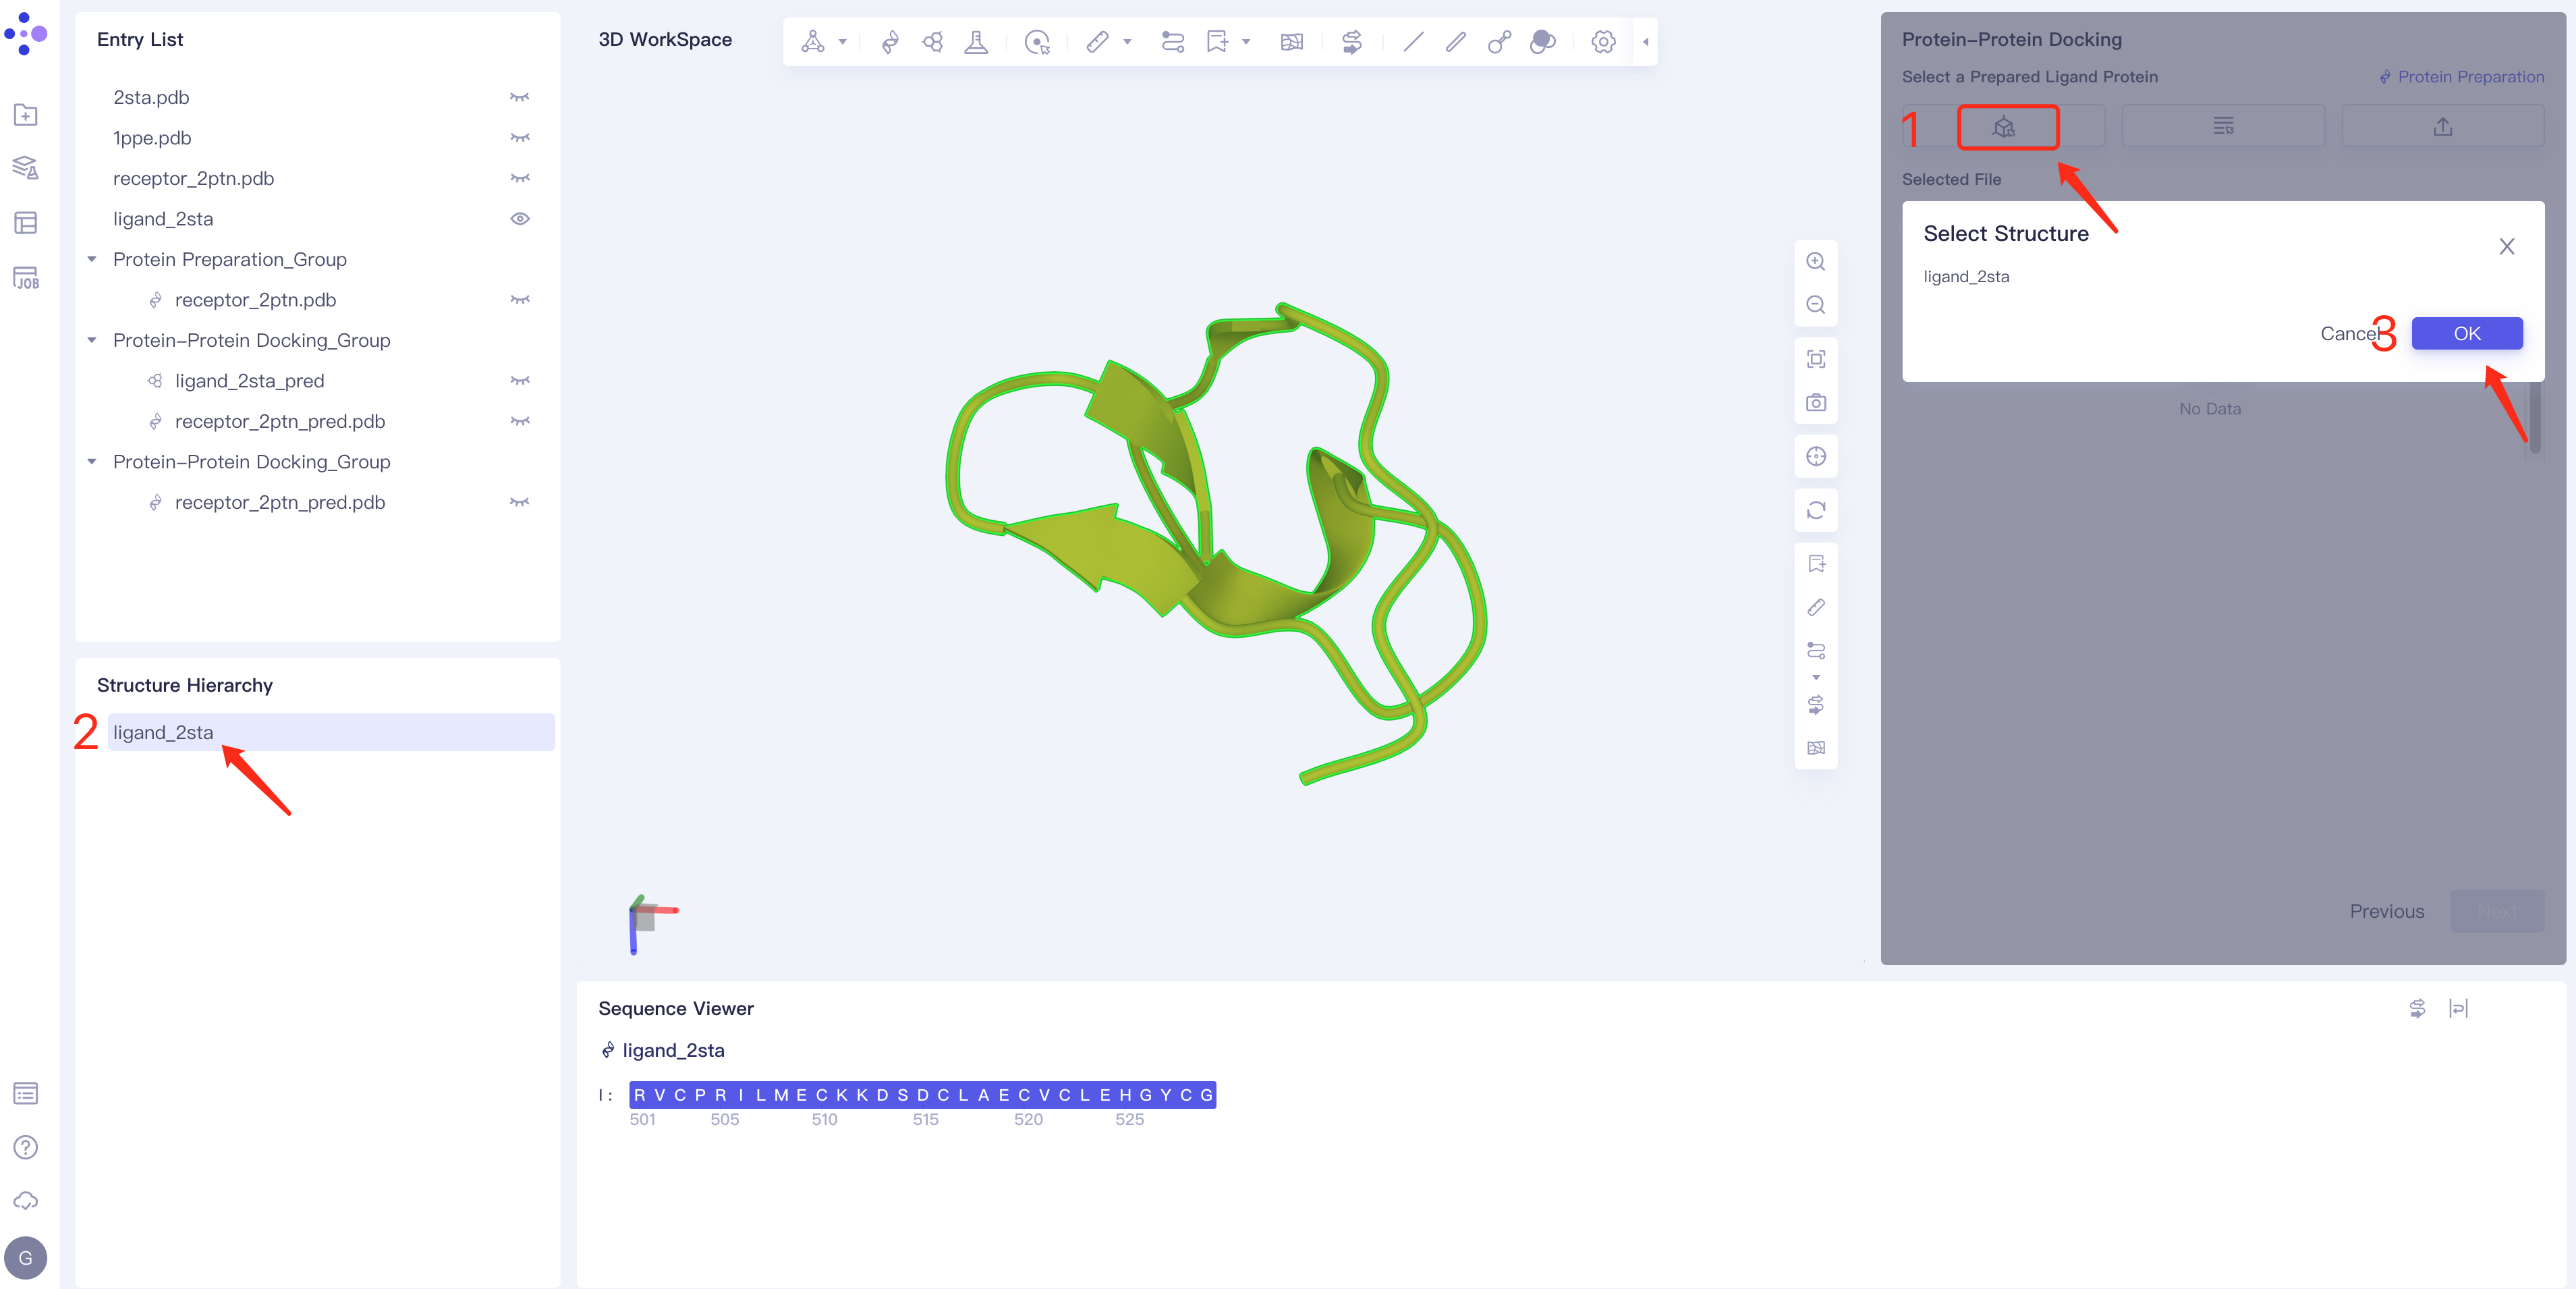
- Method 1 Select from 3D: Click the Select from 3D selection box → Select Ligands box pops up → Select the required ligand structure in the Structure Hierarchy box or 3D workspace on the left side of the interface → Select The name of the selected ligand is displayed in the Structure box. Click OK.
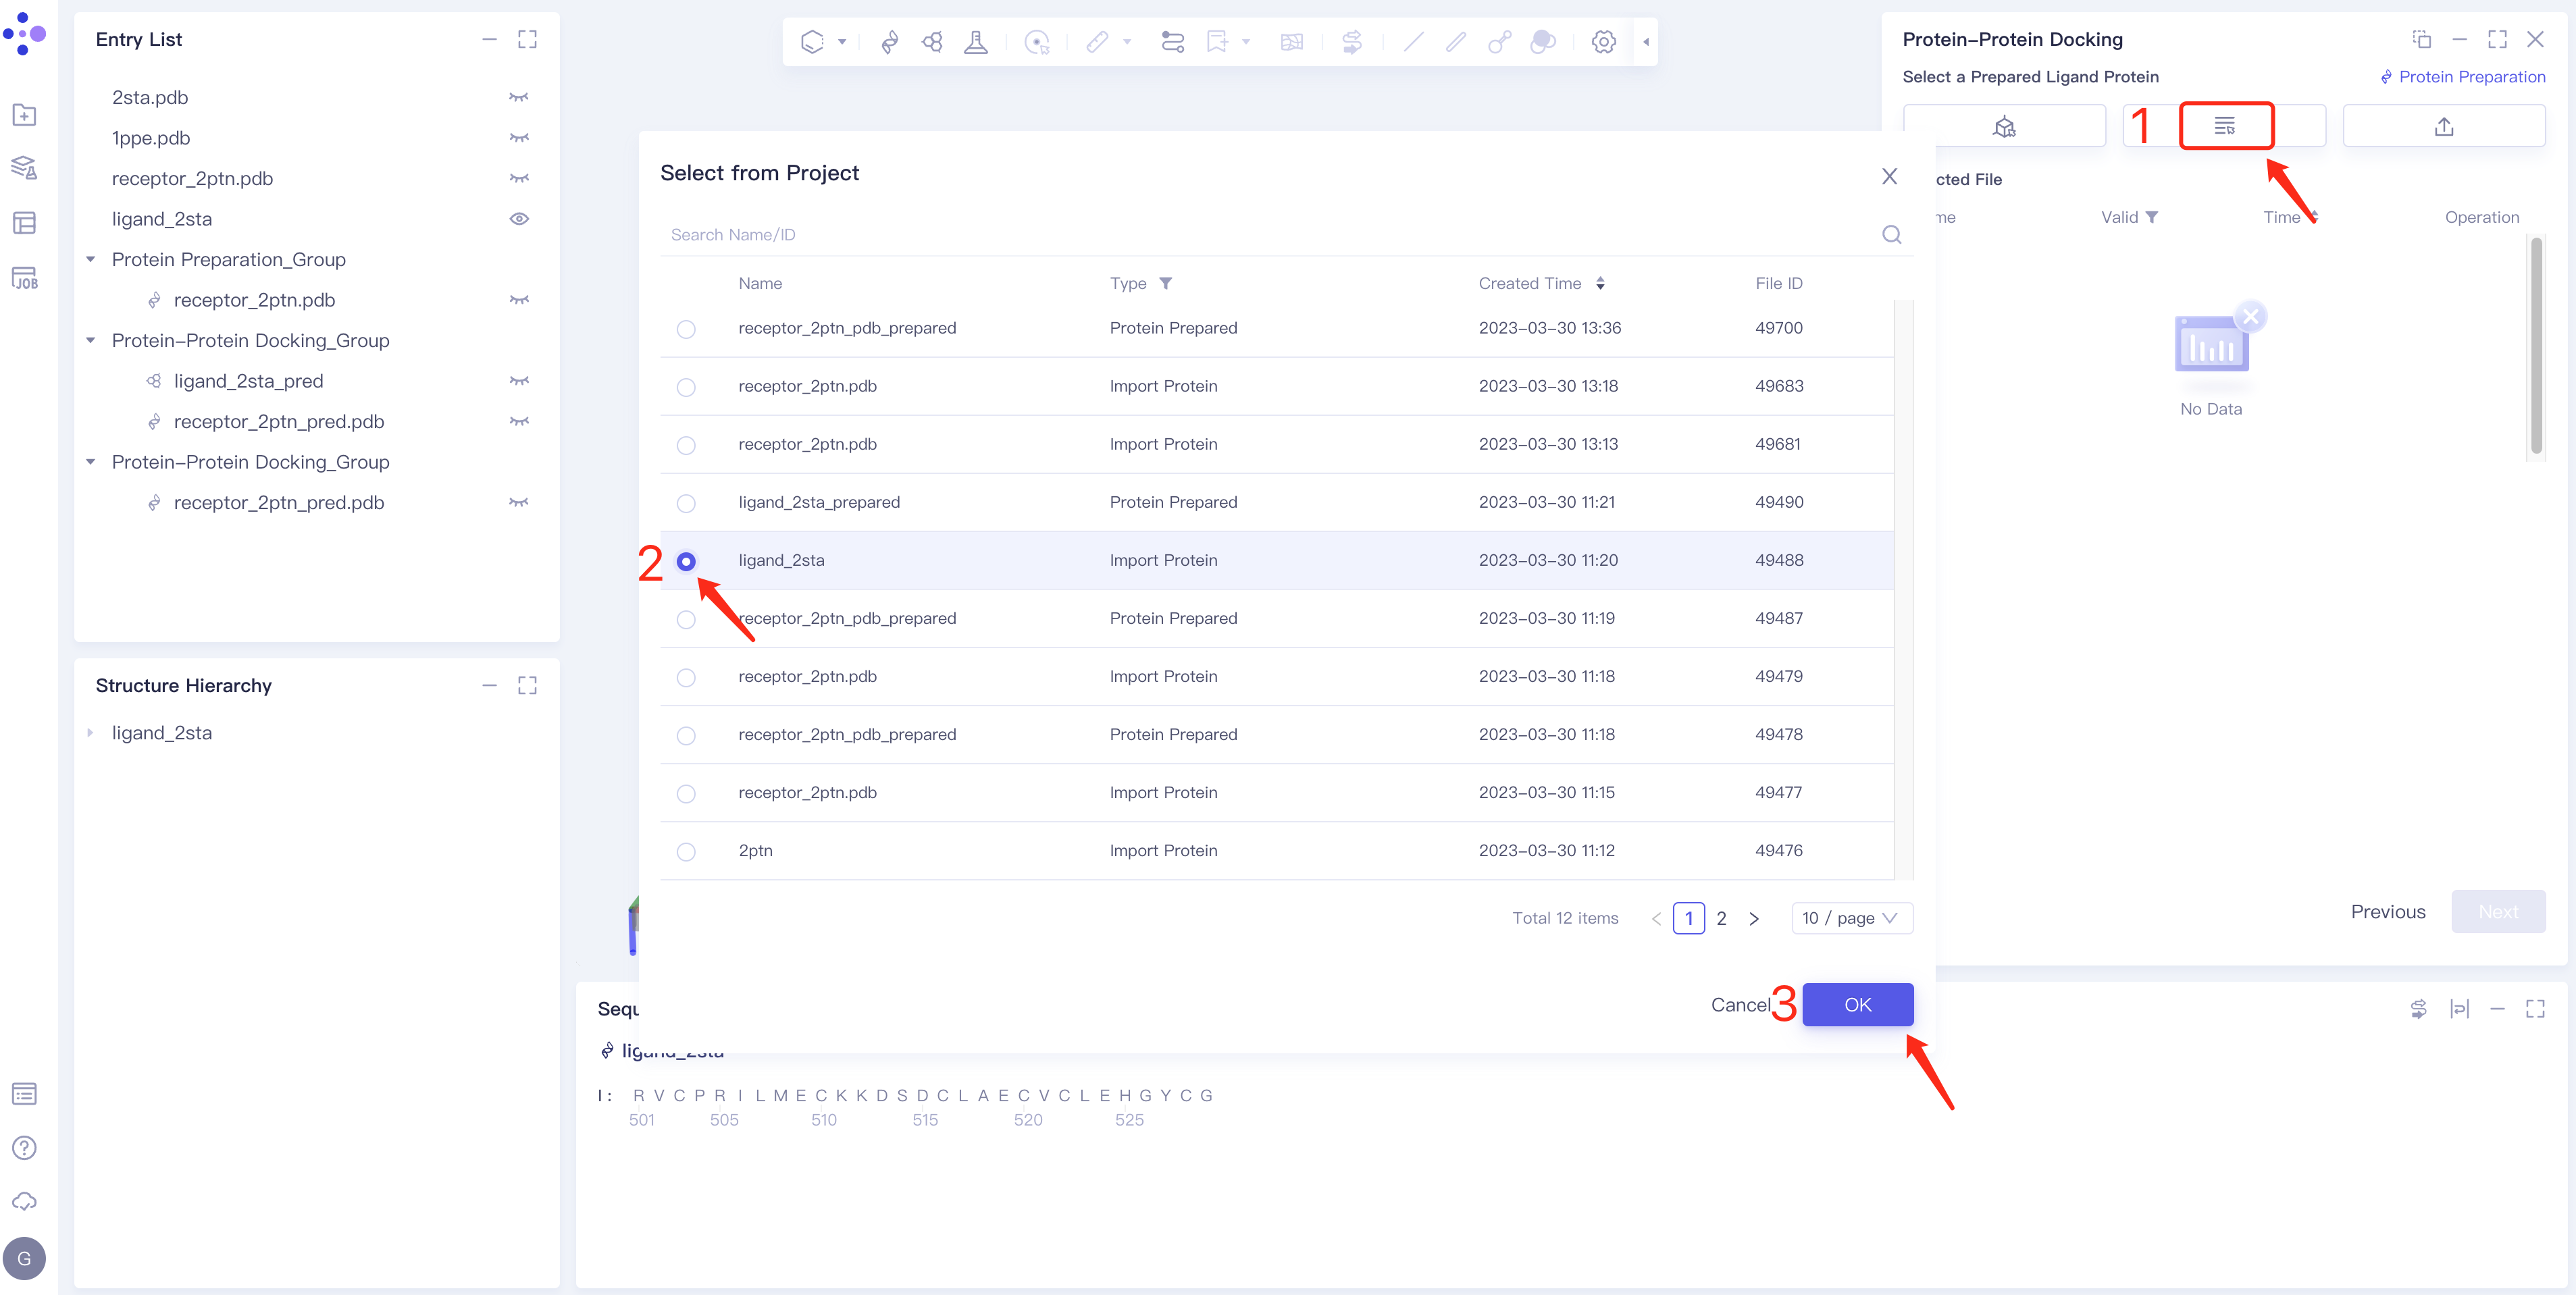
- Method 2 Select from Project: click the Select from Project box → the Select from Project box pops up in the middle of the interface → select the required ligand structure → click OK.
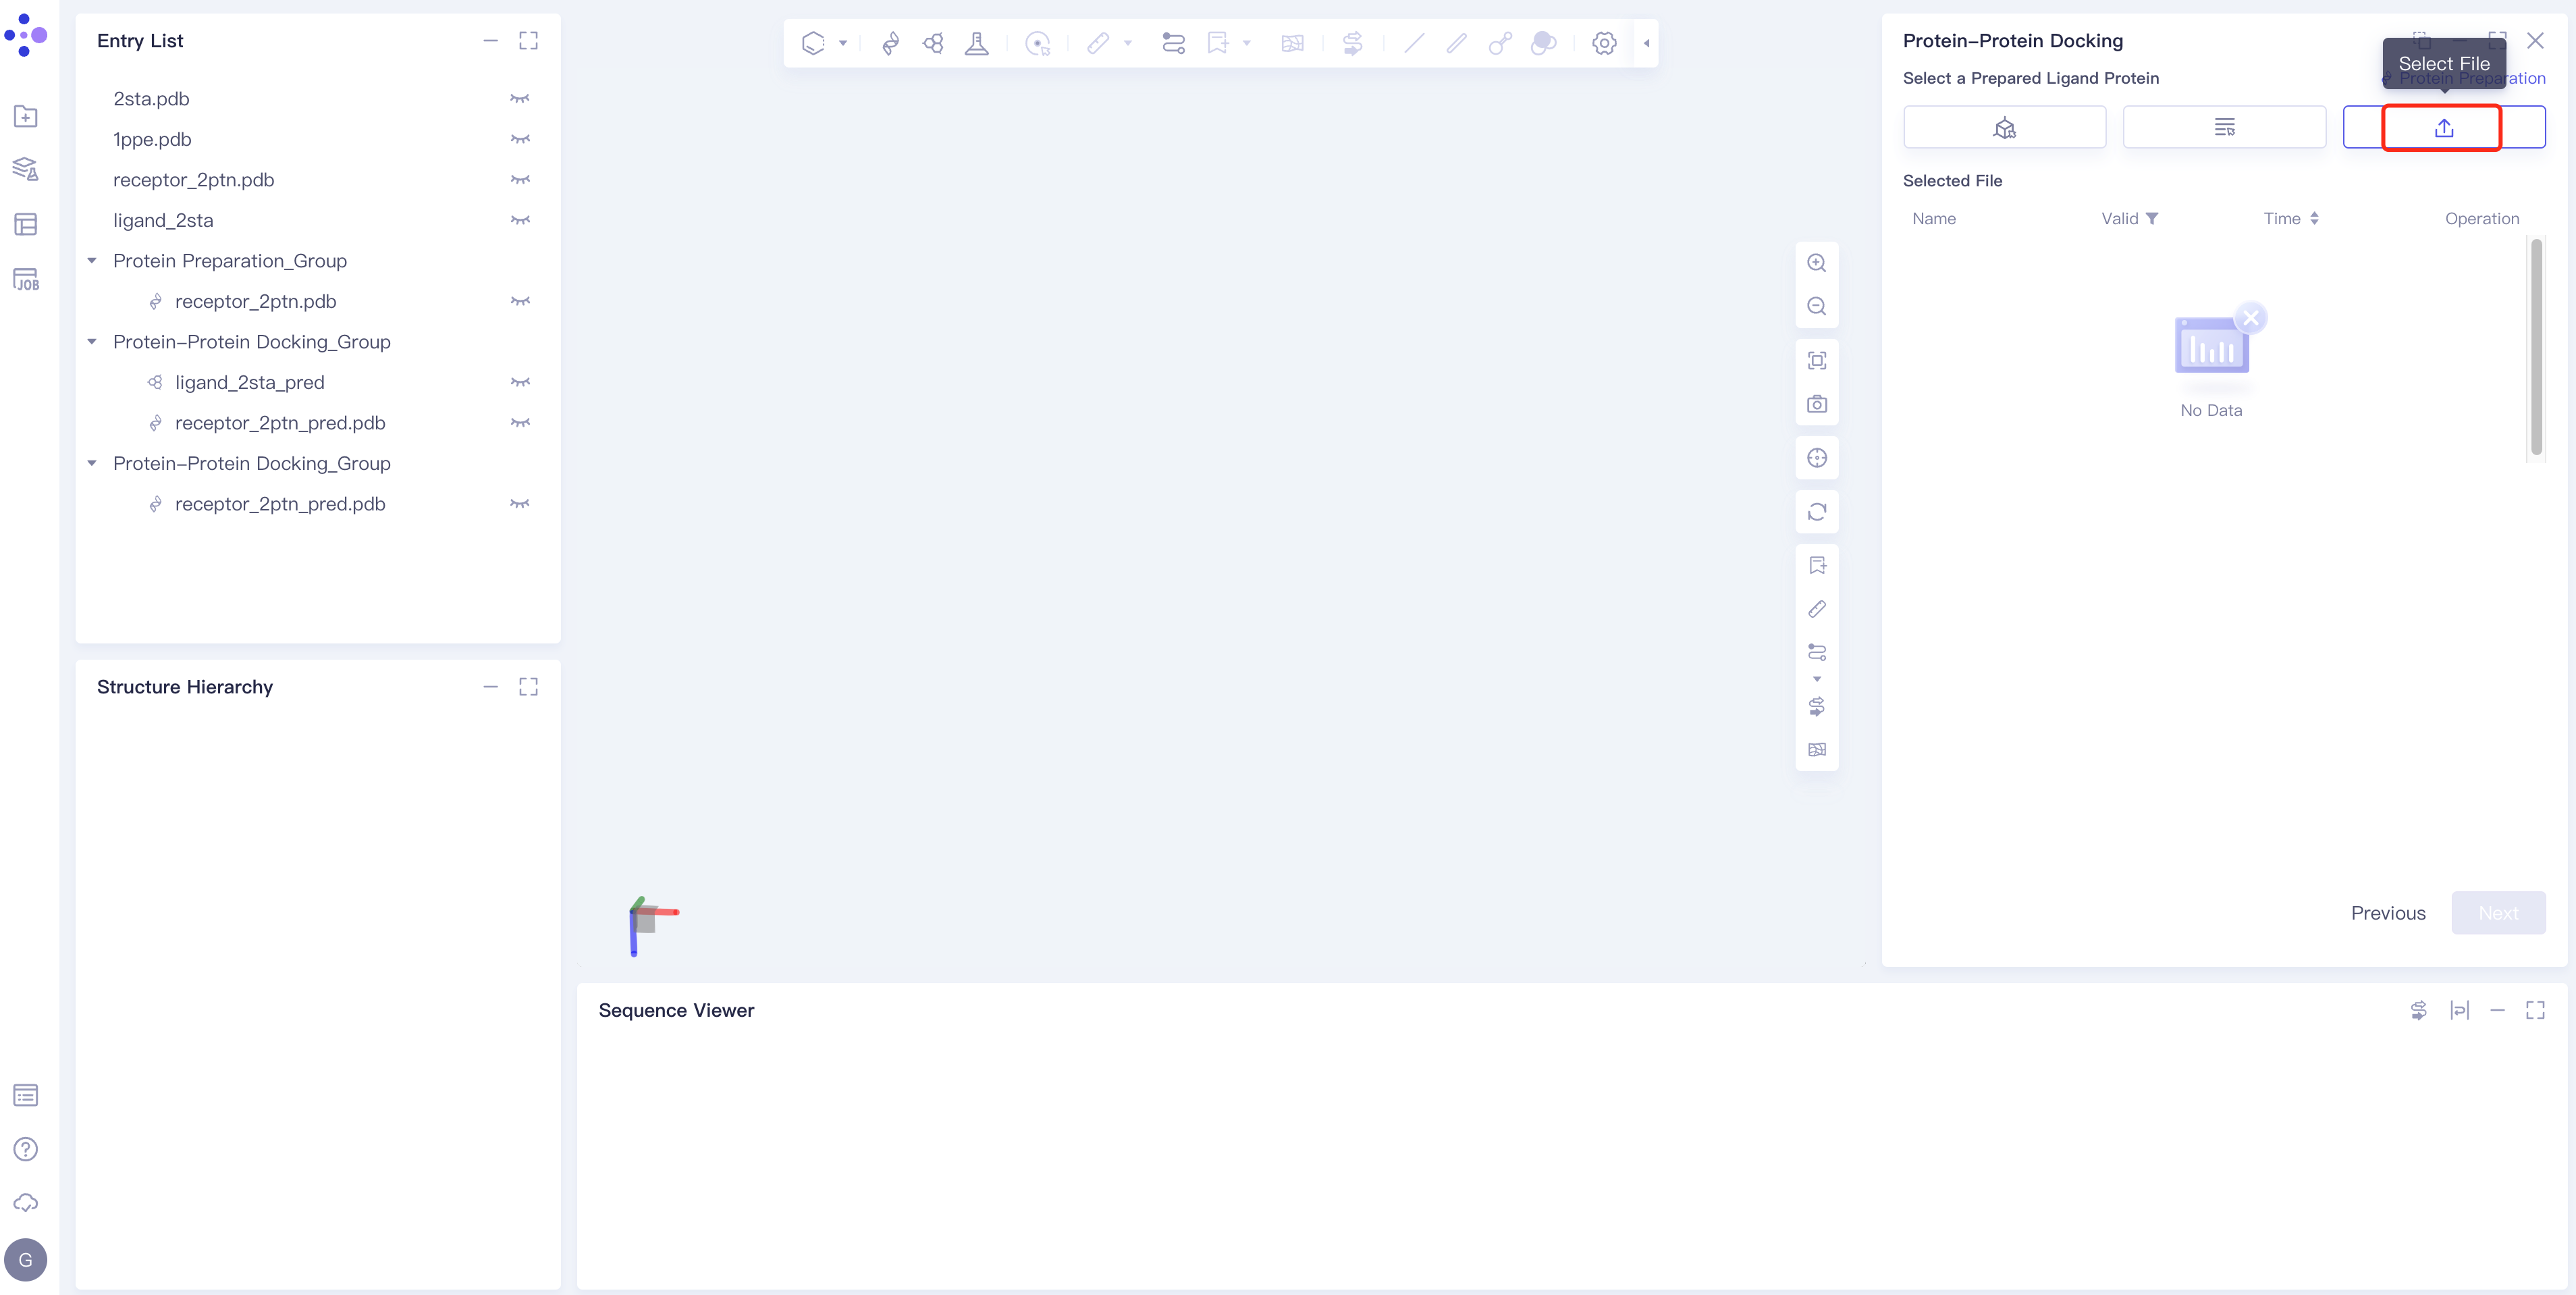
- Method 3 Select File: Select the required ligand file (mol and SDF file formats are supported) from the local folder and upload it.
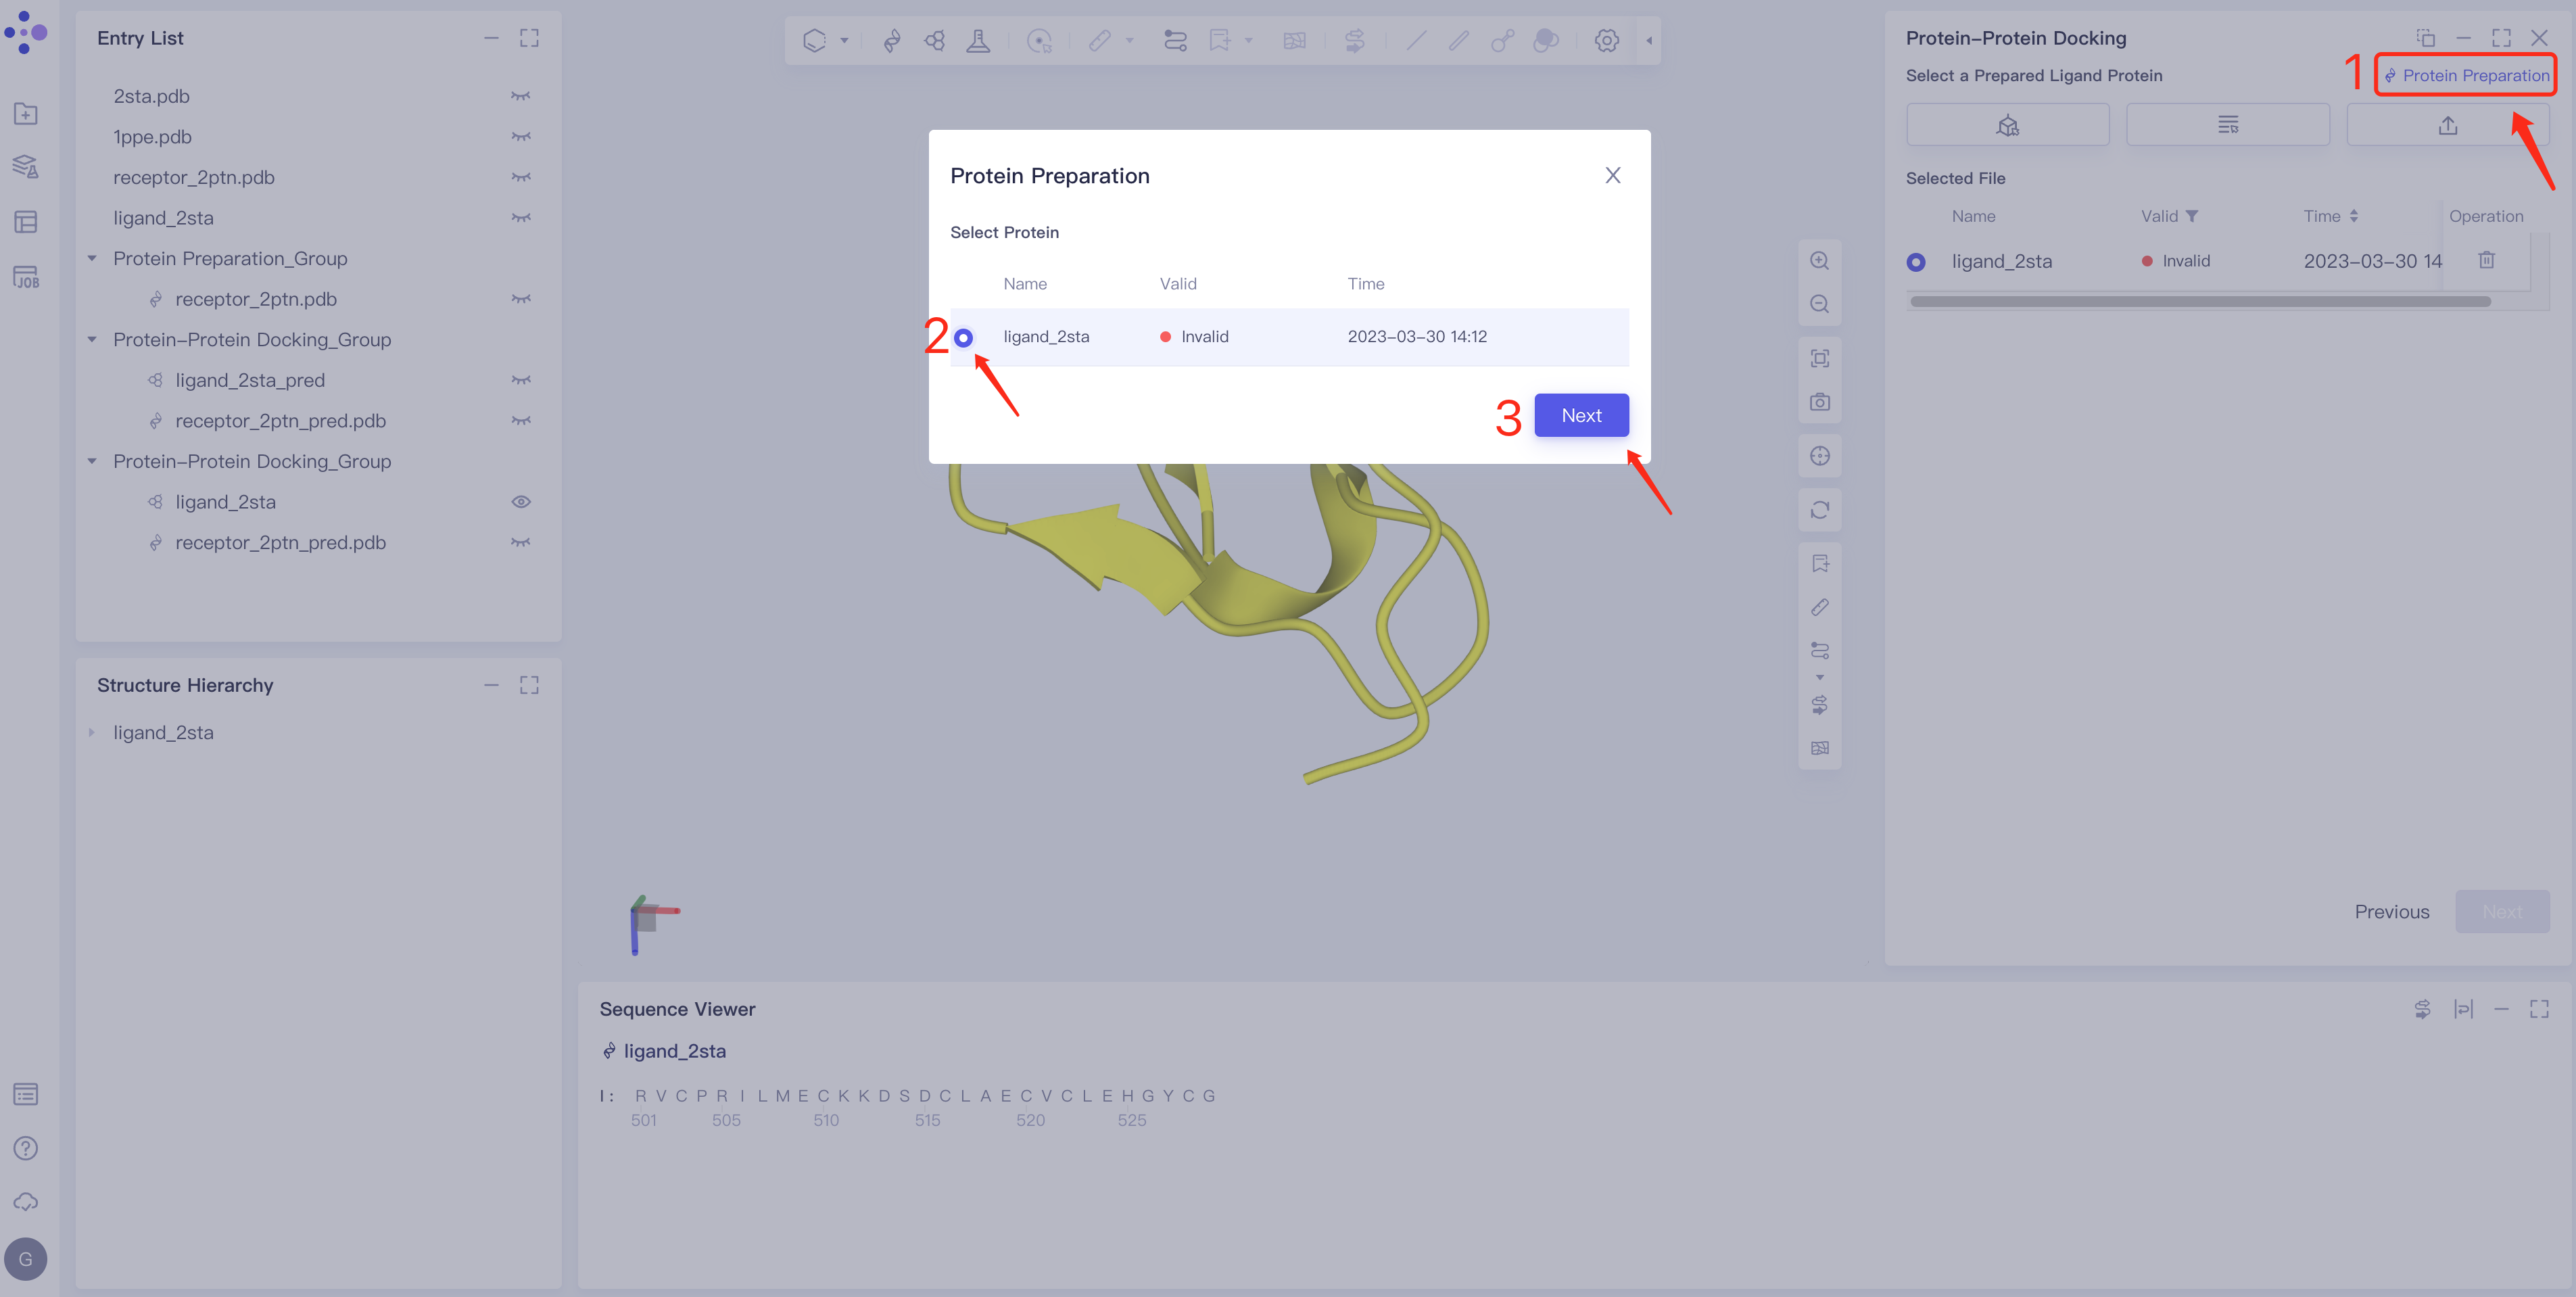
Ligand structure treatment
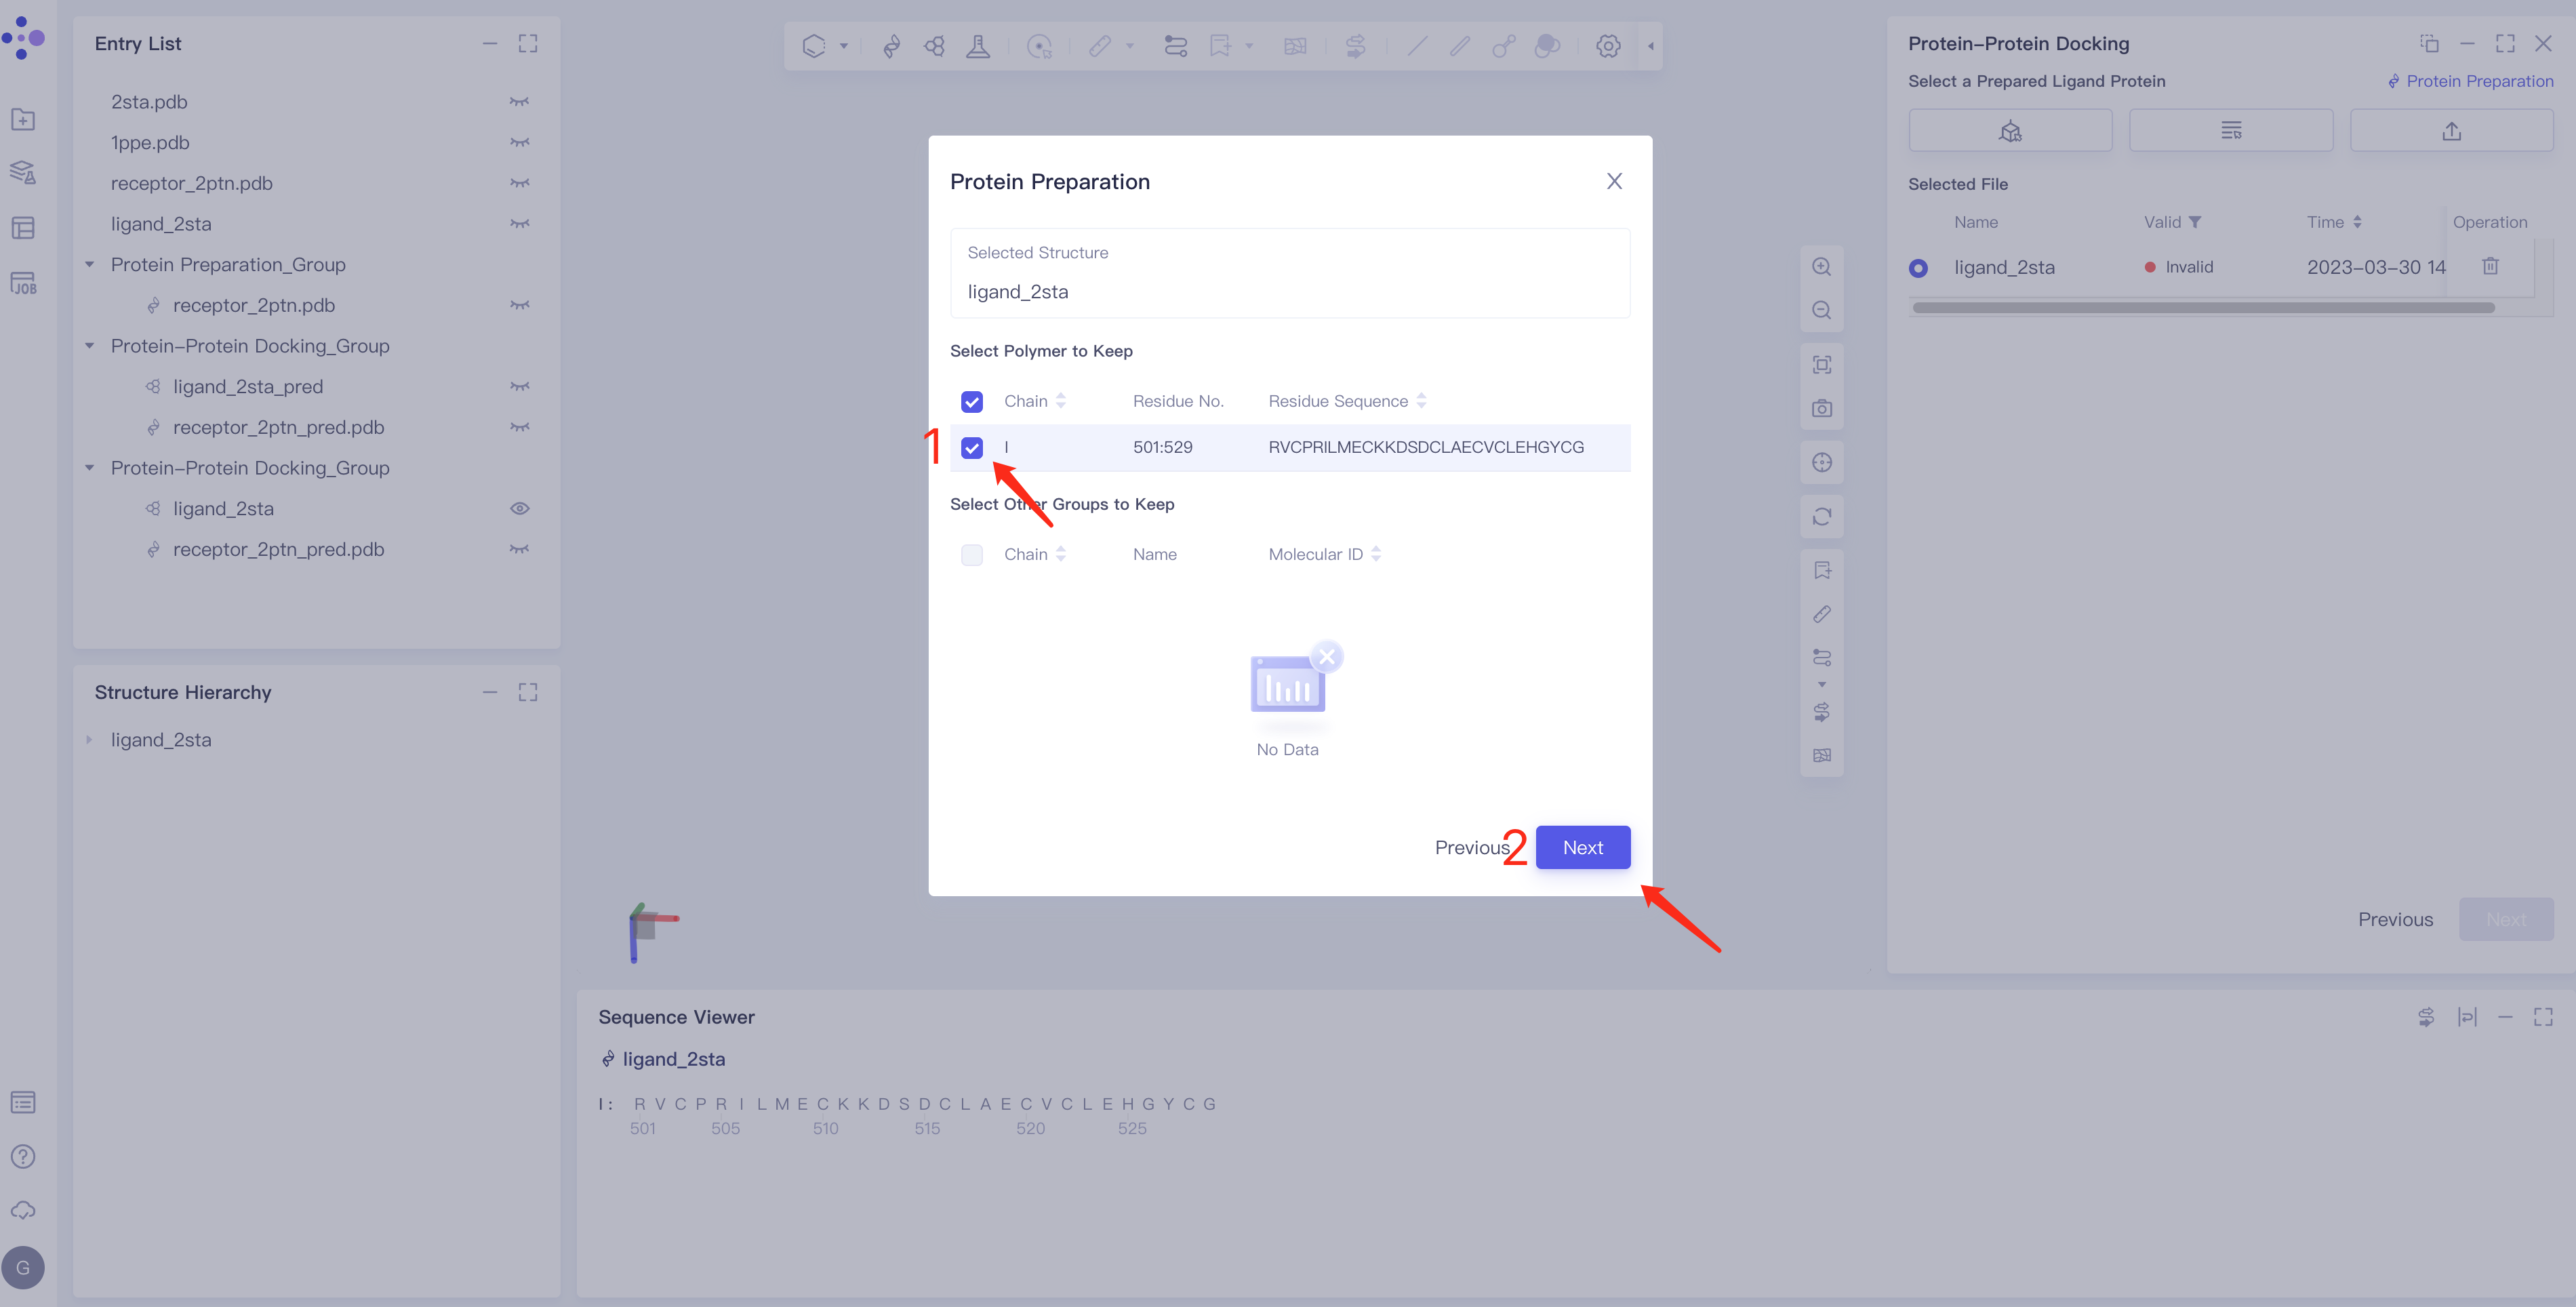
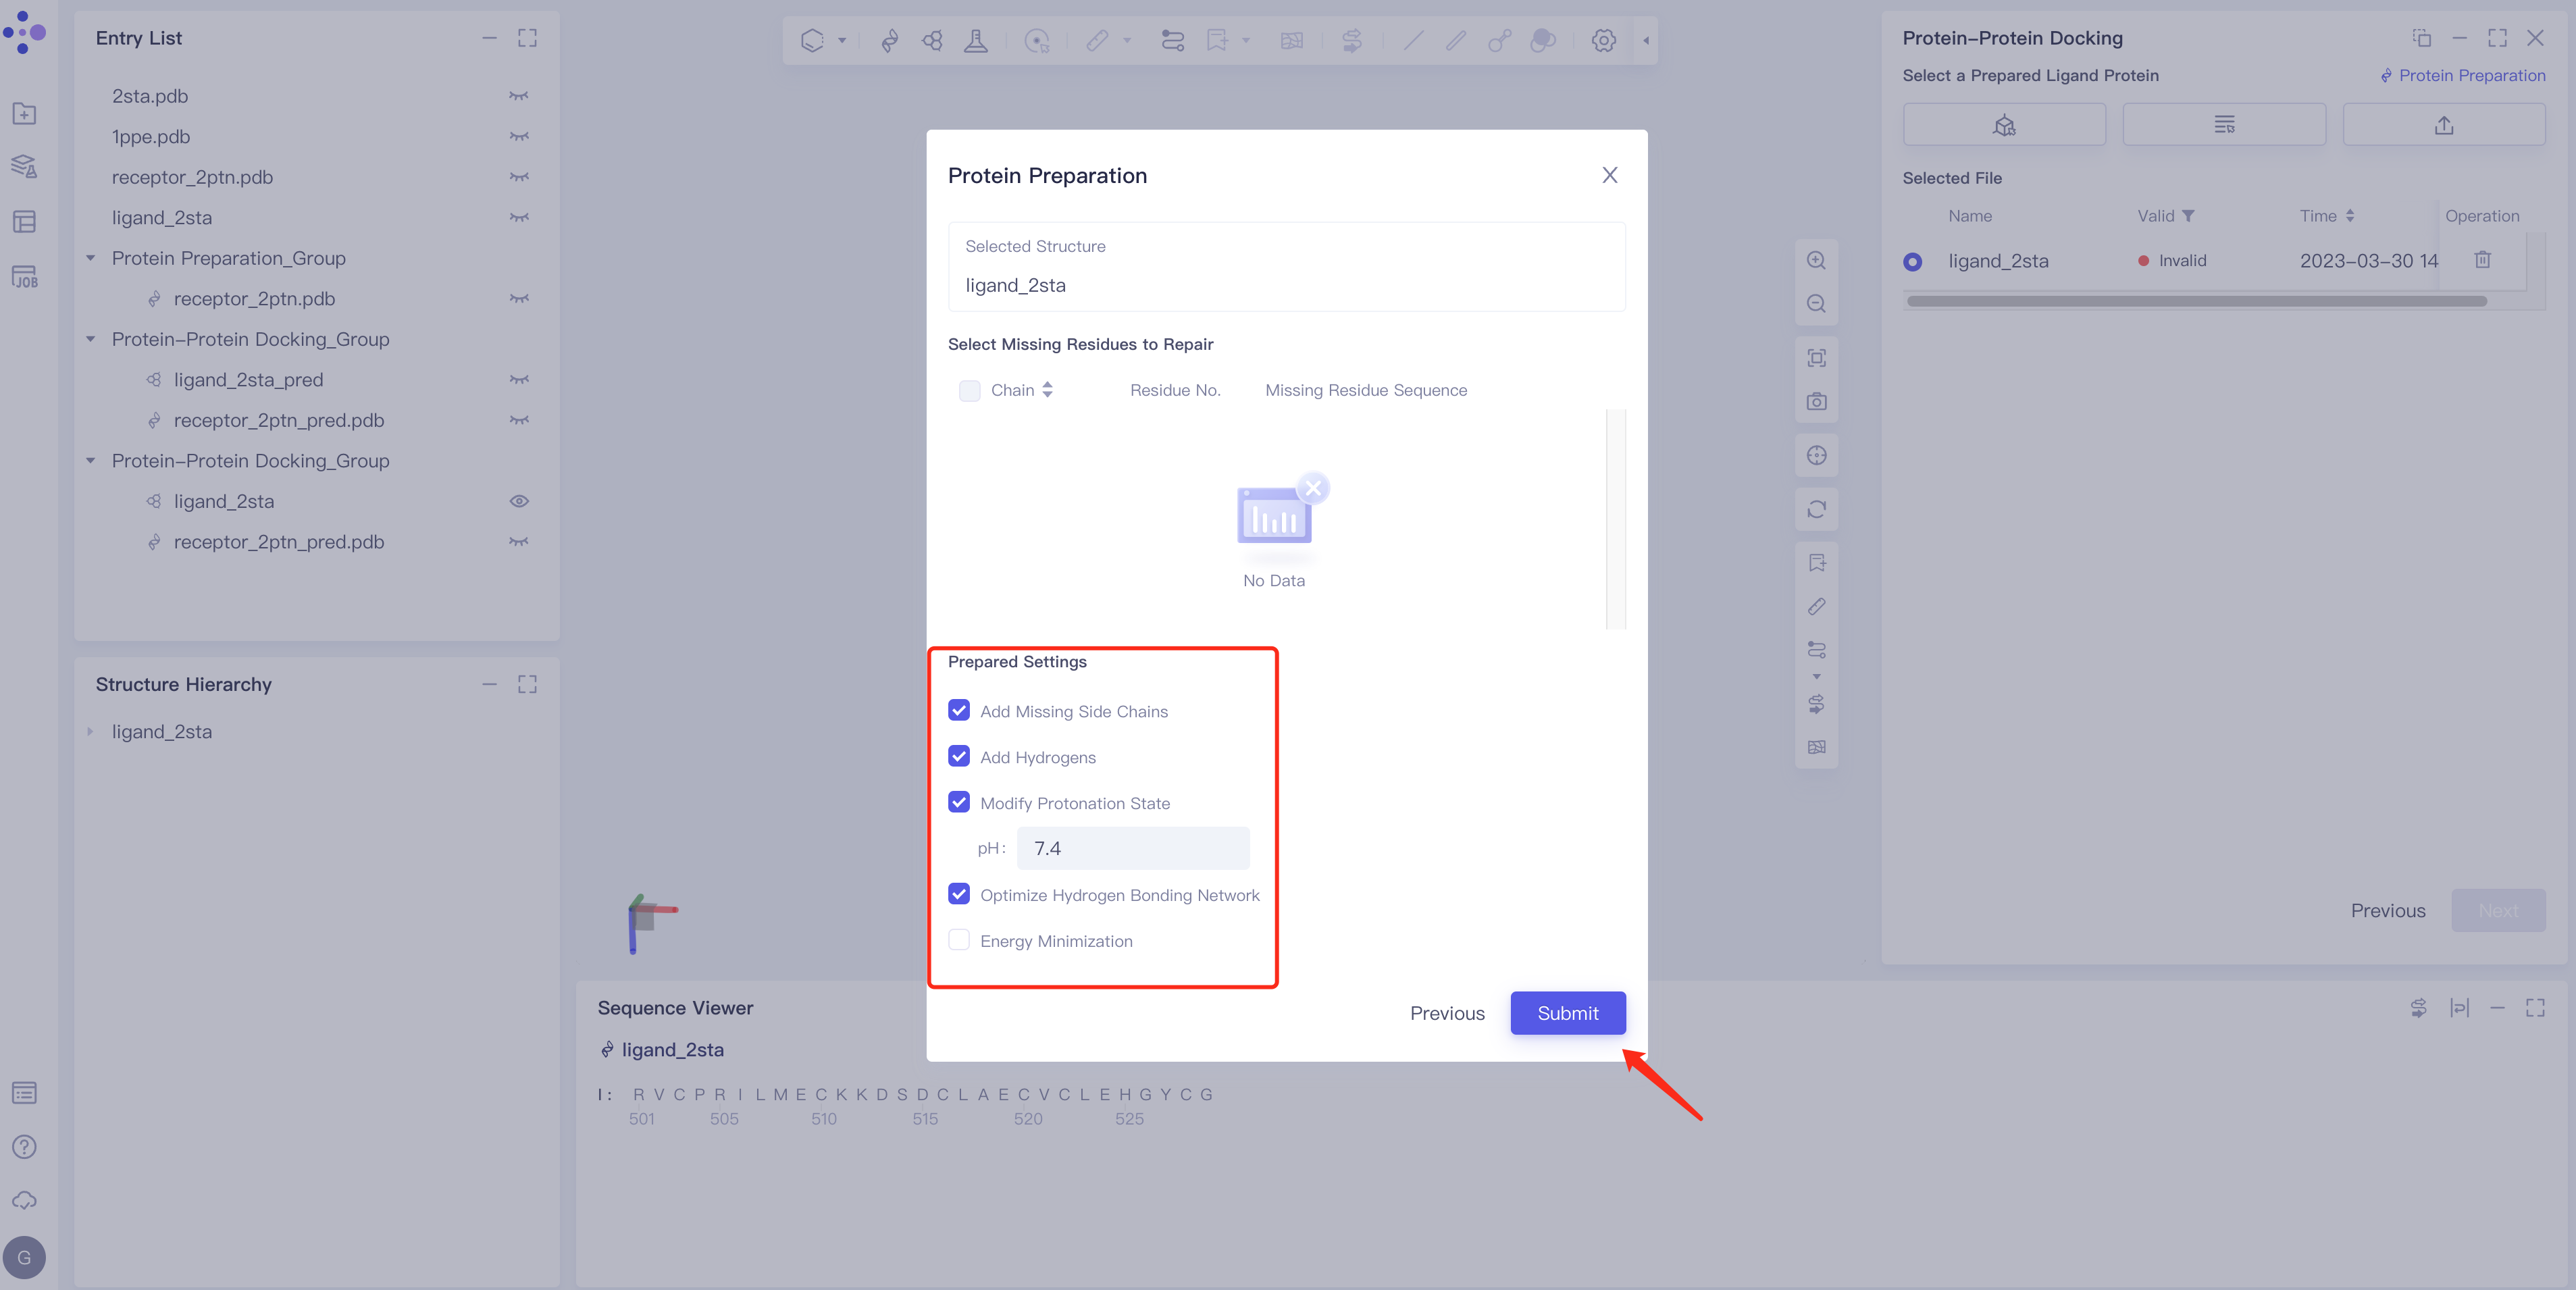
- Click Protein Preparation → the Protein Preparation box pops up in the middle of the interface → select the receptor structure to be processed → click Next.
- Parameter setting: Select the ingredient to be reserved, click Next → Submit according to the default parameters, and then submit the task.
 |  |
Binding site settings (optional, i.e., not required)
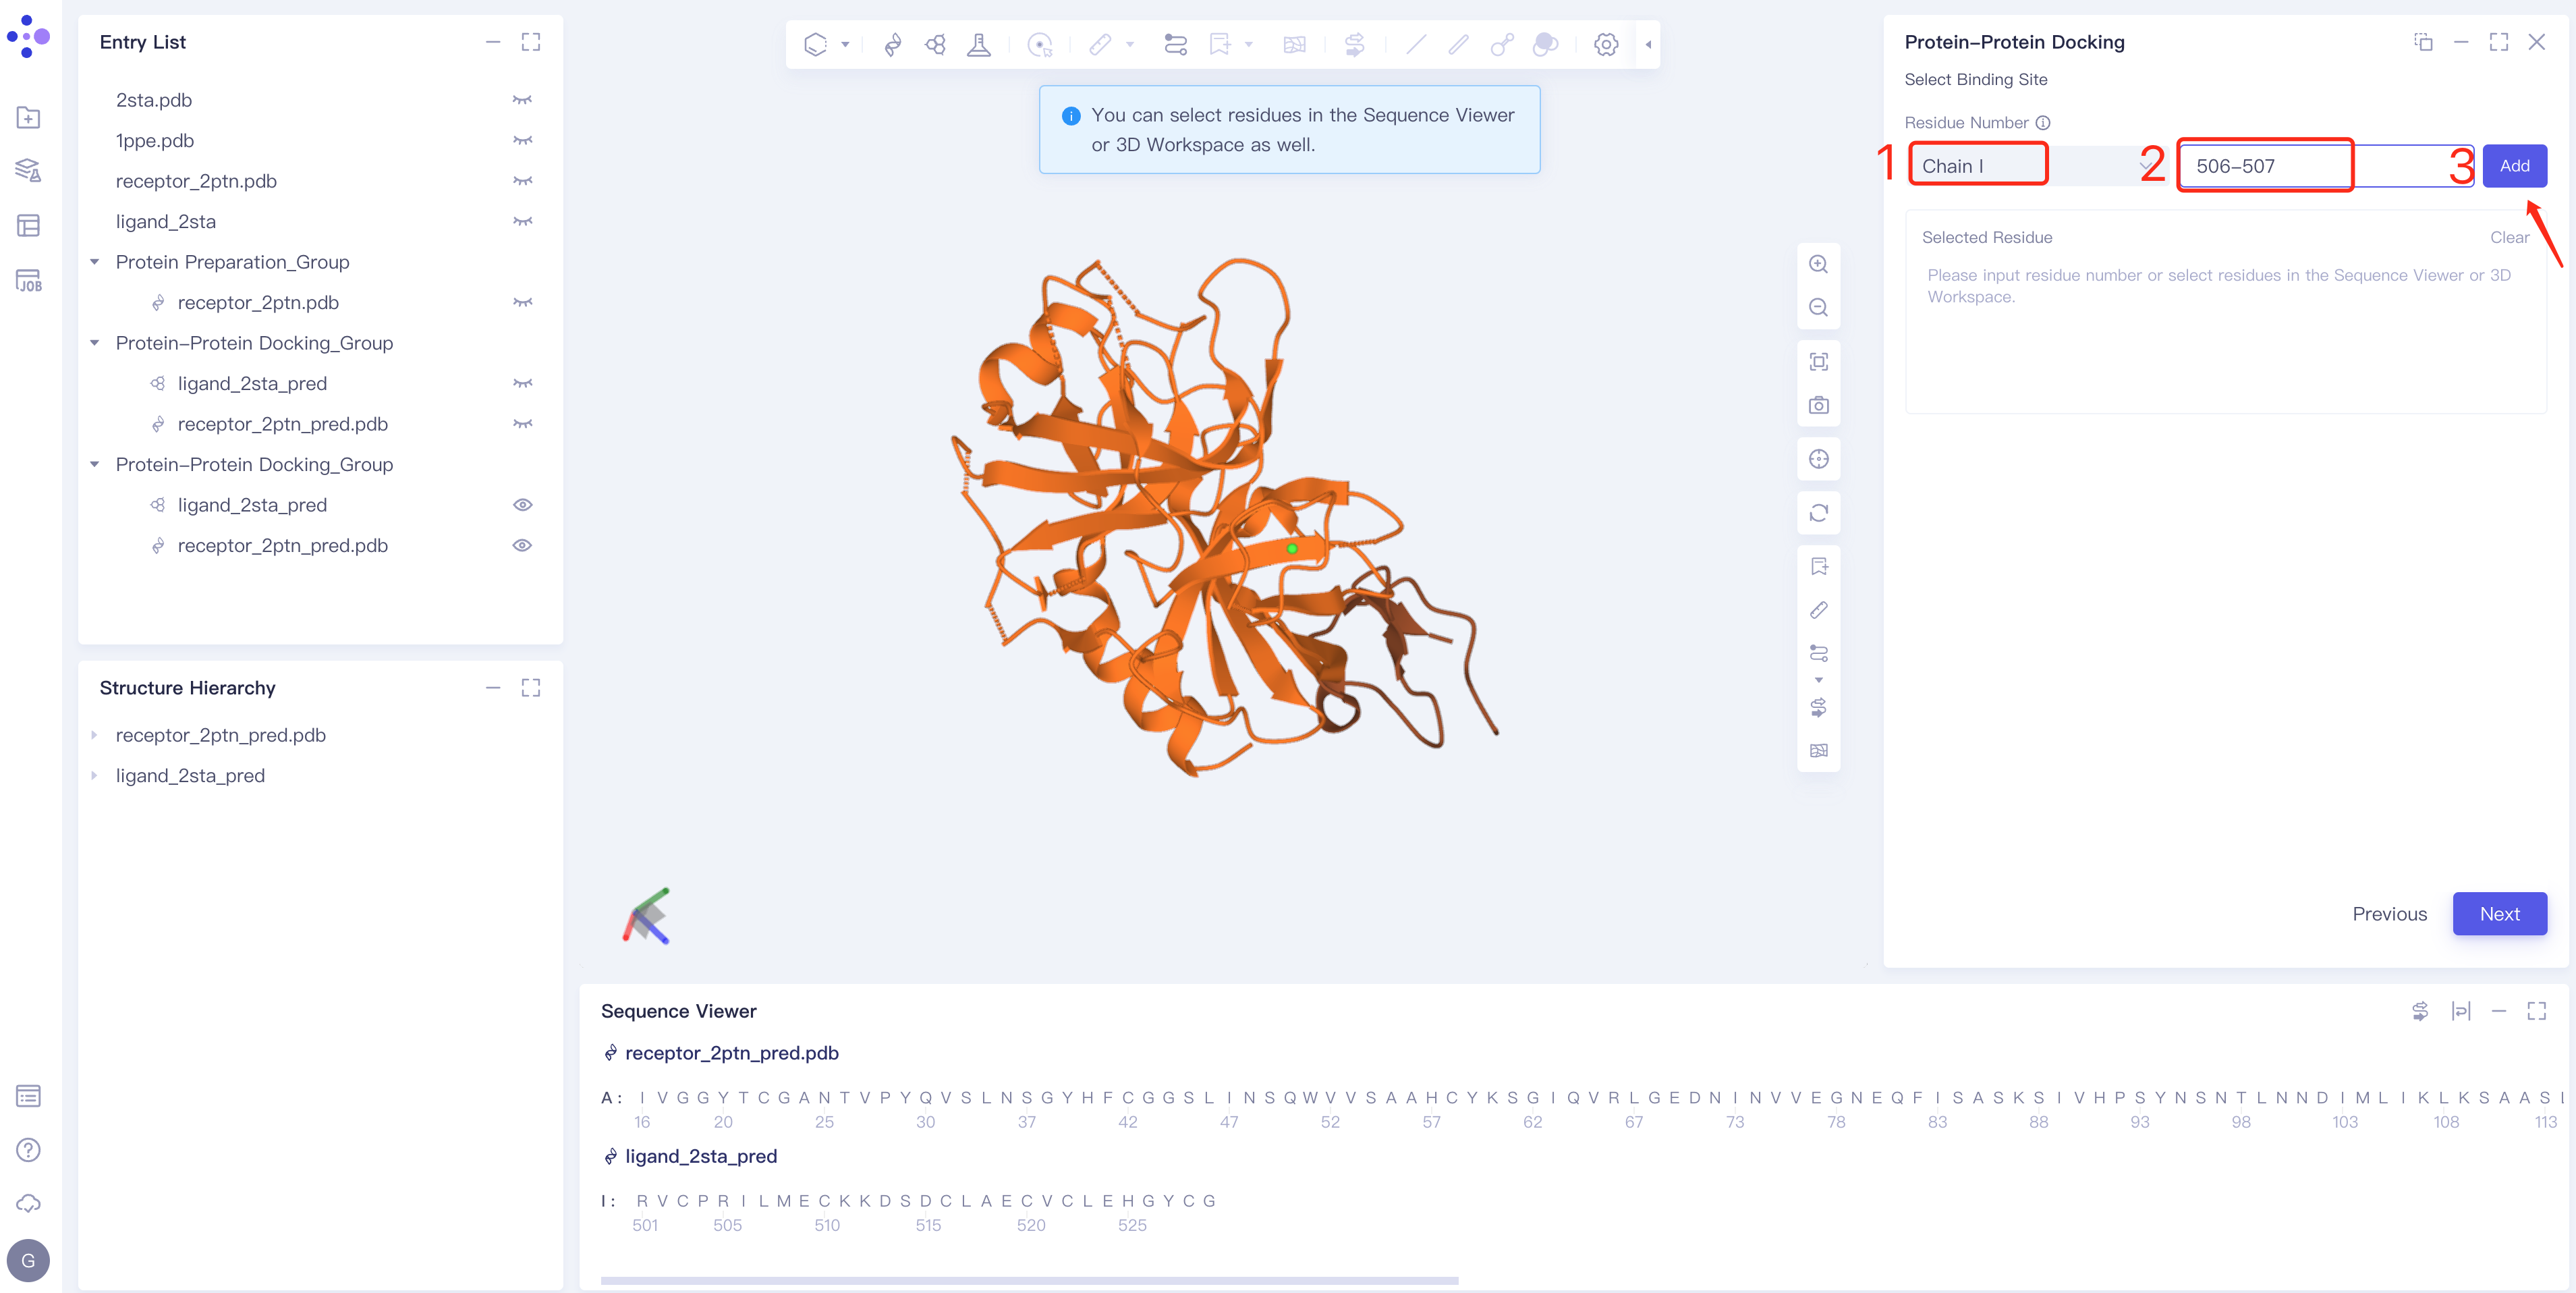
- There are two ways to set the binding site (Note: currently only ligand-based setting is supported)
- Method 1 Select the ligand chain → Enter the amino acid number → Click Add
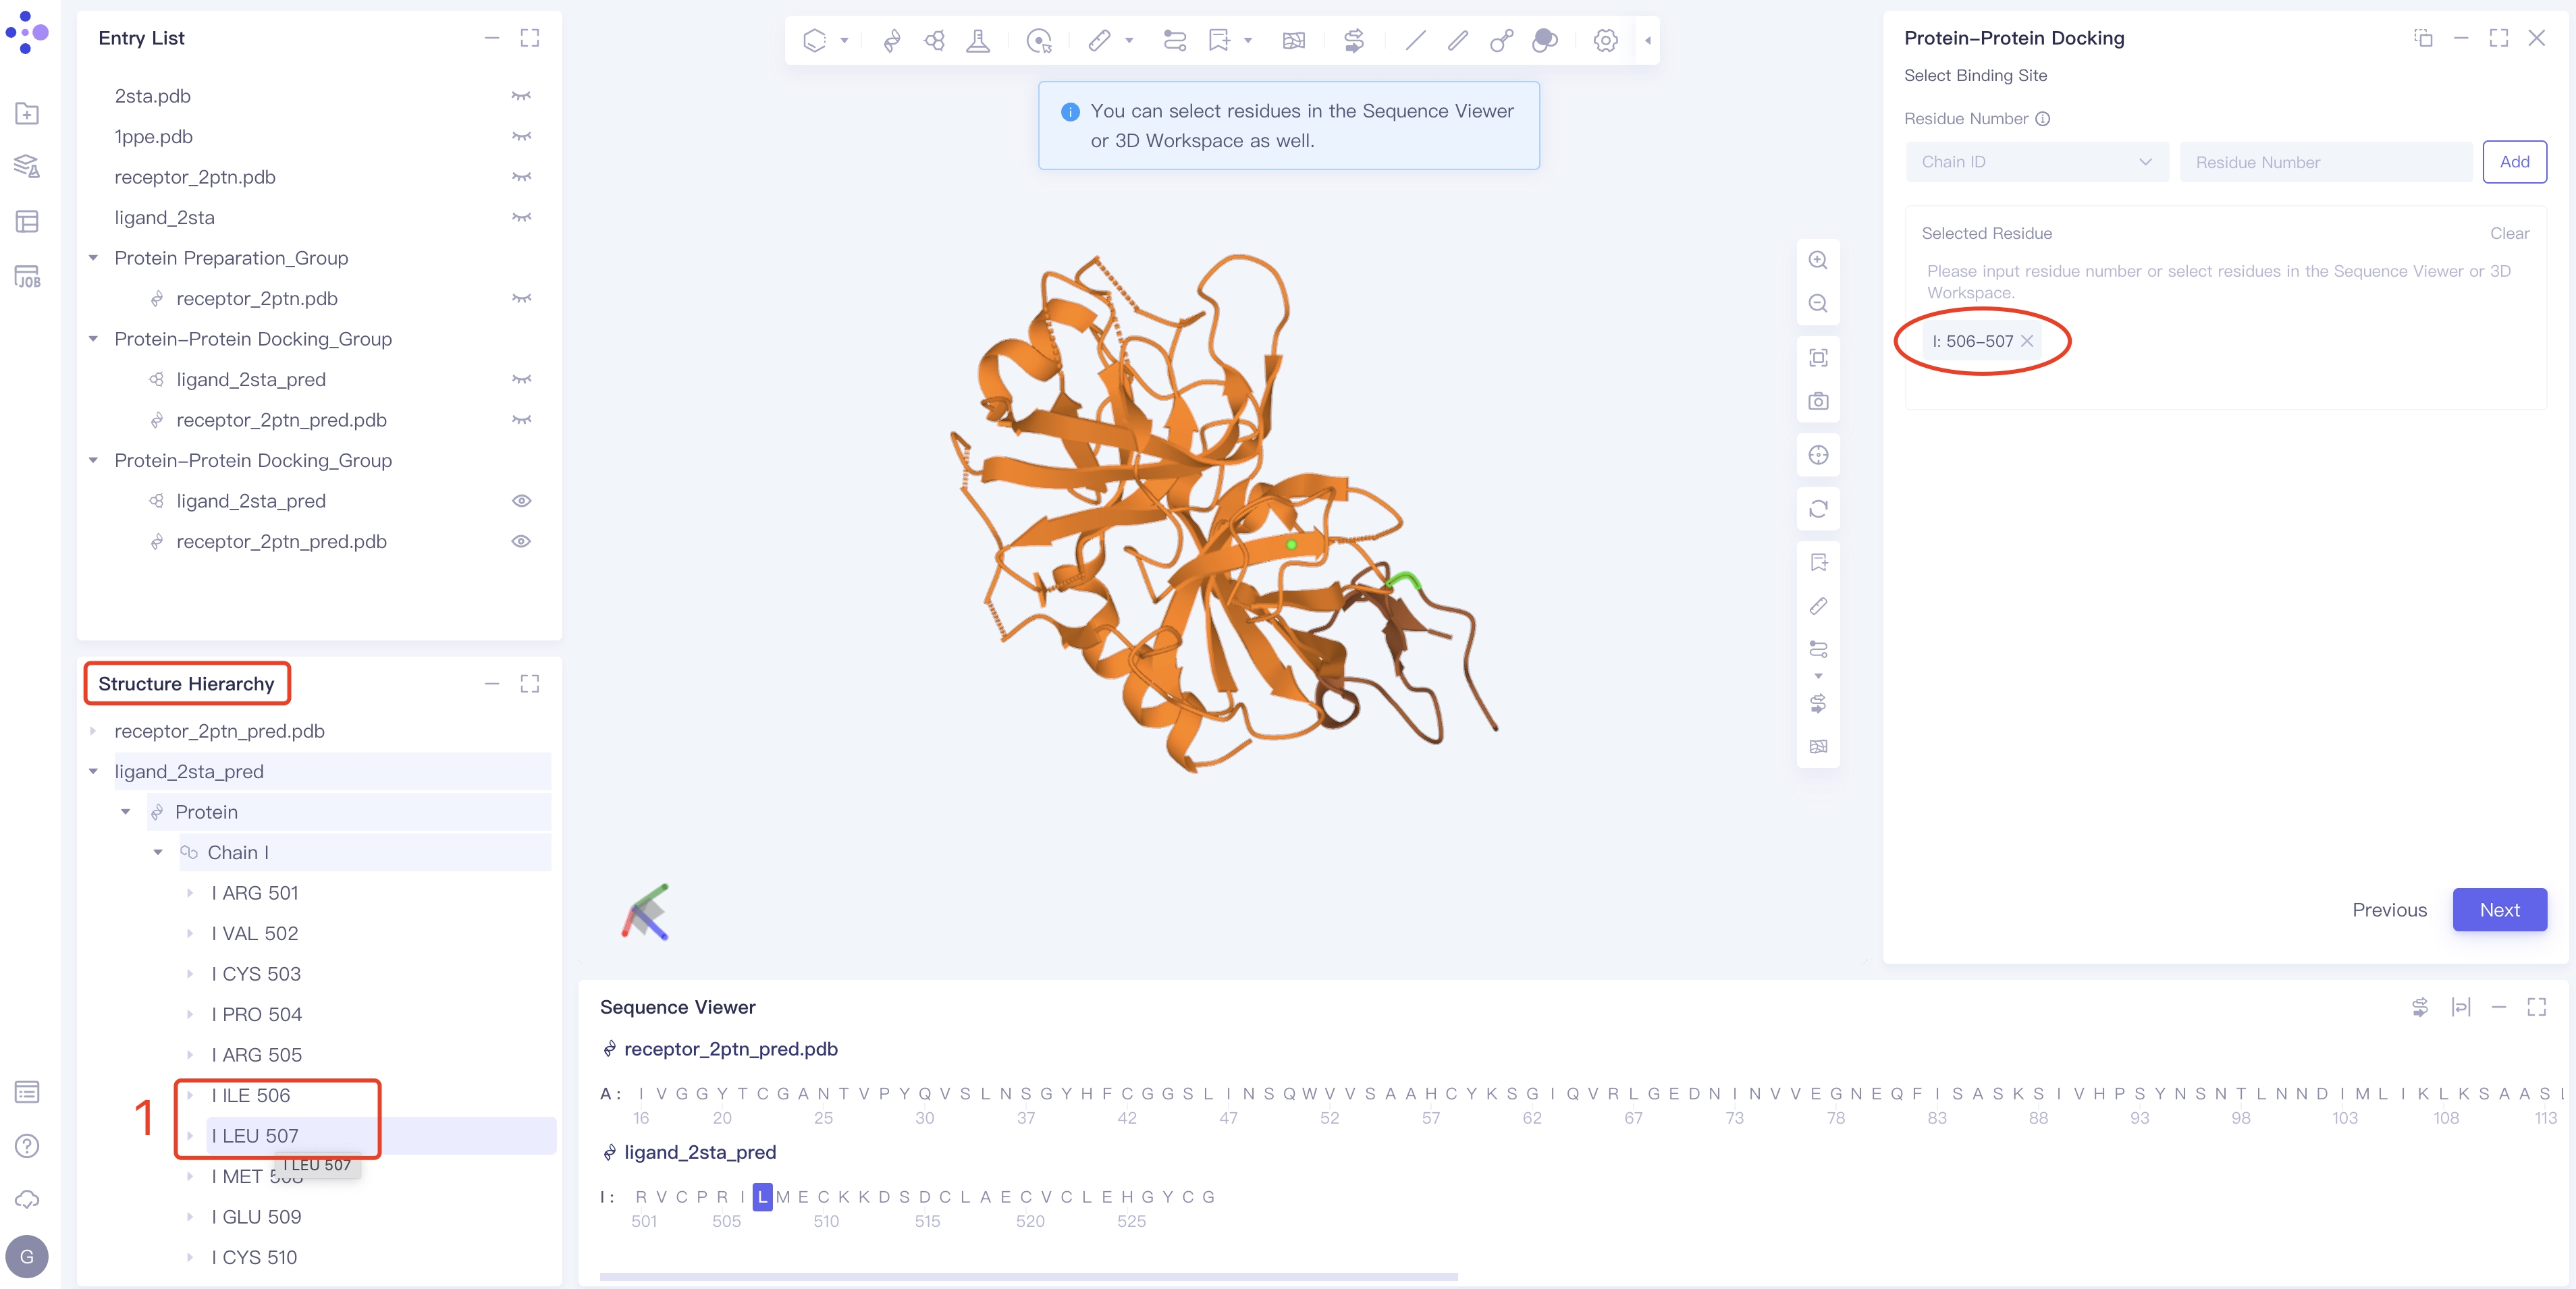
- Method 2 Select the key amino acids on the ligand in Structure Hierarchy, Sequence Viewer or 3D Workspace: for example, select 506 and 507, I: 506-507 → click Next will appear directly in the Selected Residue box on the right.
2.2.3.2 The ligand is an antibody
Input of Ligand Structure
- There are three input methods:
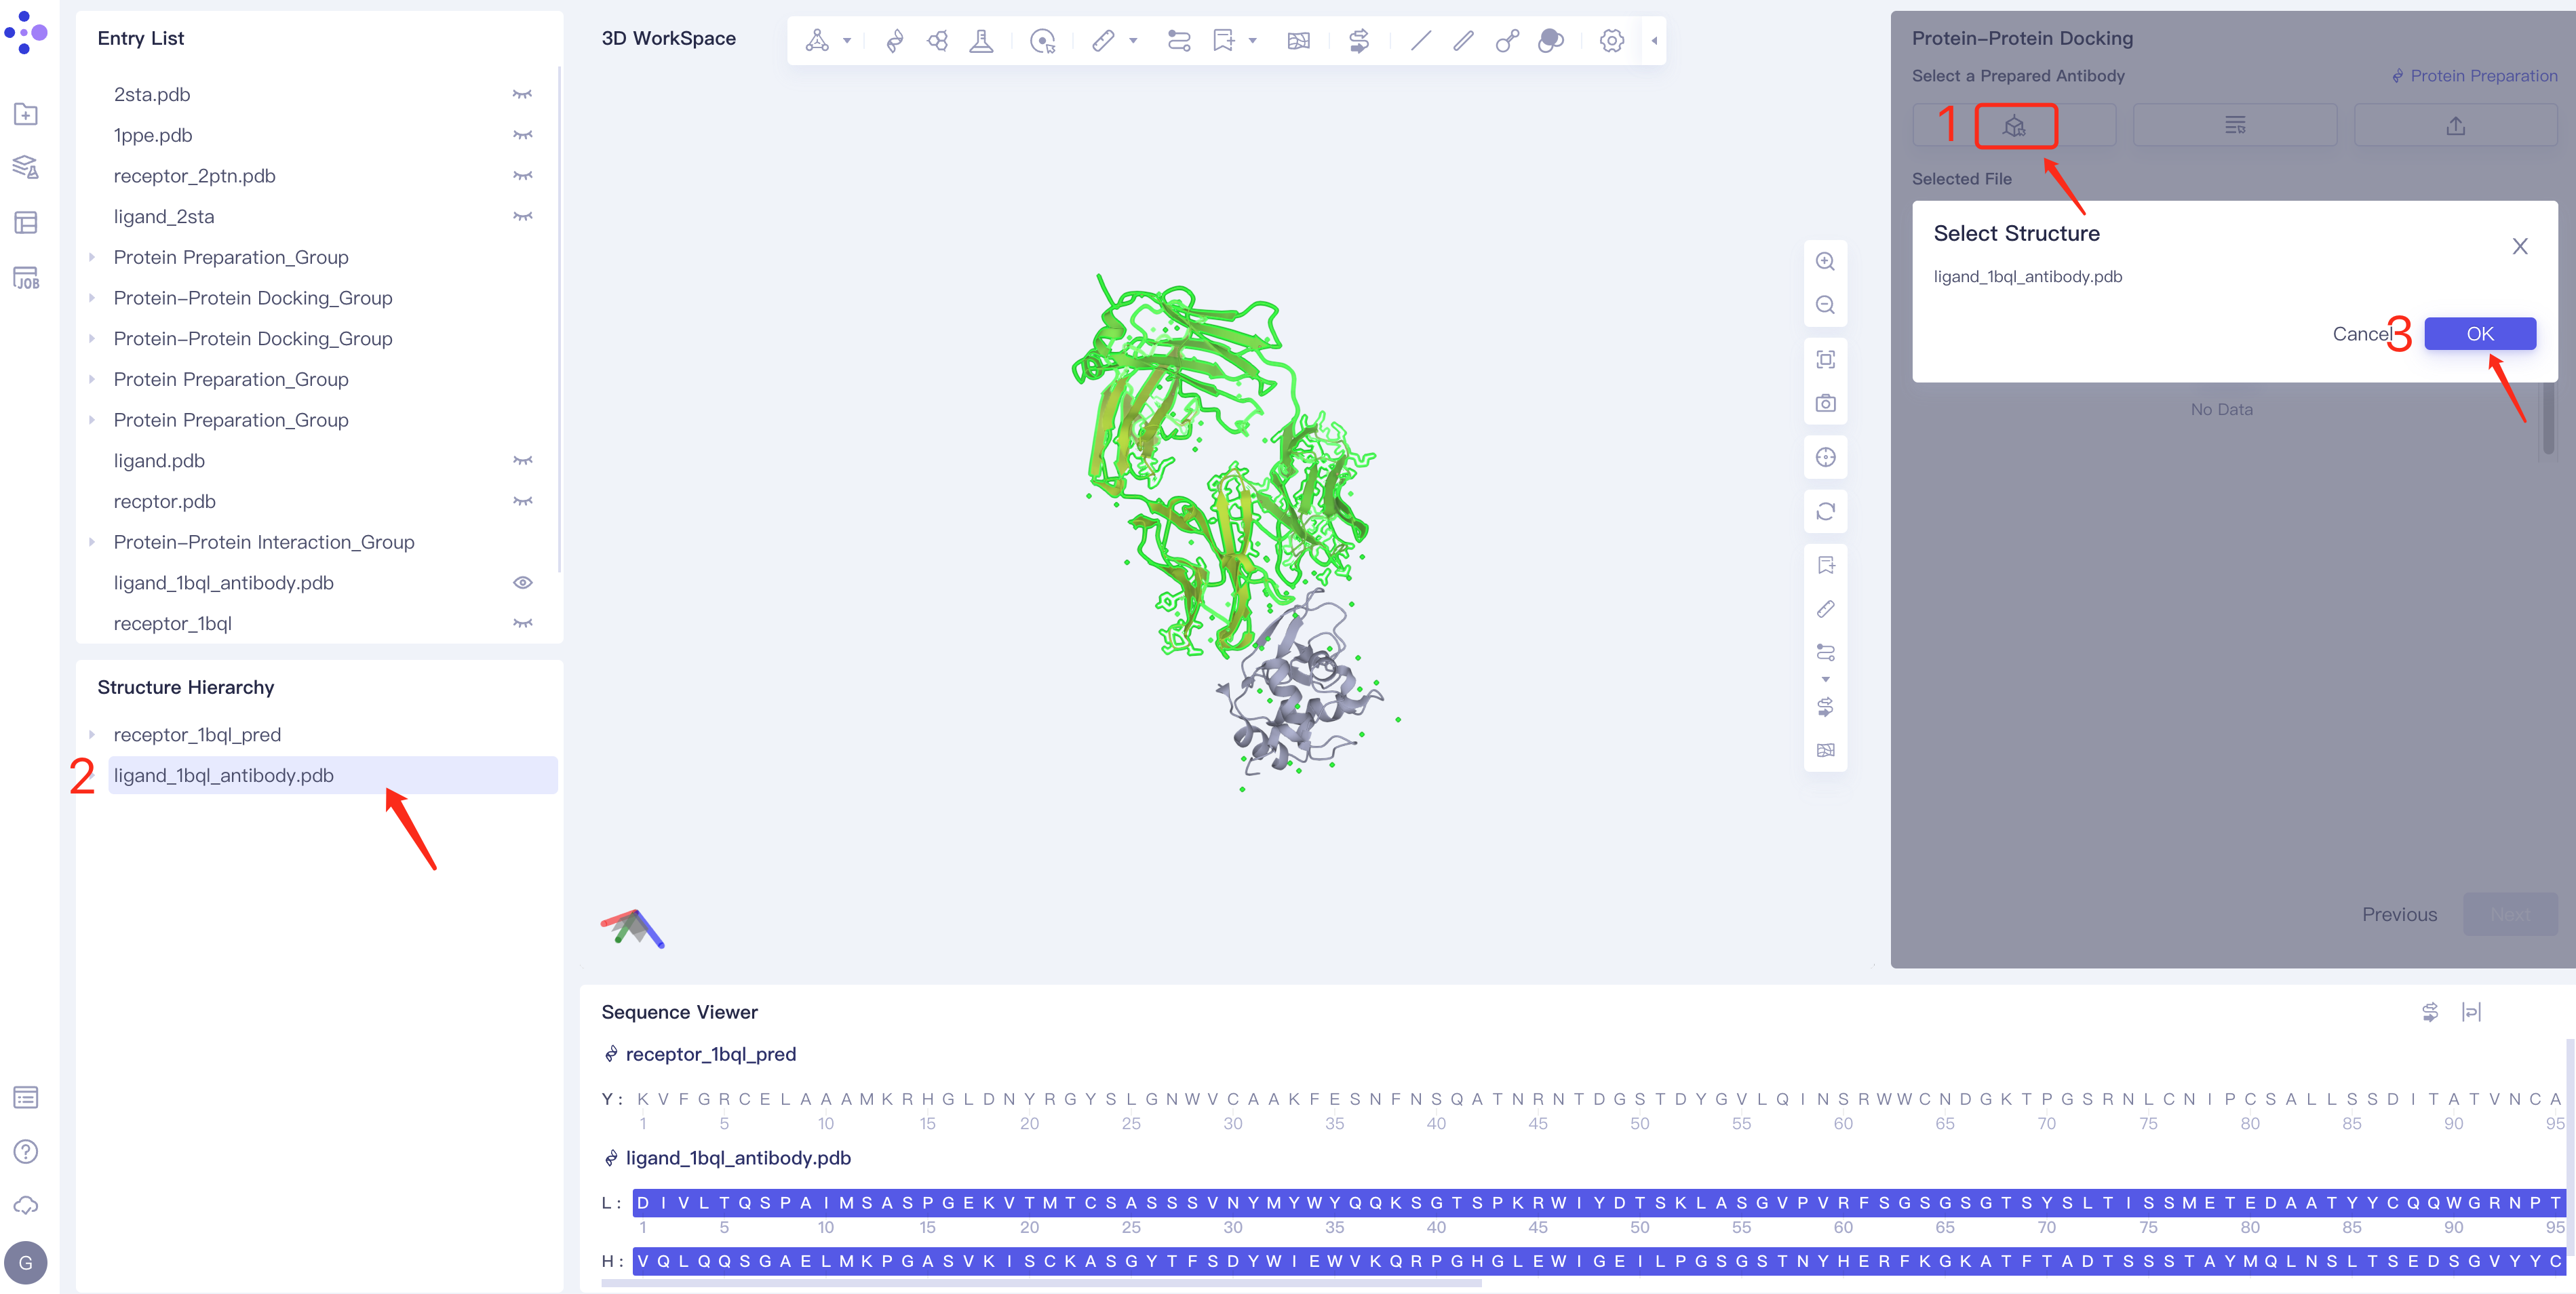
- Mode 1 Select from 3D: Click the Select from 3D box → Select Ligands box pops up → Select the required ligand structure in the Structure Hierarchy box on the left side of the interface → Select The name of the selected ligand is displayed in the Structure box. Click OK.
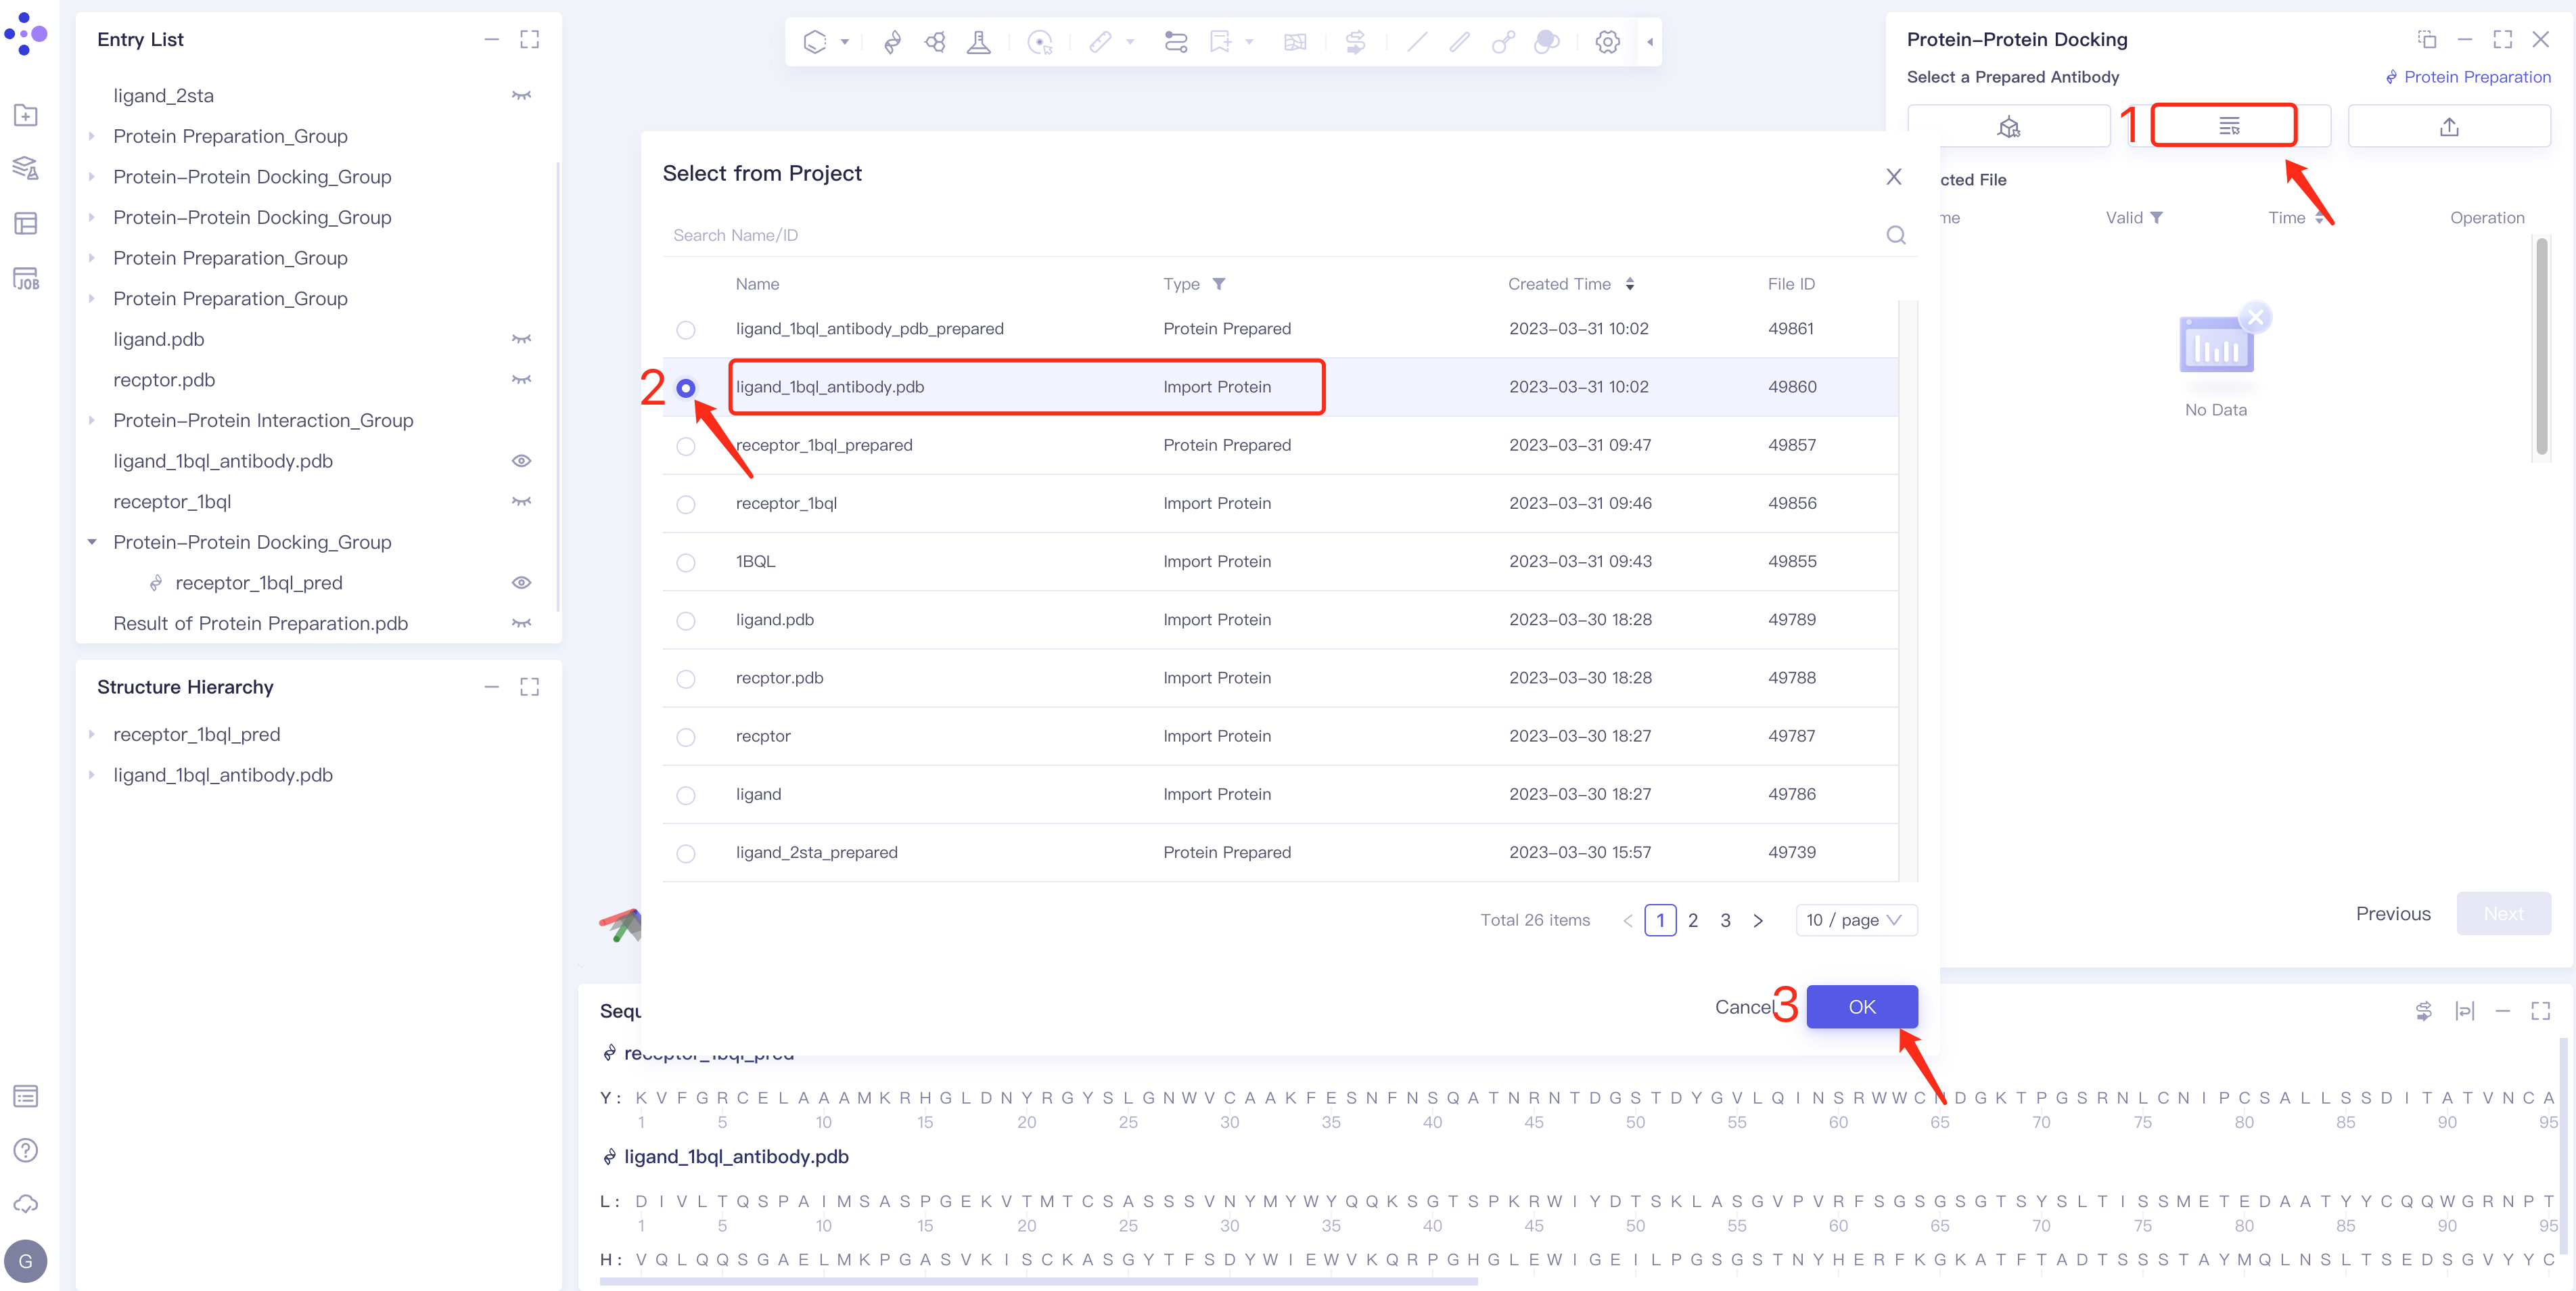
- Method 2 Select from Project: click the Select from Project box → the Select from Project box pops up in the middle of the interface → select the required ligand structure → click OK.
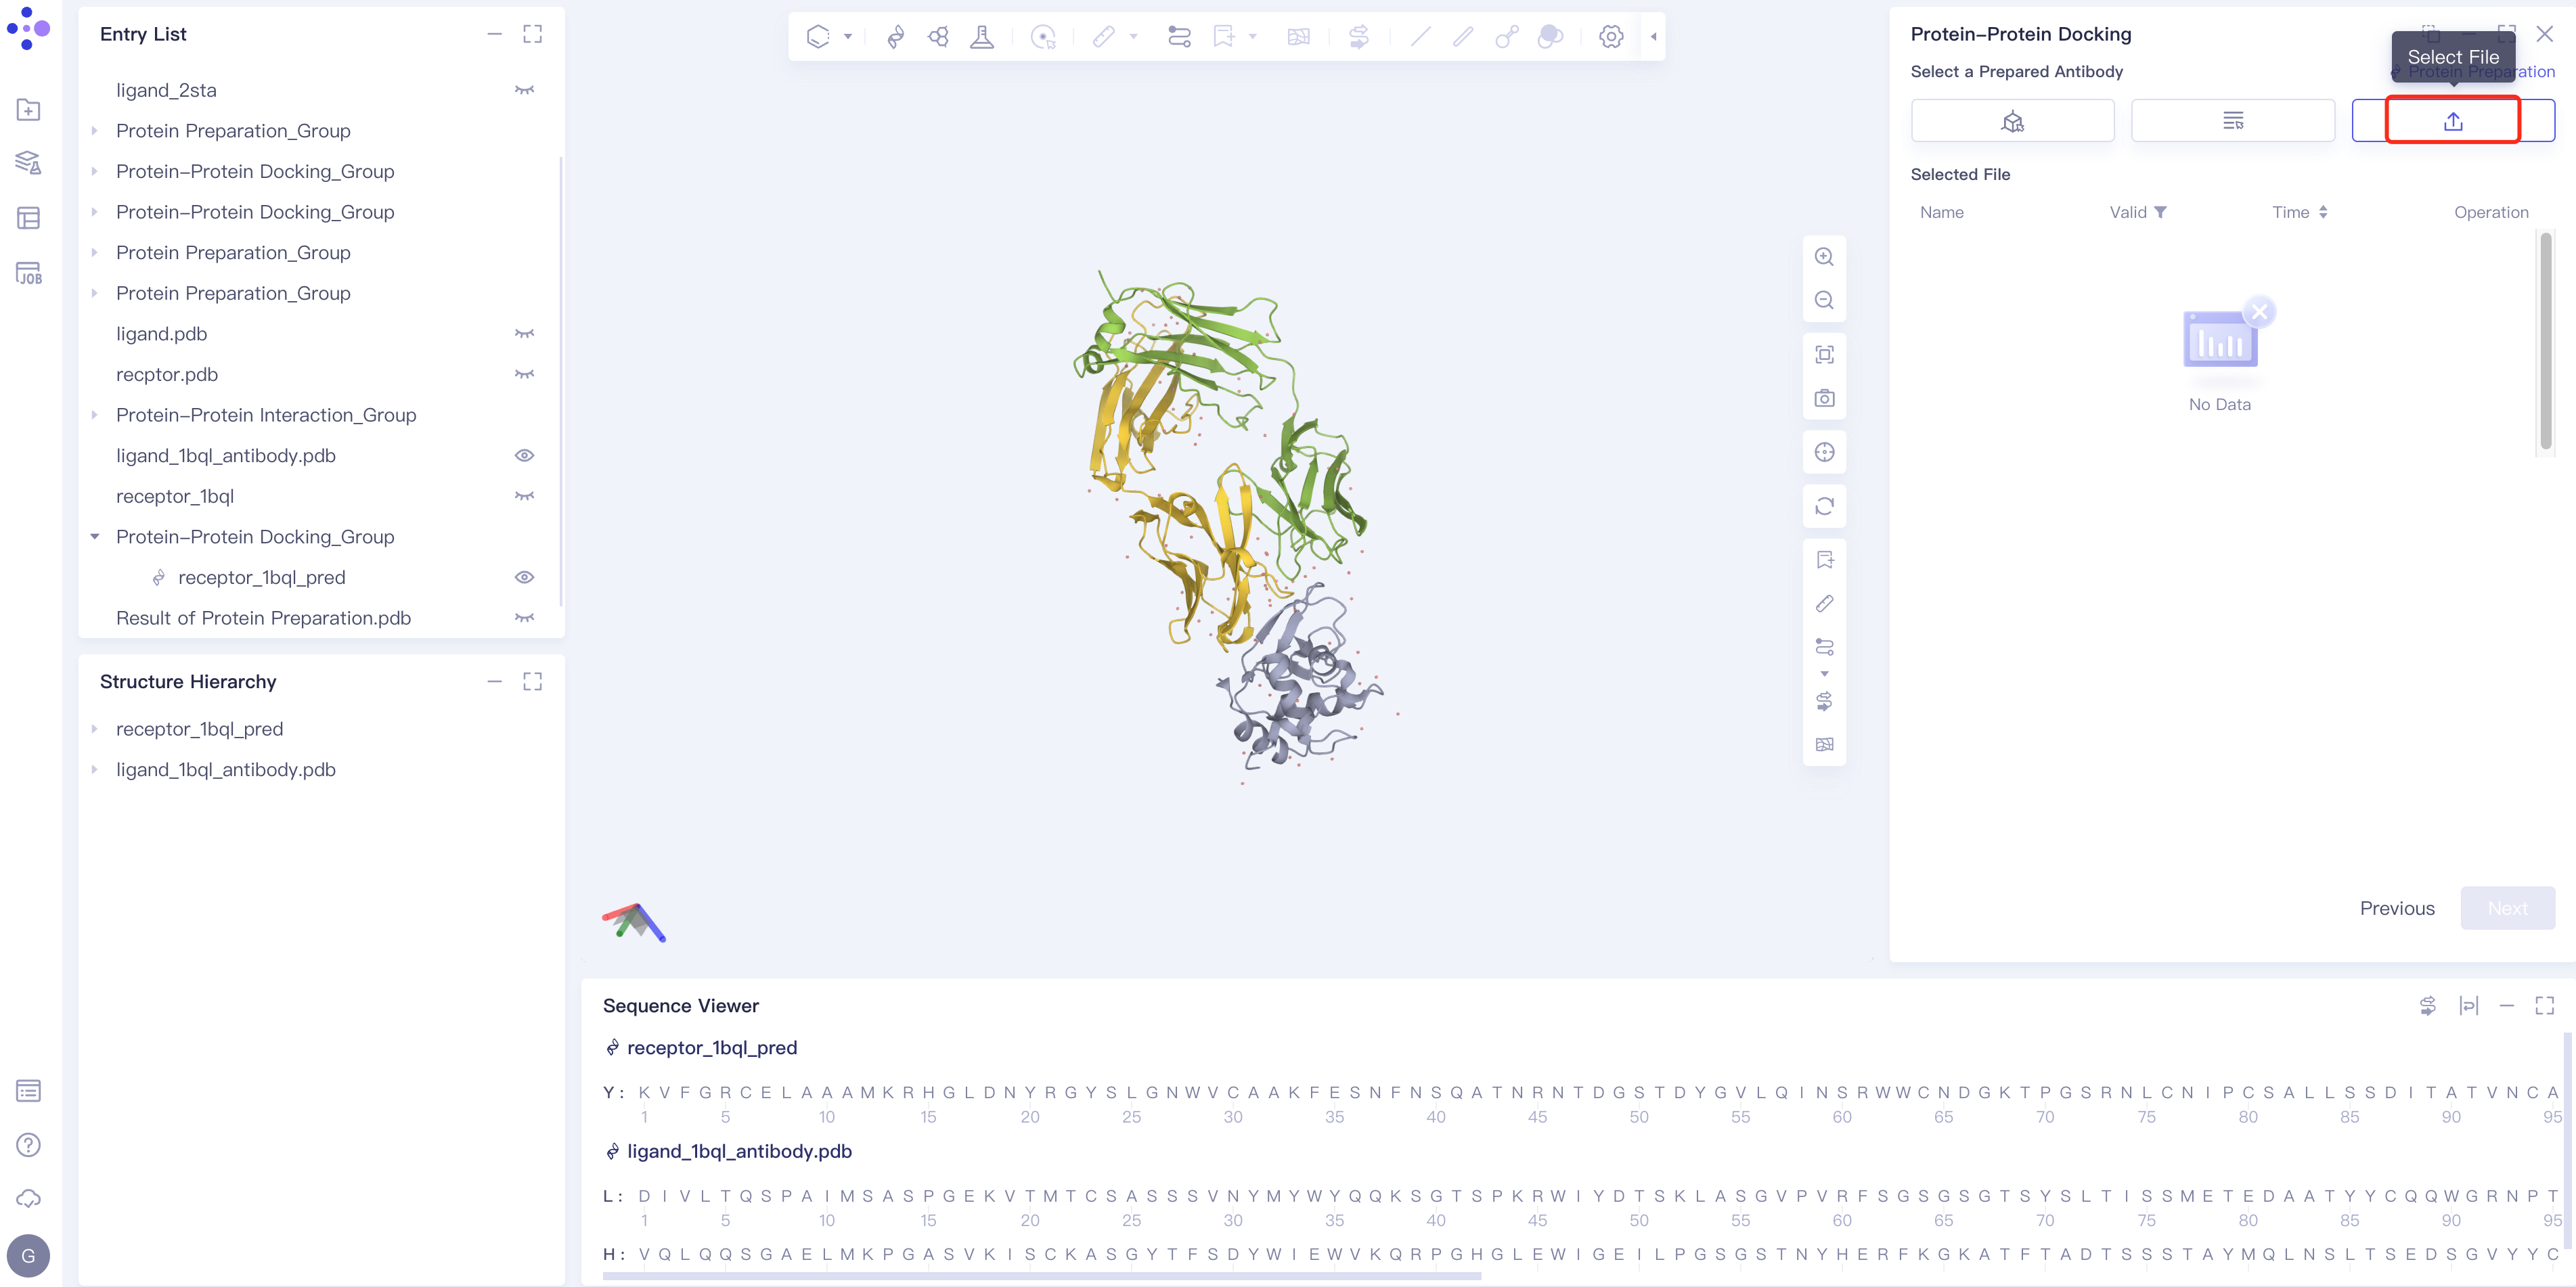
- Method 3 Select File: Select the required ligand file (mol and SDF file formats are supported) from the local folder and upload it.
Ligand structure treatment
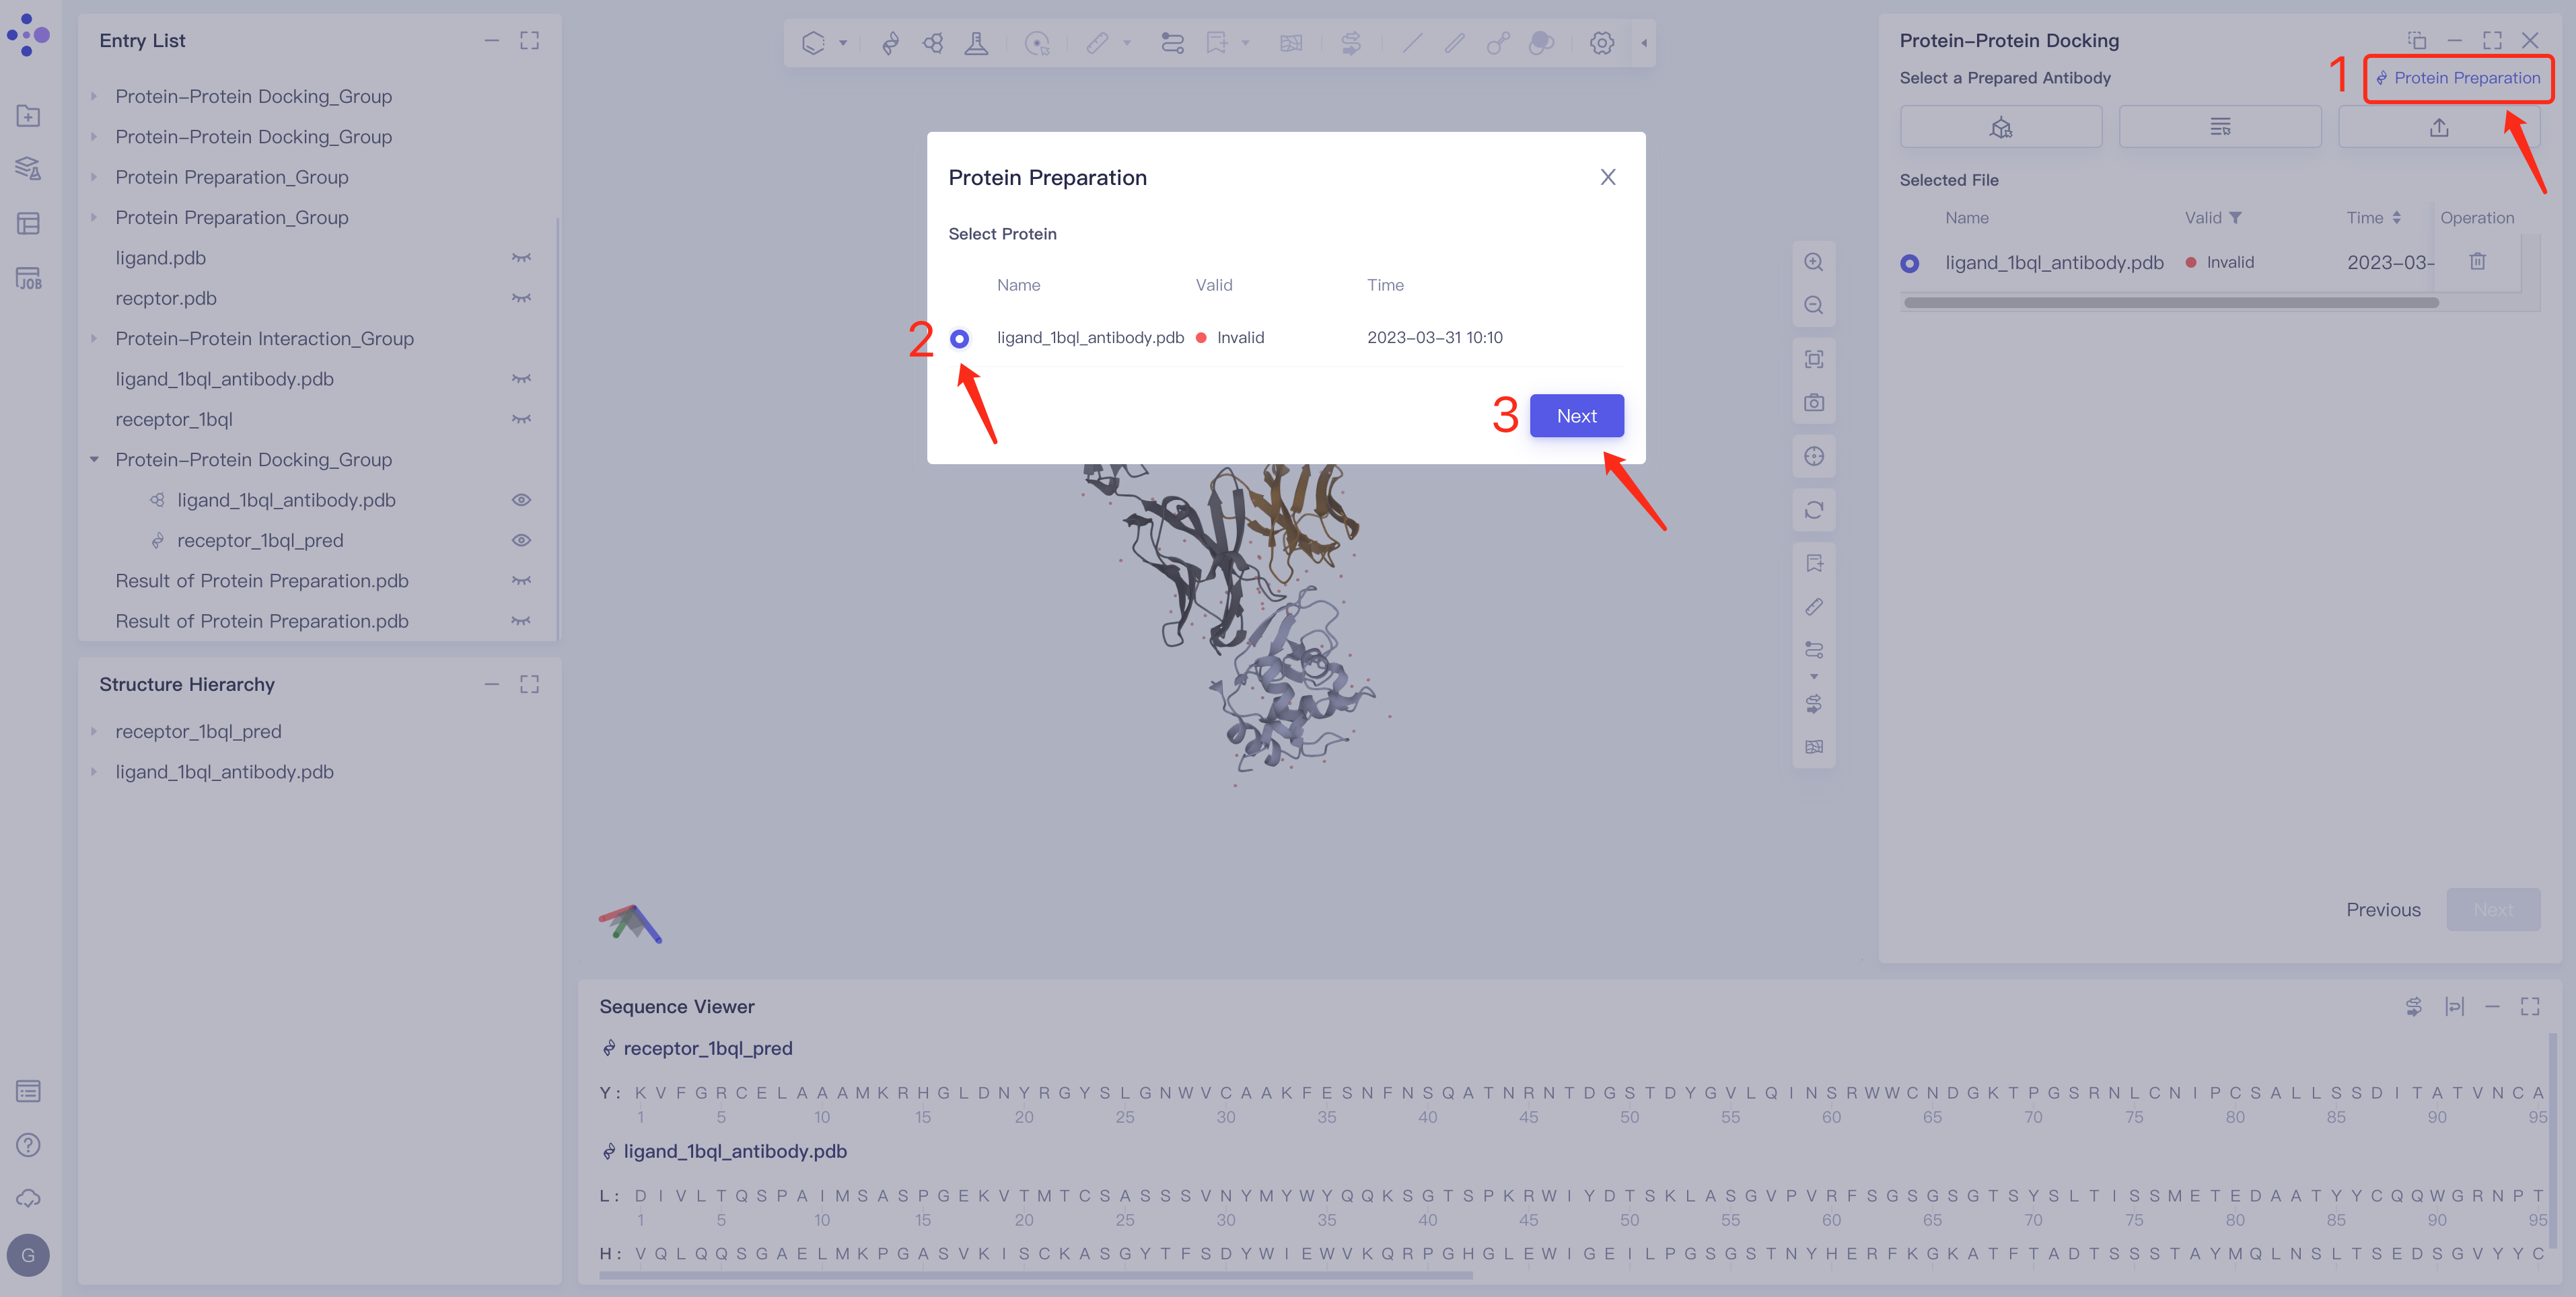
- Click Protein Preparation → the Protein Preparation box pops up in the middle of the interface → select the receptor structure to be processed → click Next.
- Parameter setting: Select the ingredient to be reserved, click Next → Submit according to the default parameters, and then submit the task.
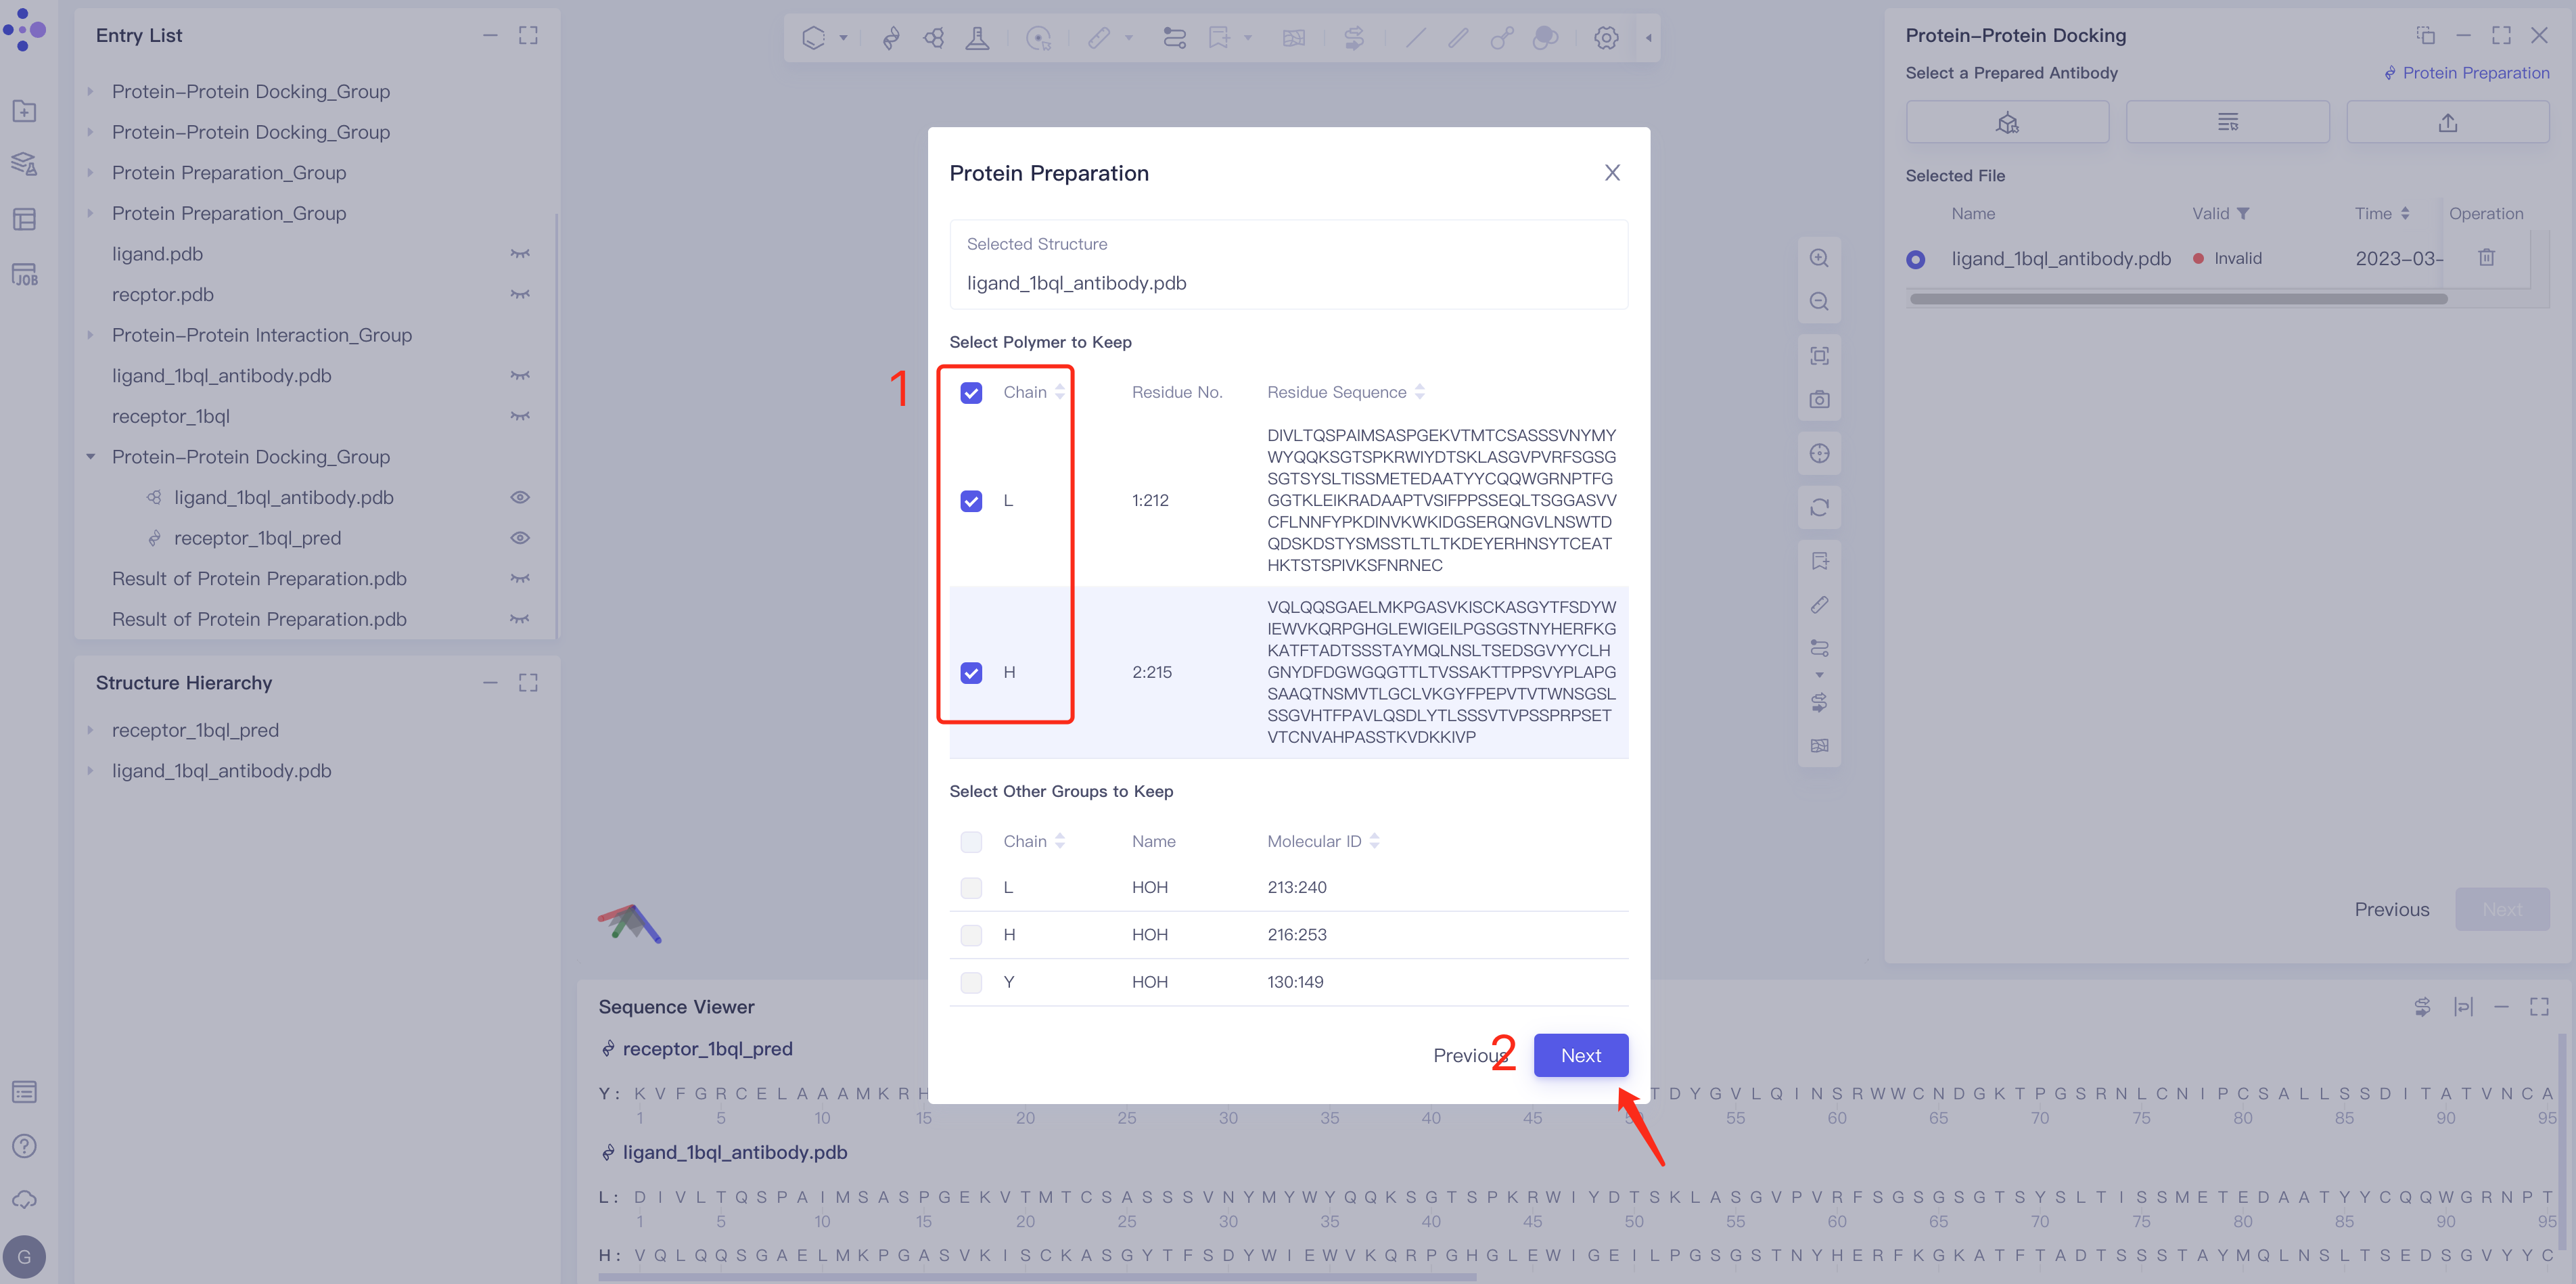 | 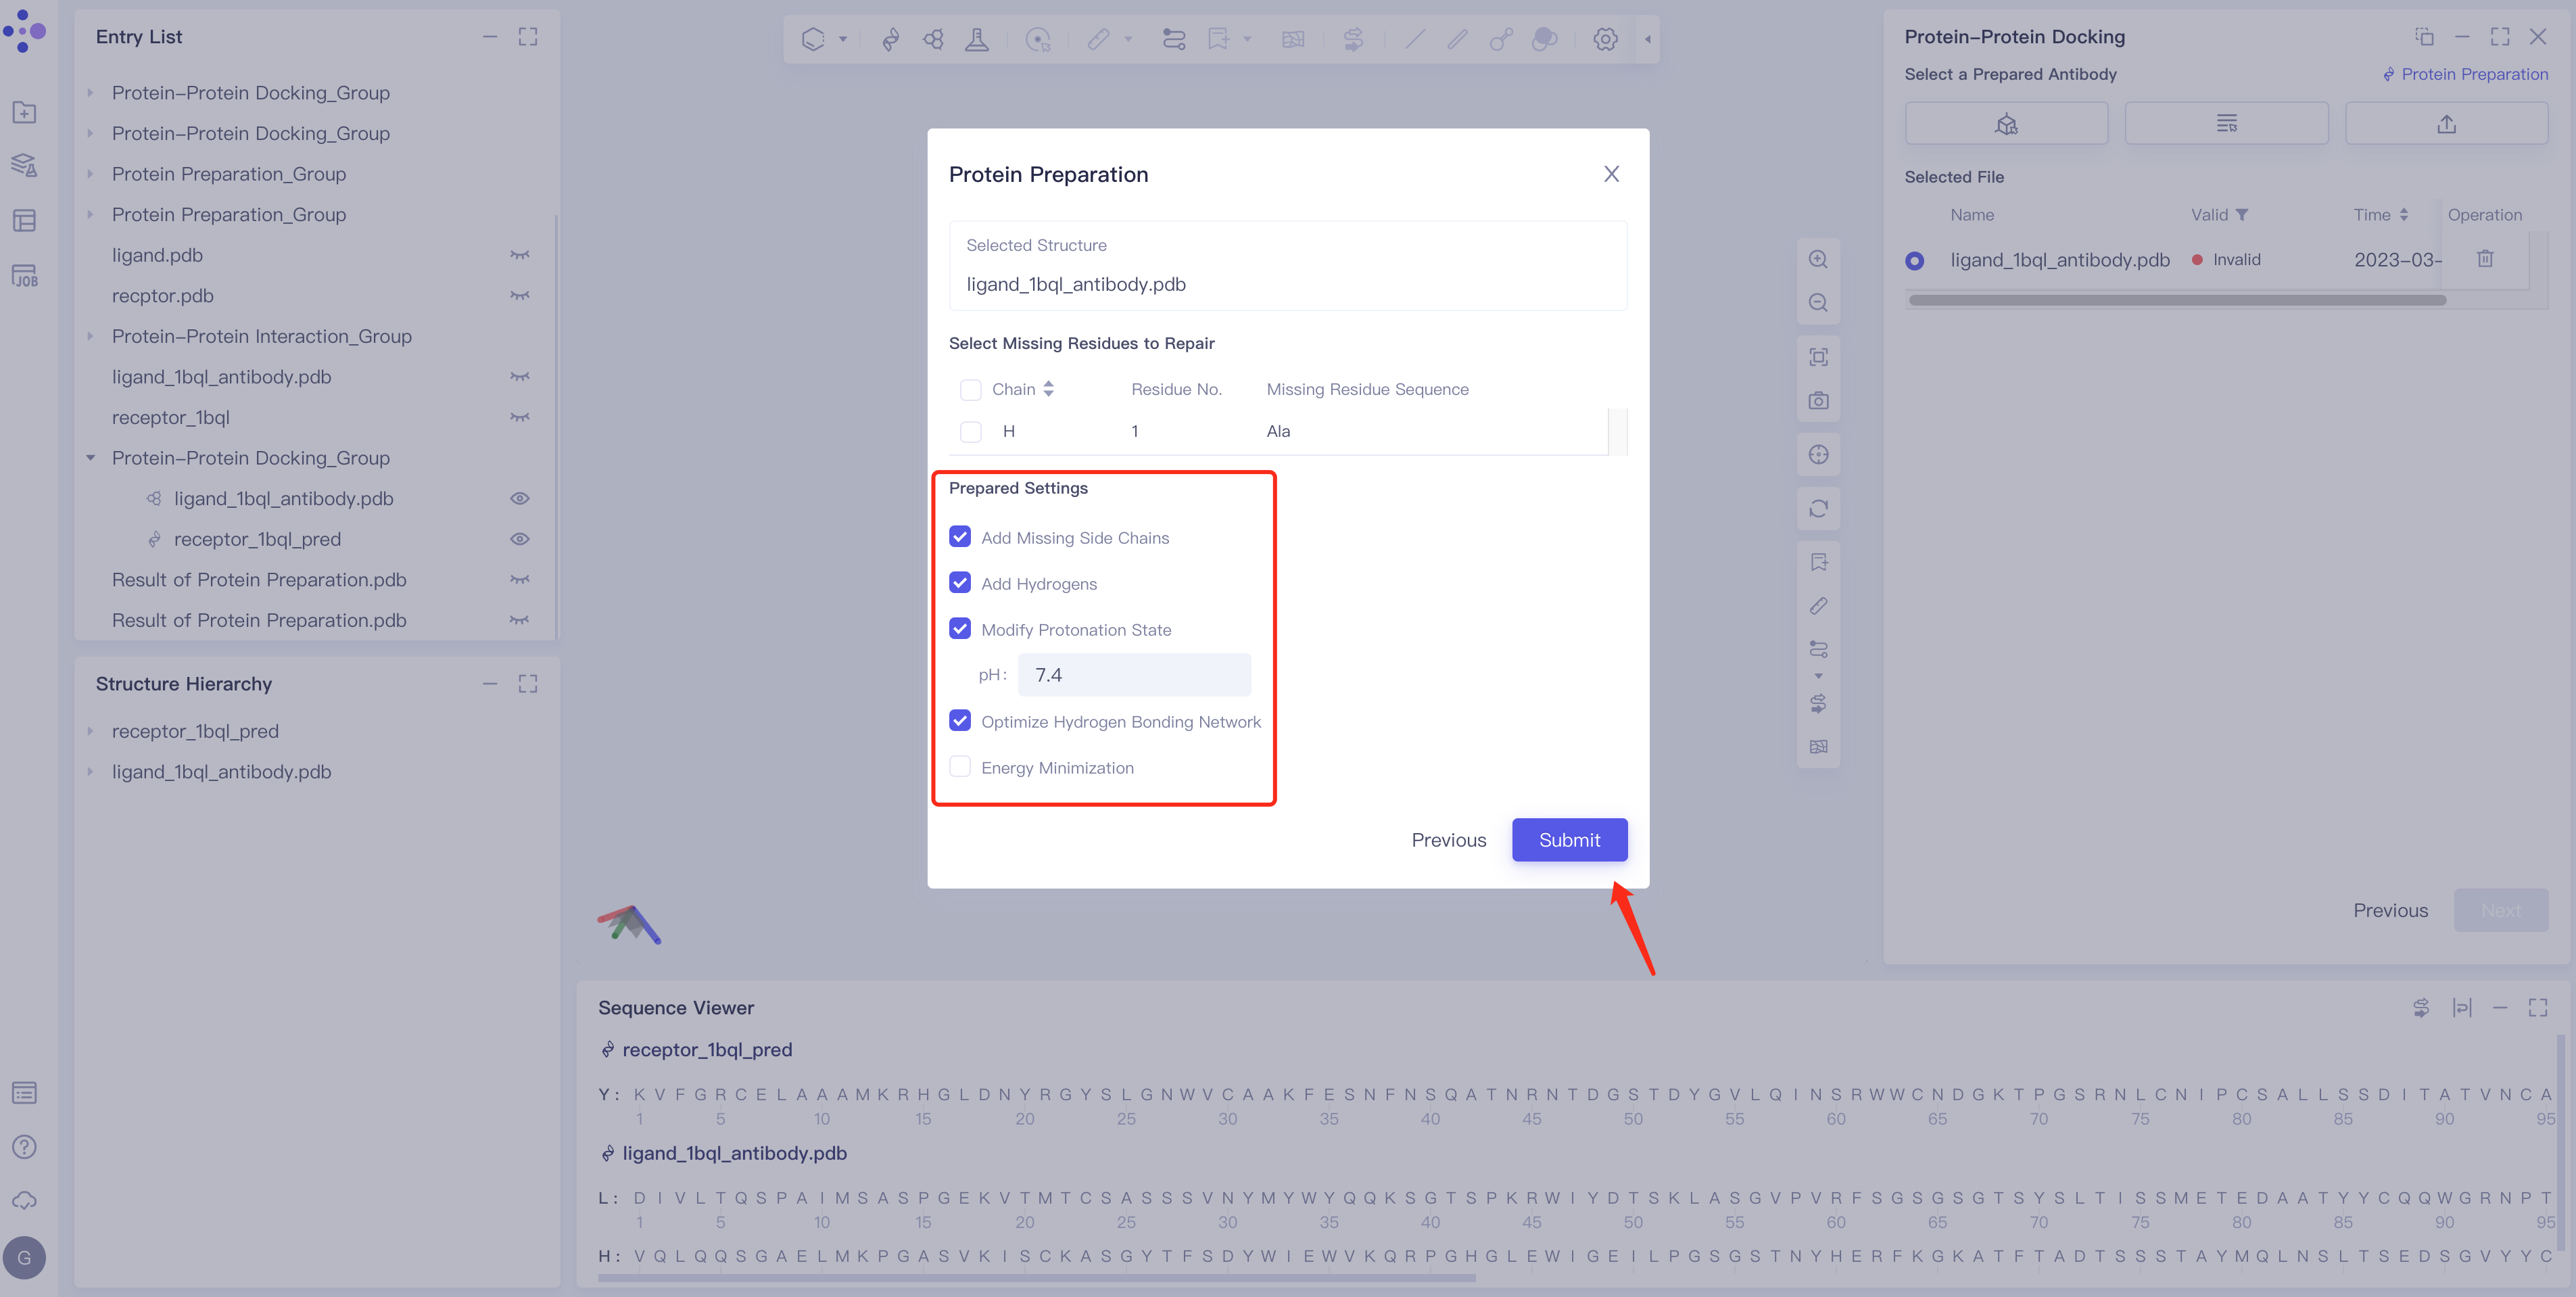 |
Binding site setting
- If the ligand is an antibody, the program will automatically set part of the CDR region as the docking site. The binding site can also be modified manually in two ways. For details, see “Binding Site Setting” in 2.2.3.1. (Note: Currently only ligand-based settings are supported)
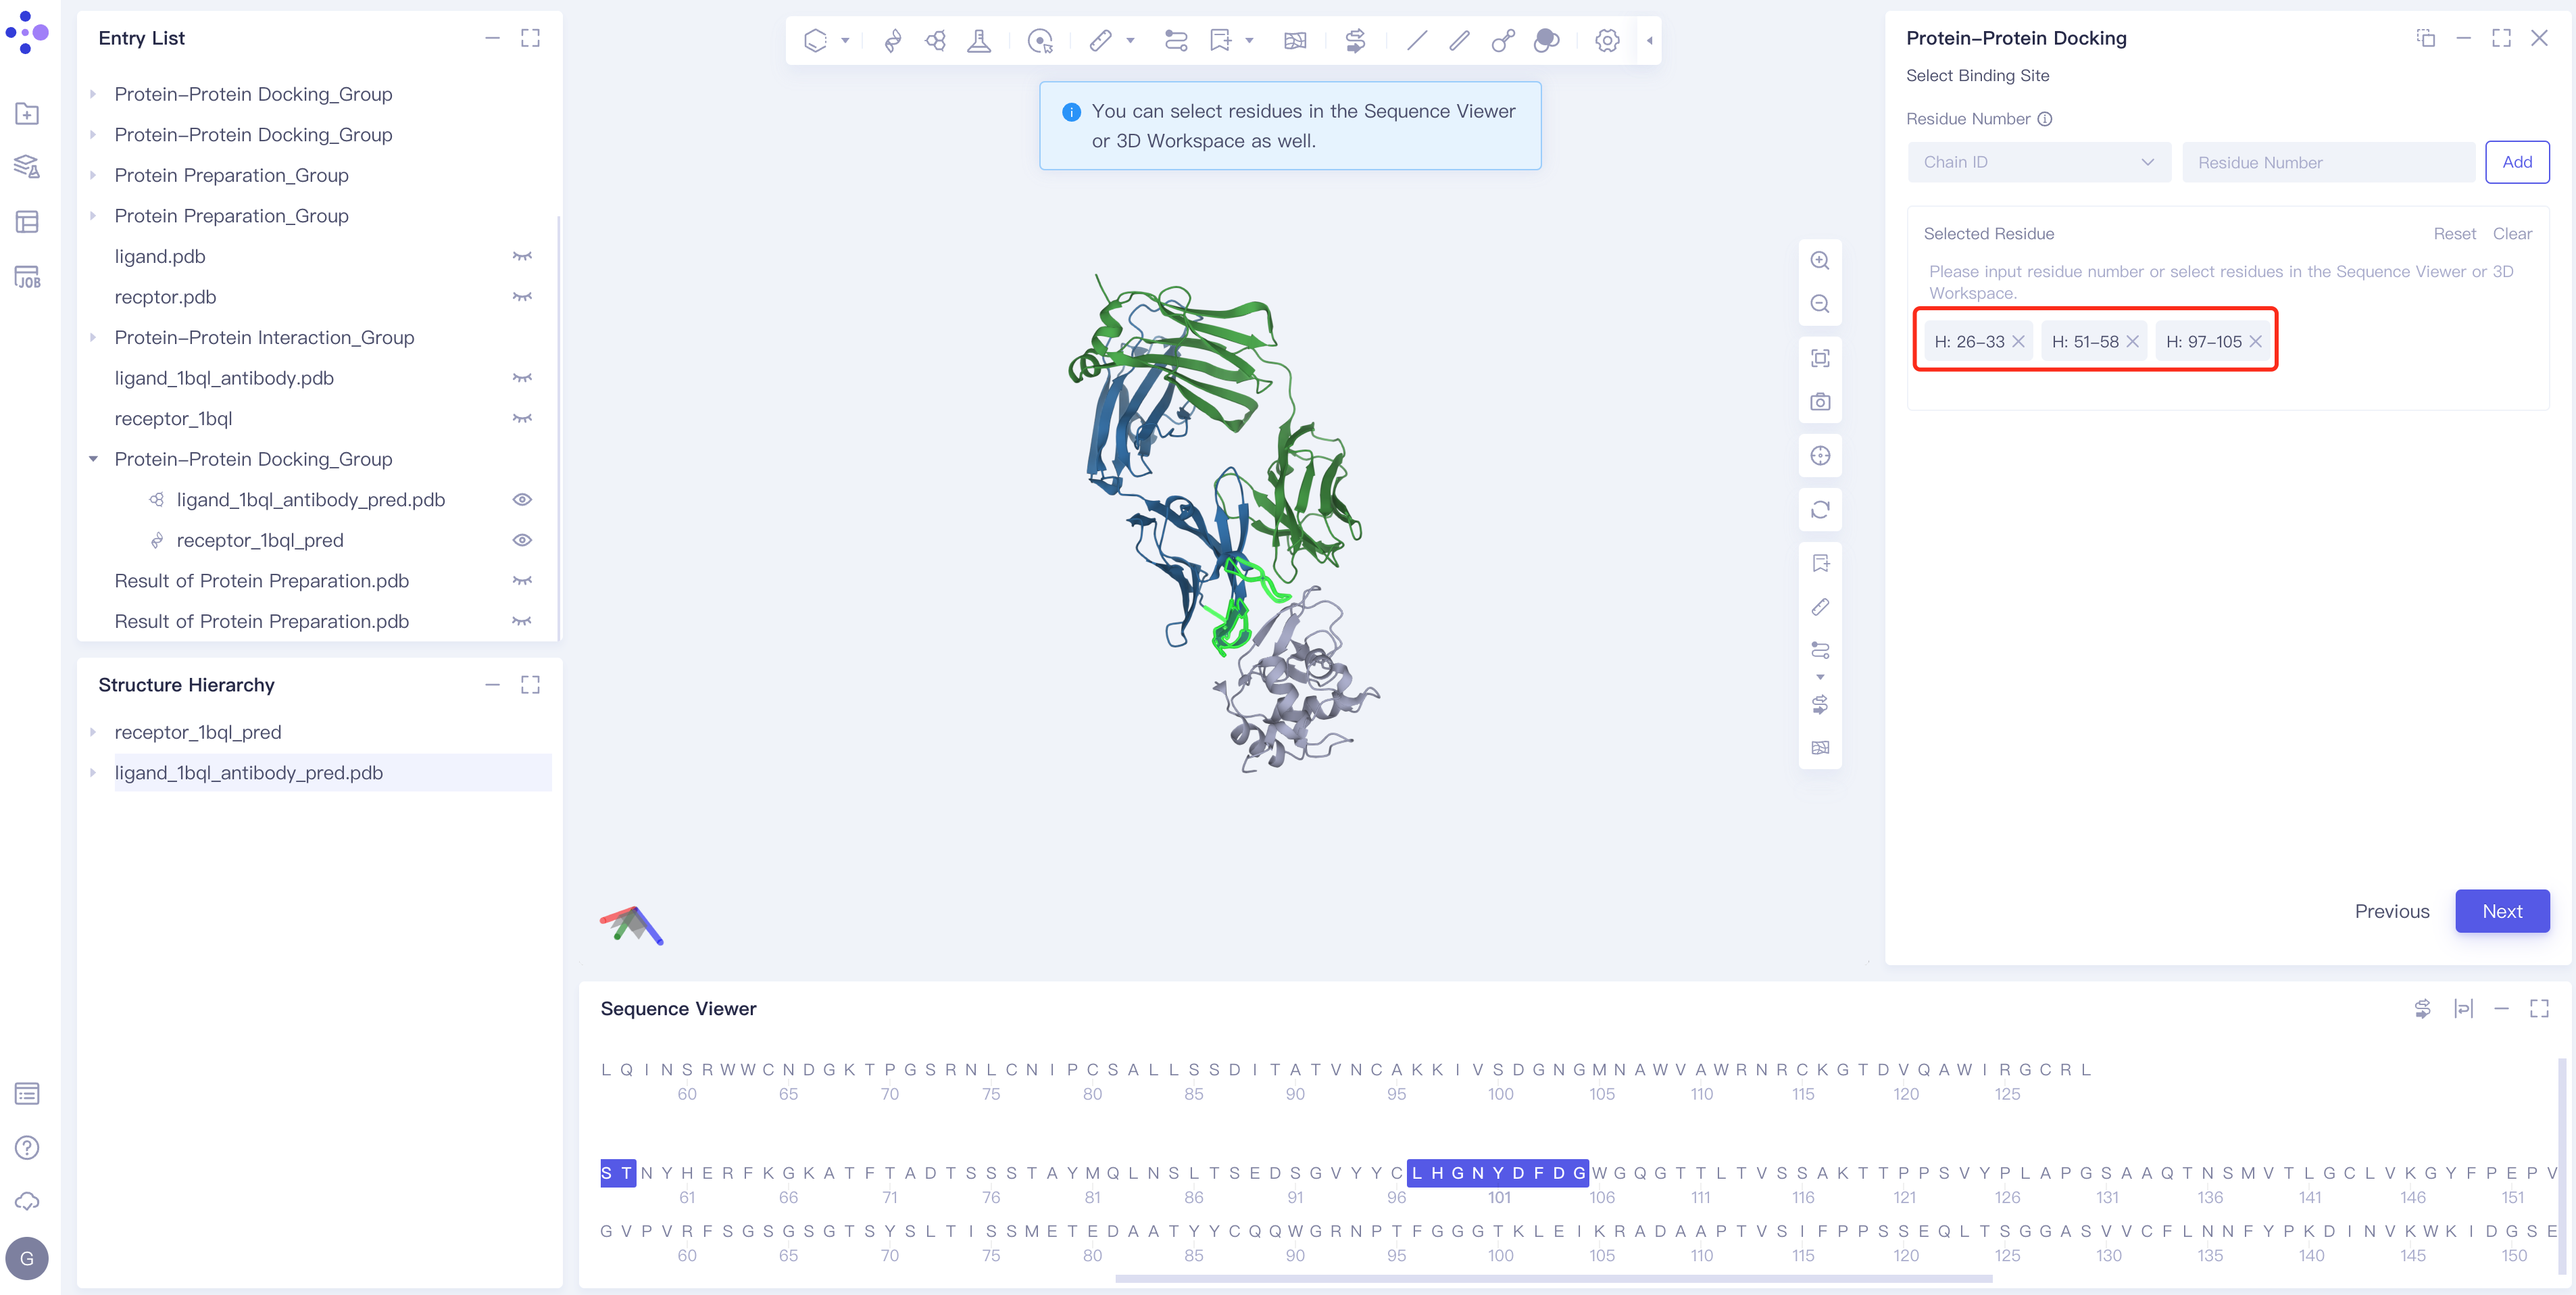
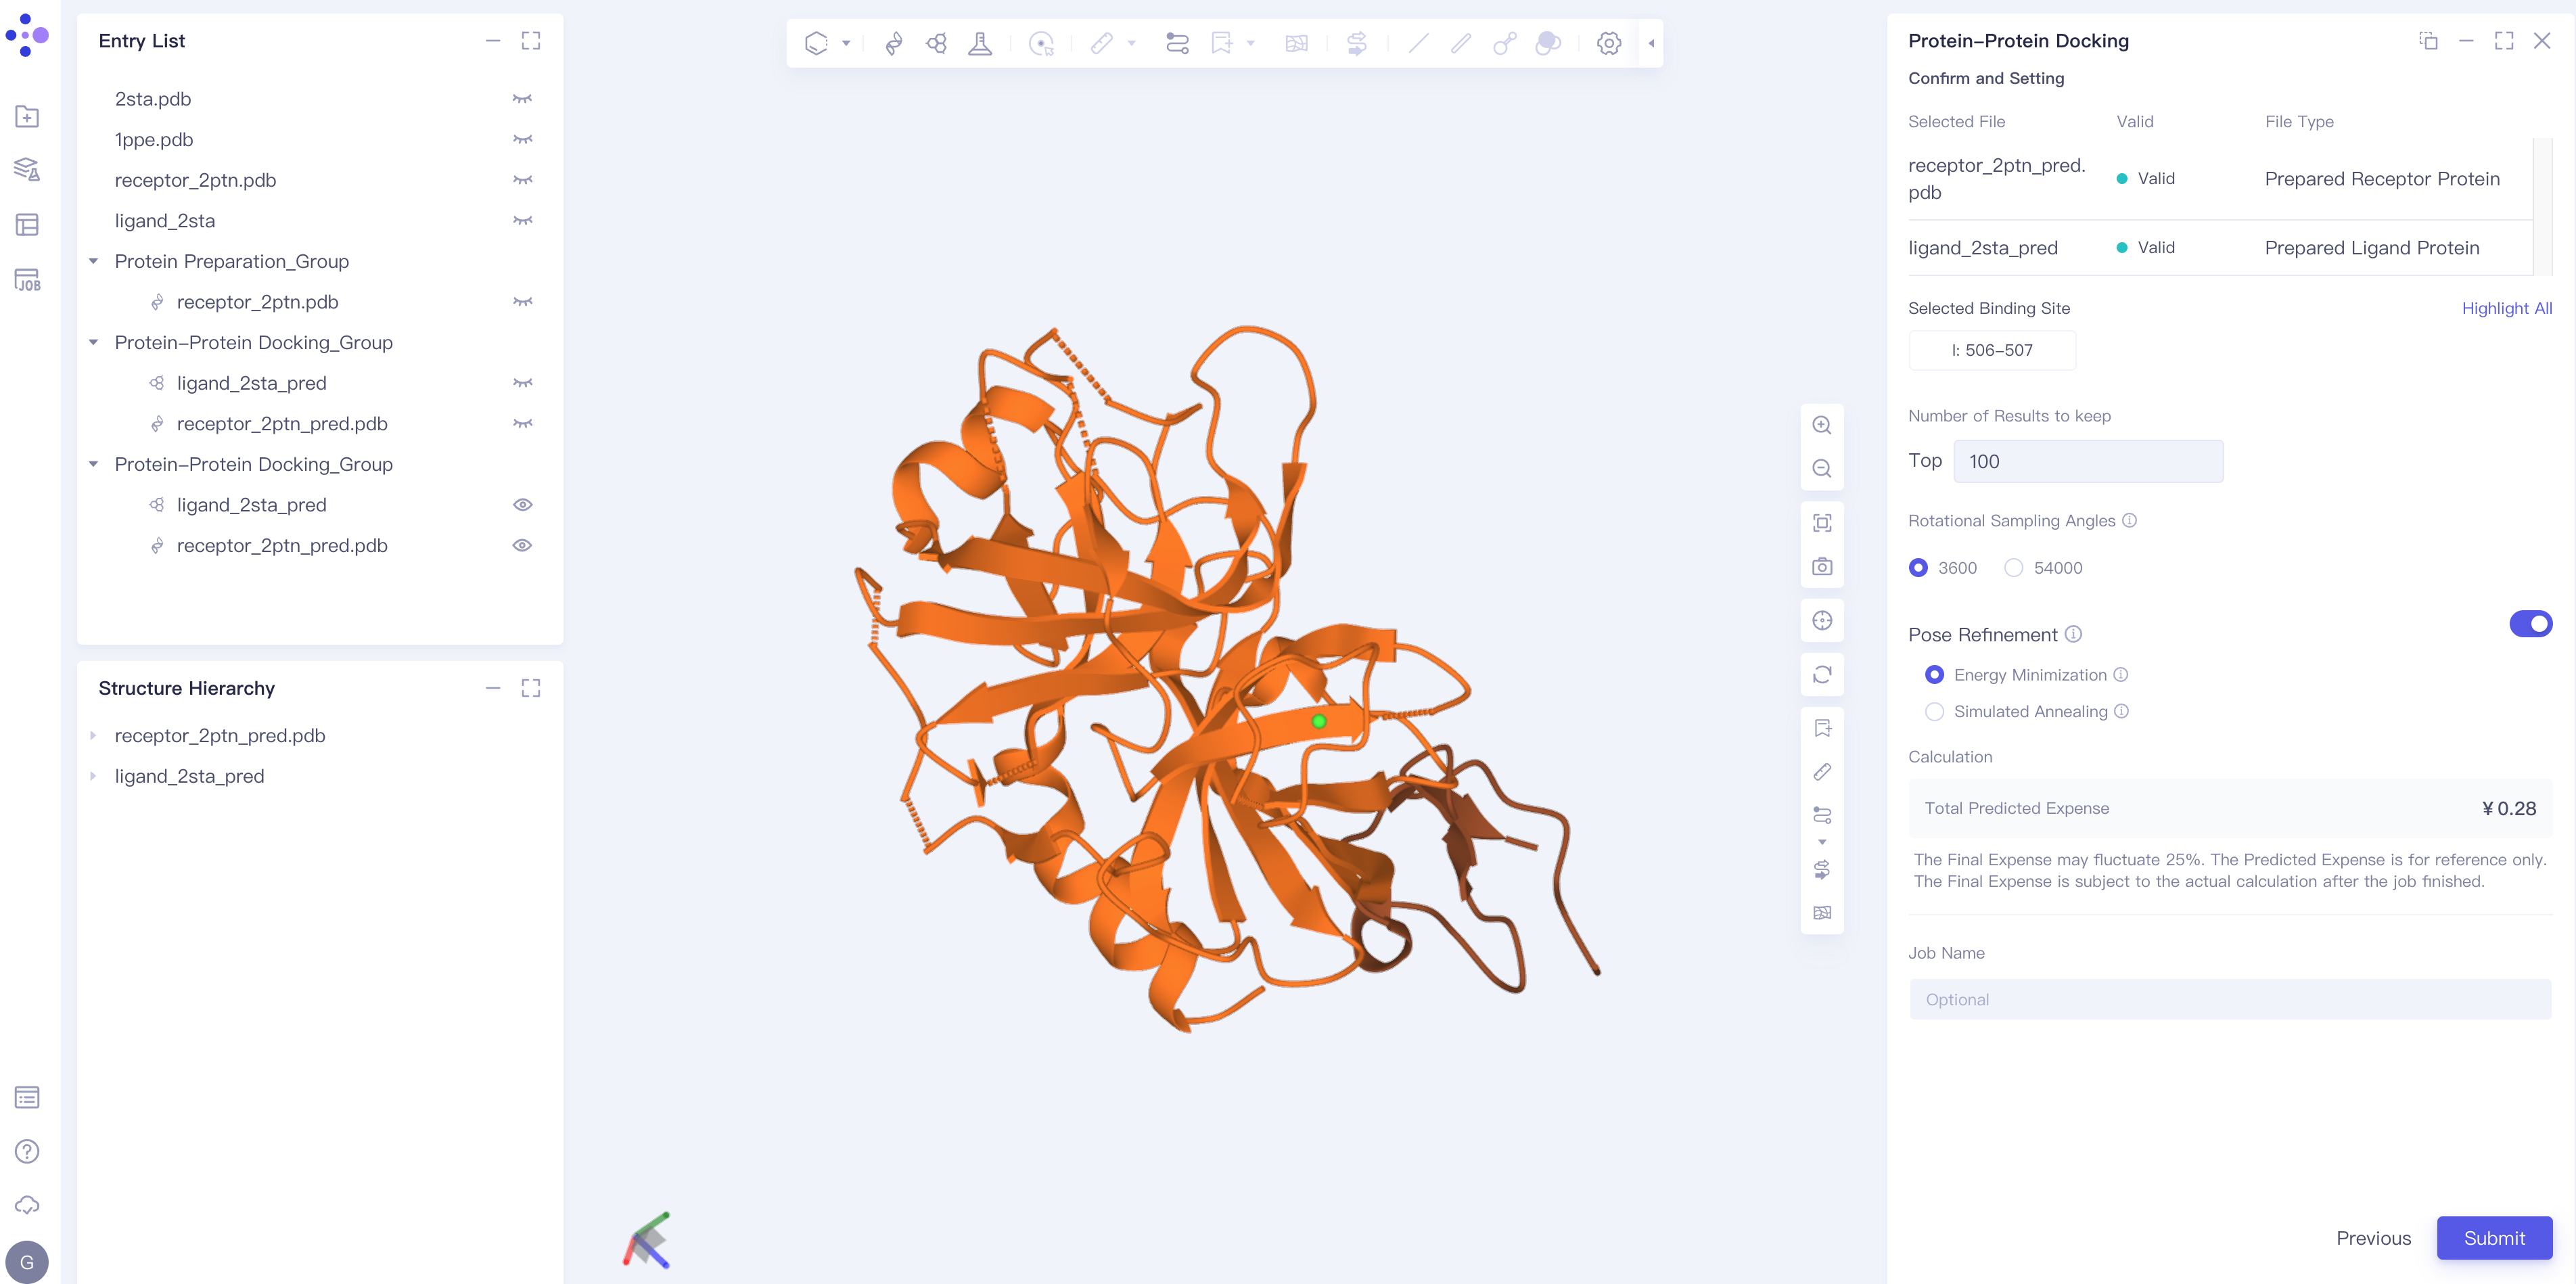
2.2.4 Parameter setting
-
confirming a receptor, a ligand and a set docking site;
-
Number of Results to keep: set the number of results to keep (Note: up to 1000);
-
Rotational Sampling Angles: Set the rotation sampling angle, which can be 3600 or 54000;
-
Pose Refinement: Conformation optimization, including Energy Minimization and Simulated Annealing;
-
Total Predicted Expense: estimate and predict the required cost (note: the machine-hour cost is related to the parameter setting);
-
Name the task at Job Name;
-
Click Submit to submit the task.
3. Analysis of results
3.1 Entrance
- Left General Menu Bar Job
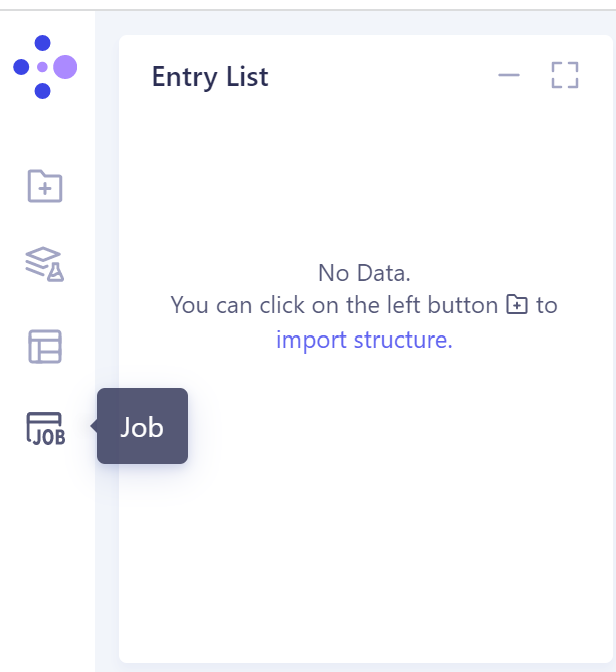
3.2 Operation
3.2.1 Presentation of results
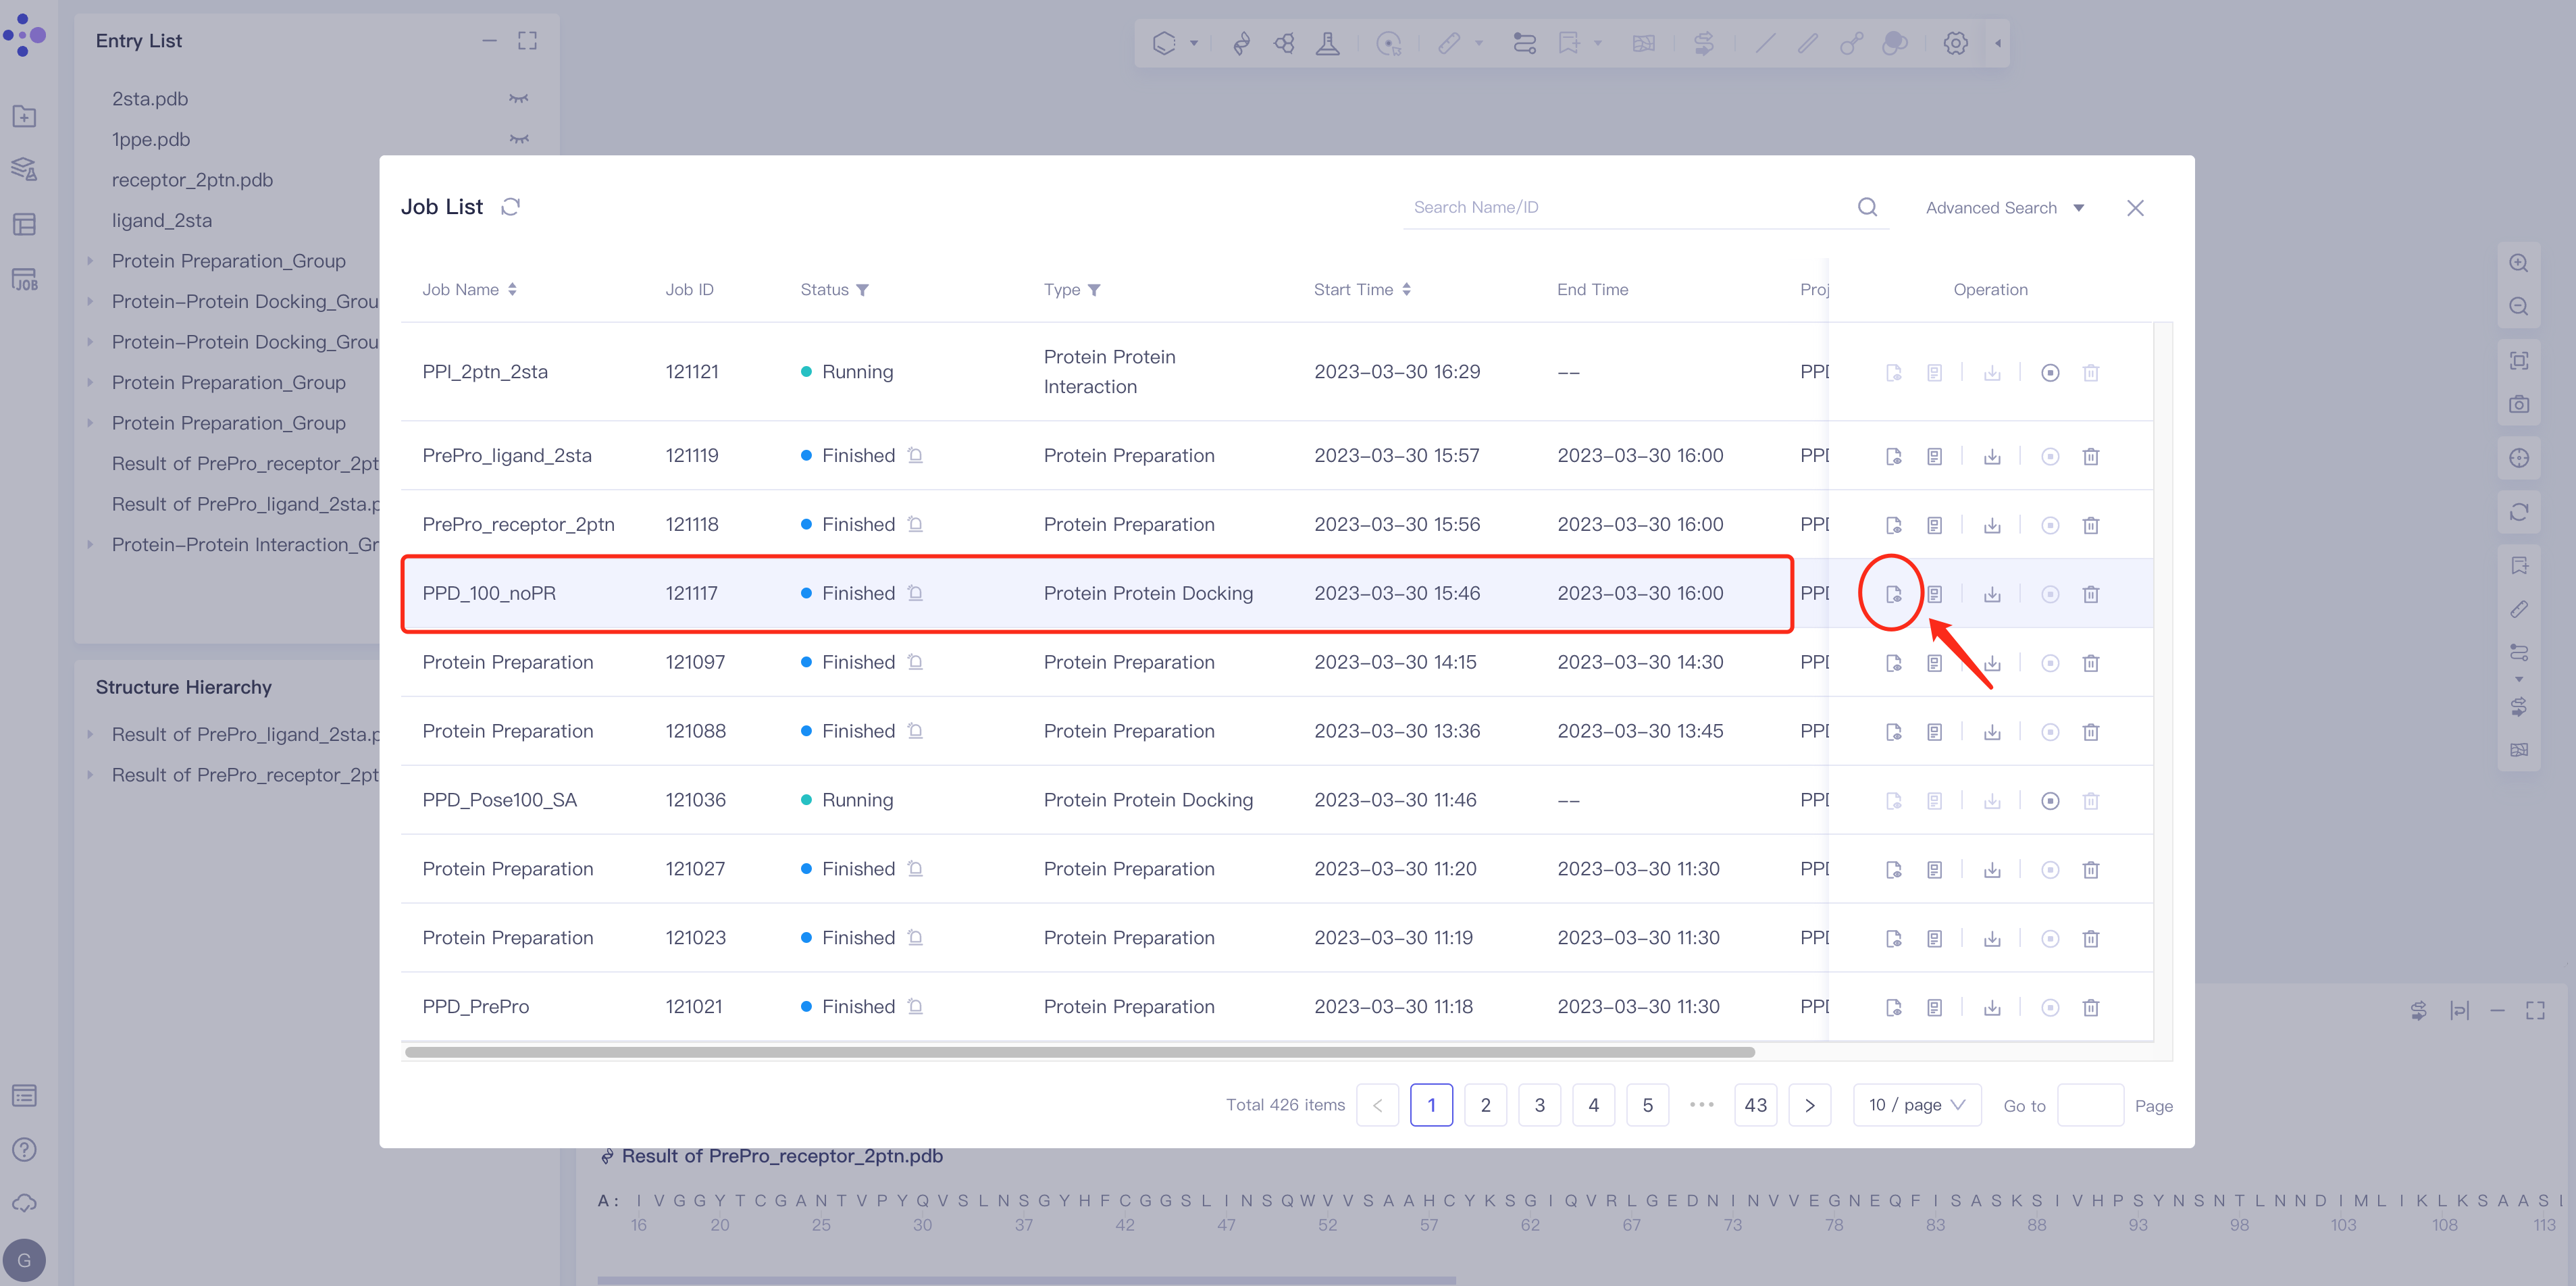
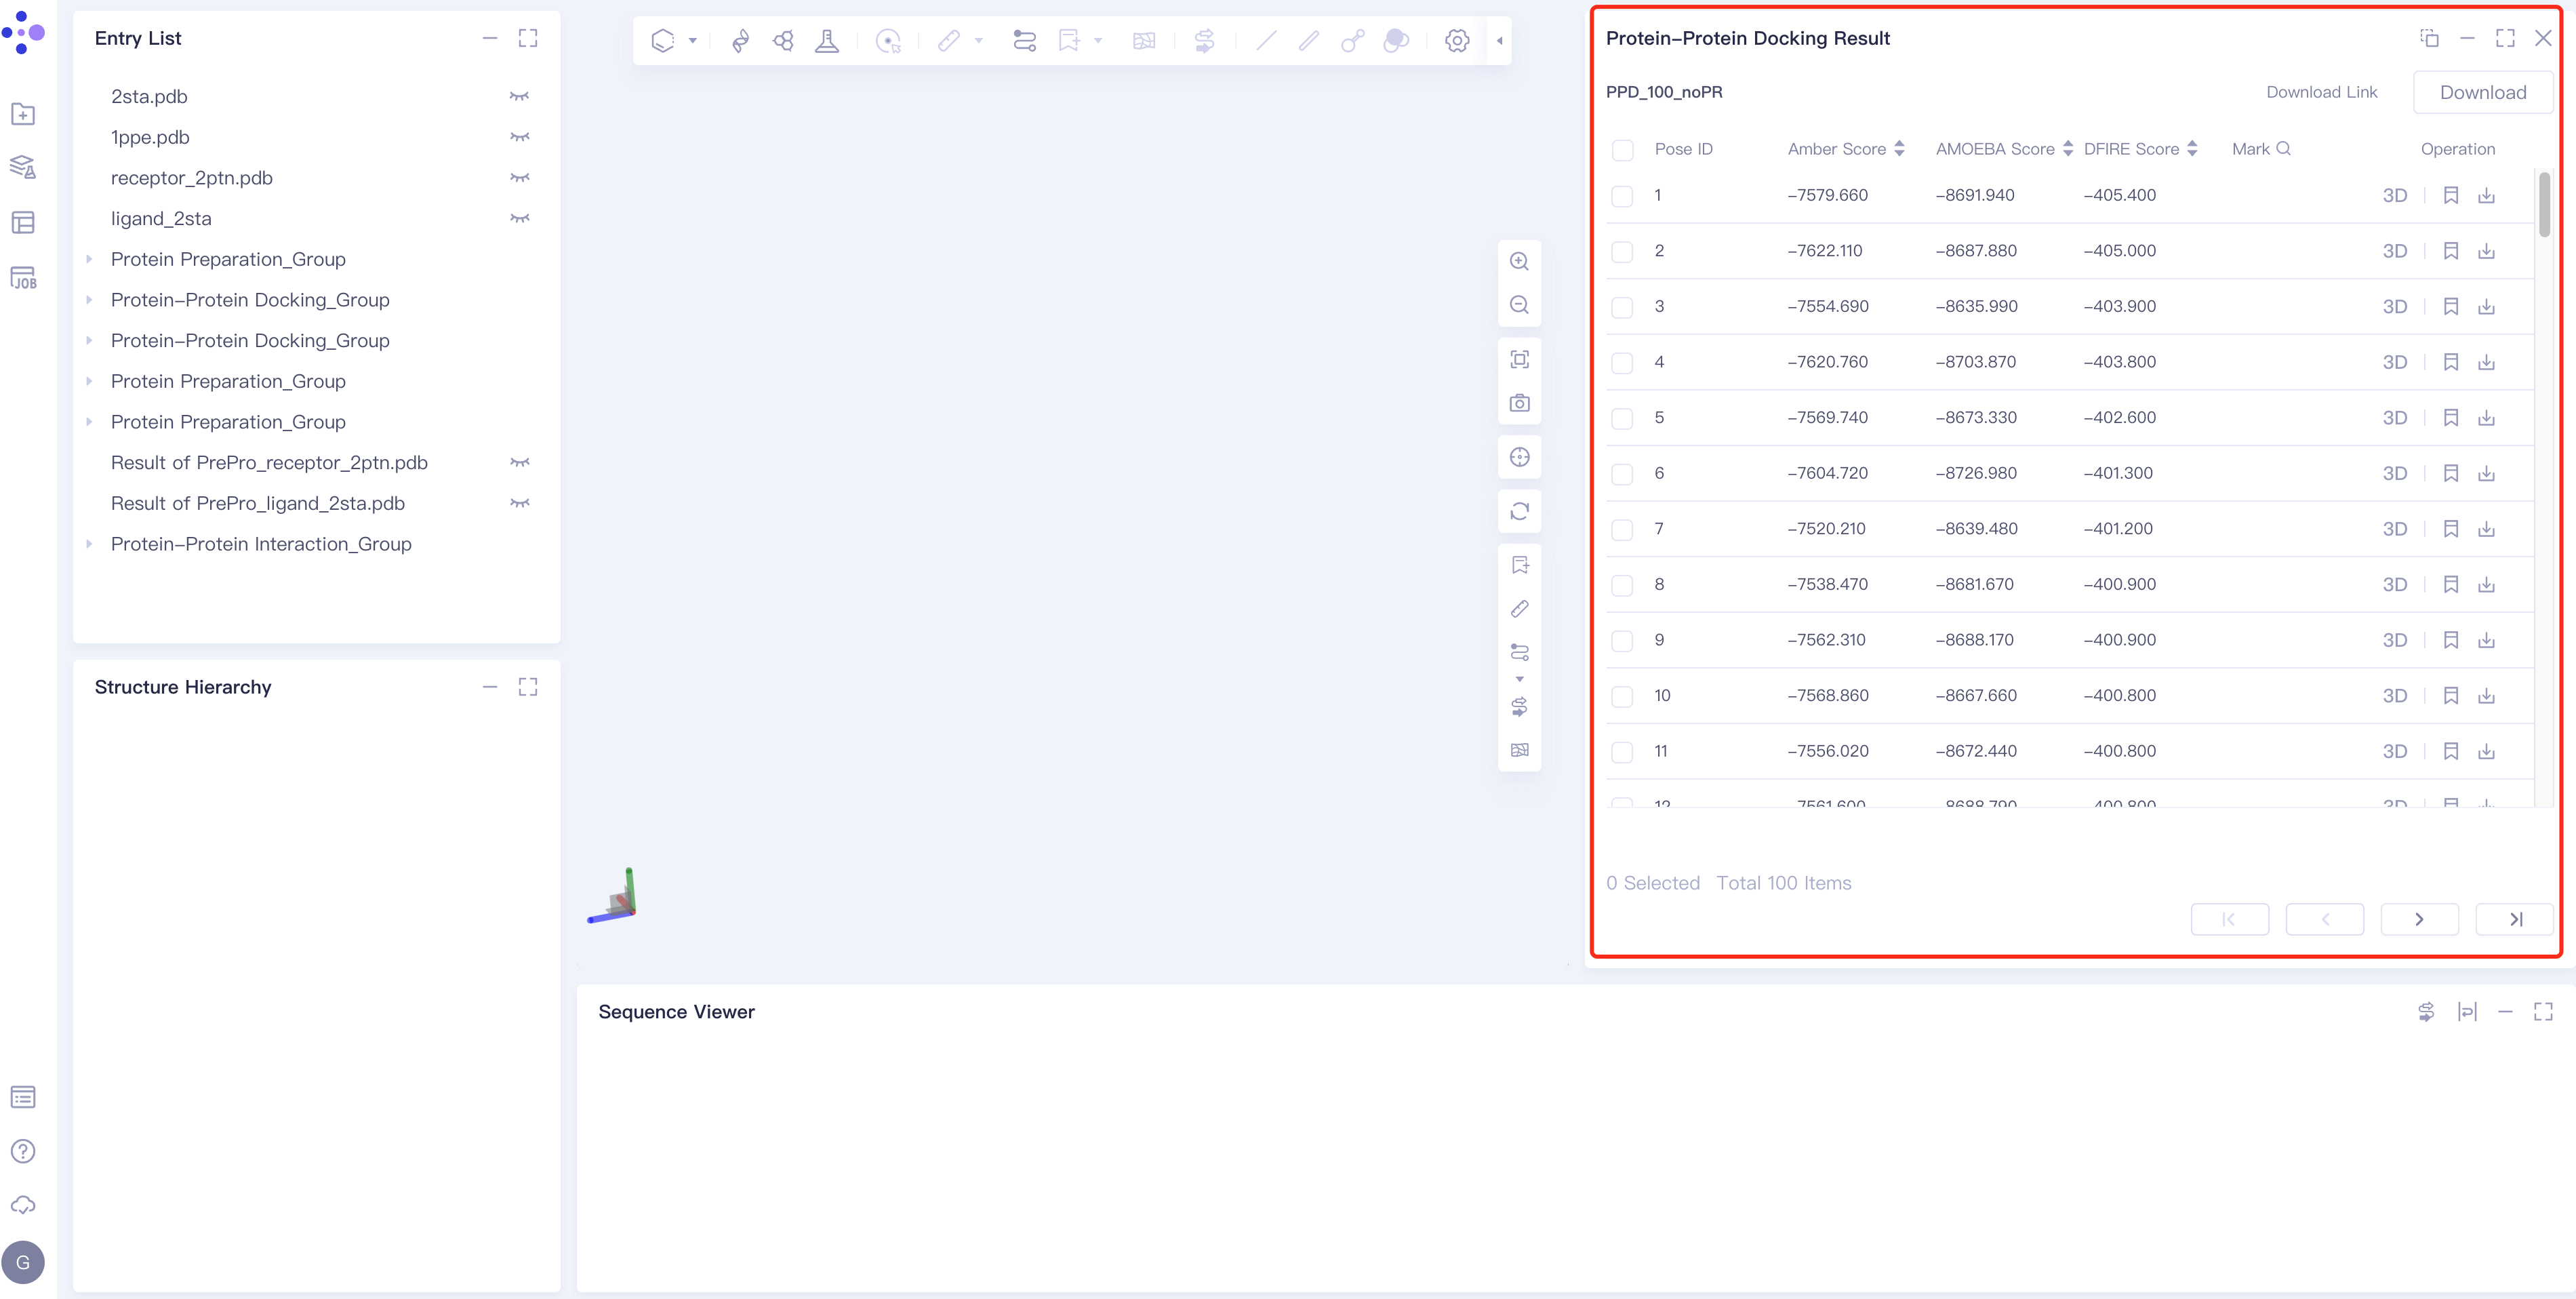
- Select the task to be viewed and click Show in the Operation column to display the result of the task, as shown in the figure below.
 |  |
3.2.2 Analysis of binding mode
-
Pose display and switching
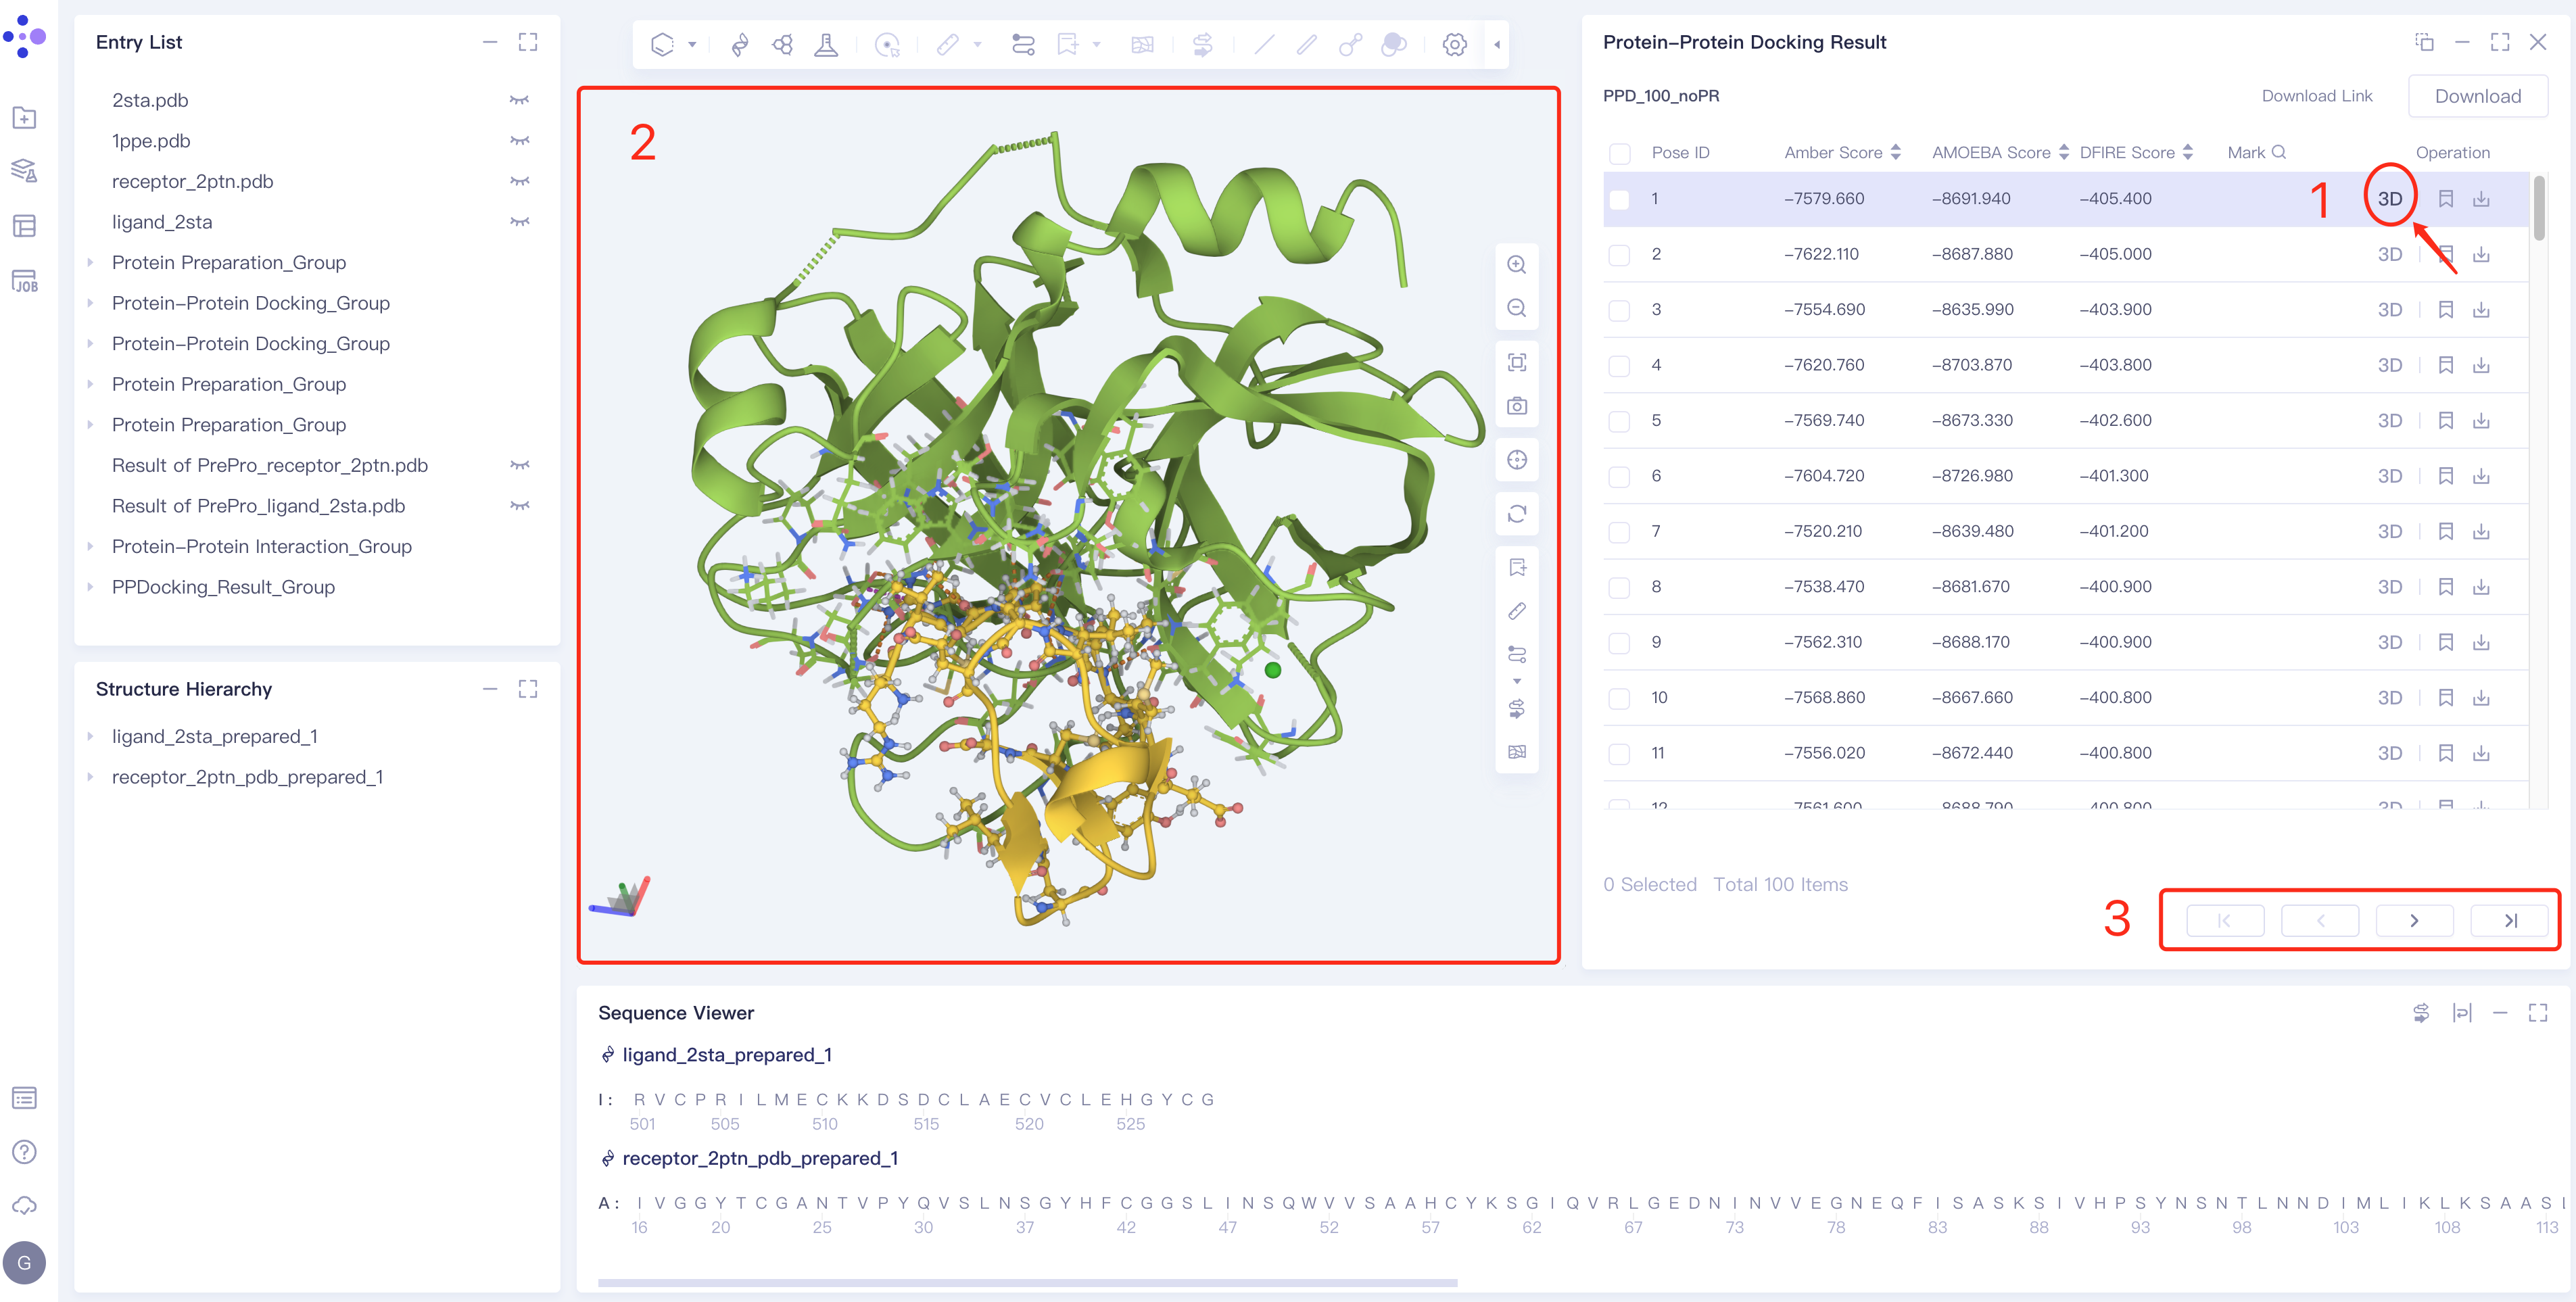
- Click 3D in the Operation column of the right Protein Protein Docking Result interface to display the binding mode after ligand-receptor docking in 3D Workspace. Click the arrow in the 3 box to switch the pose.
-
View non-bonding interactions
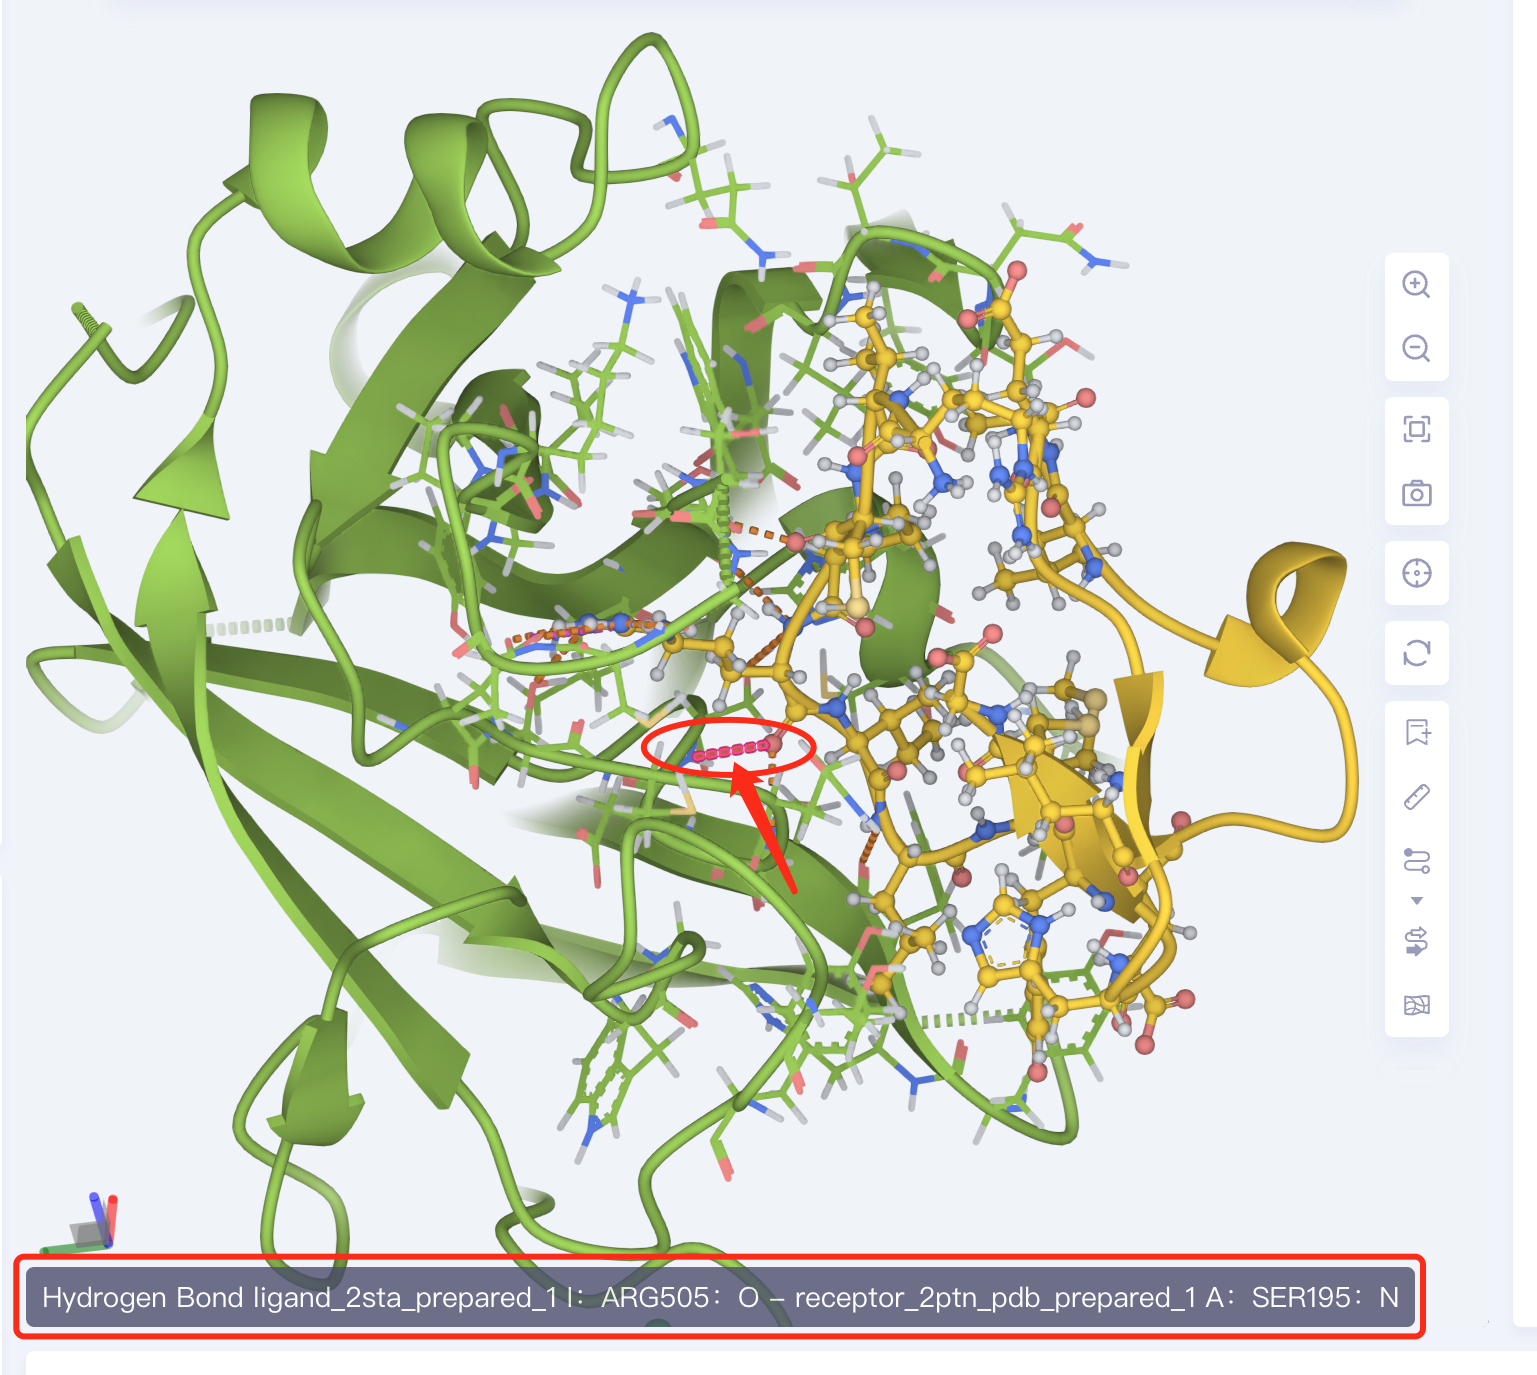
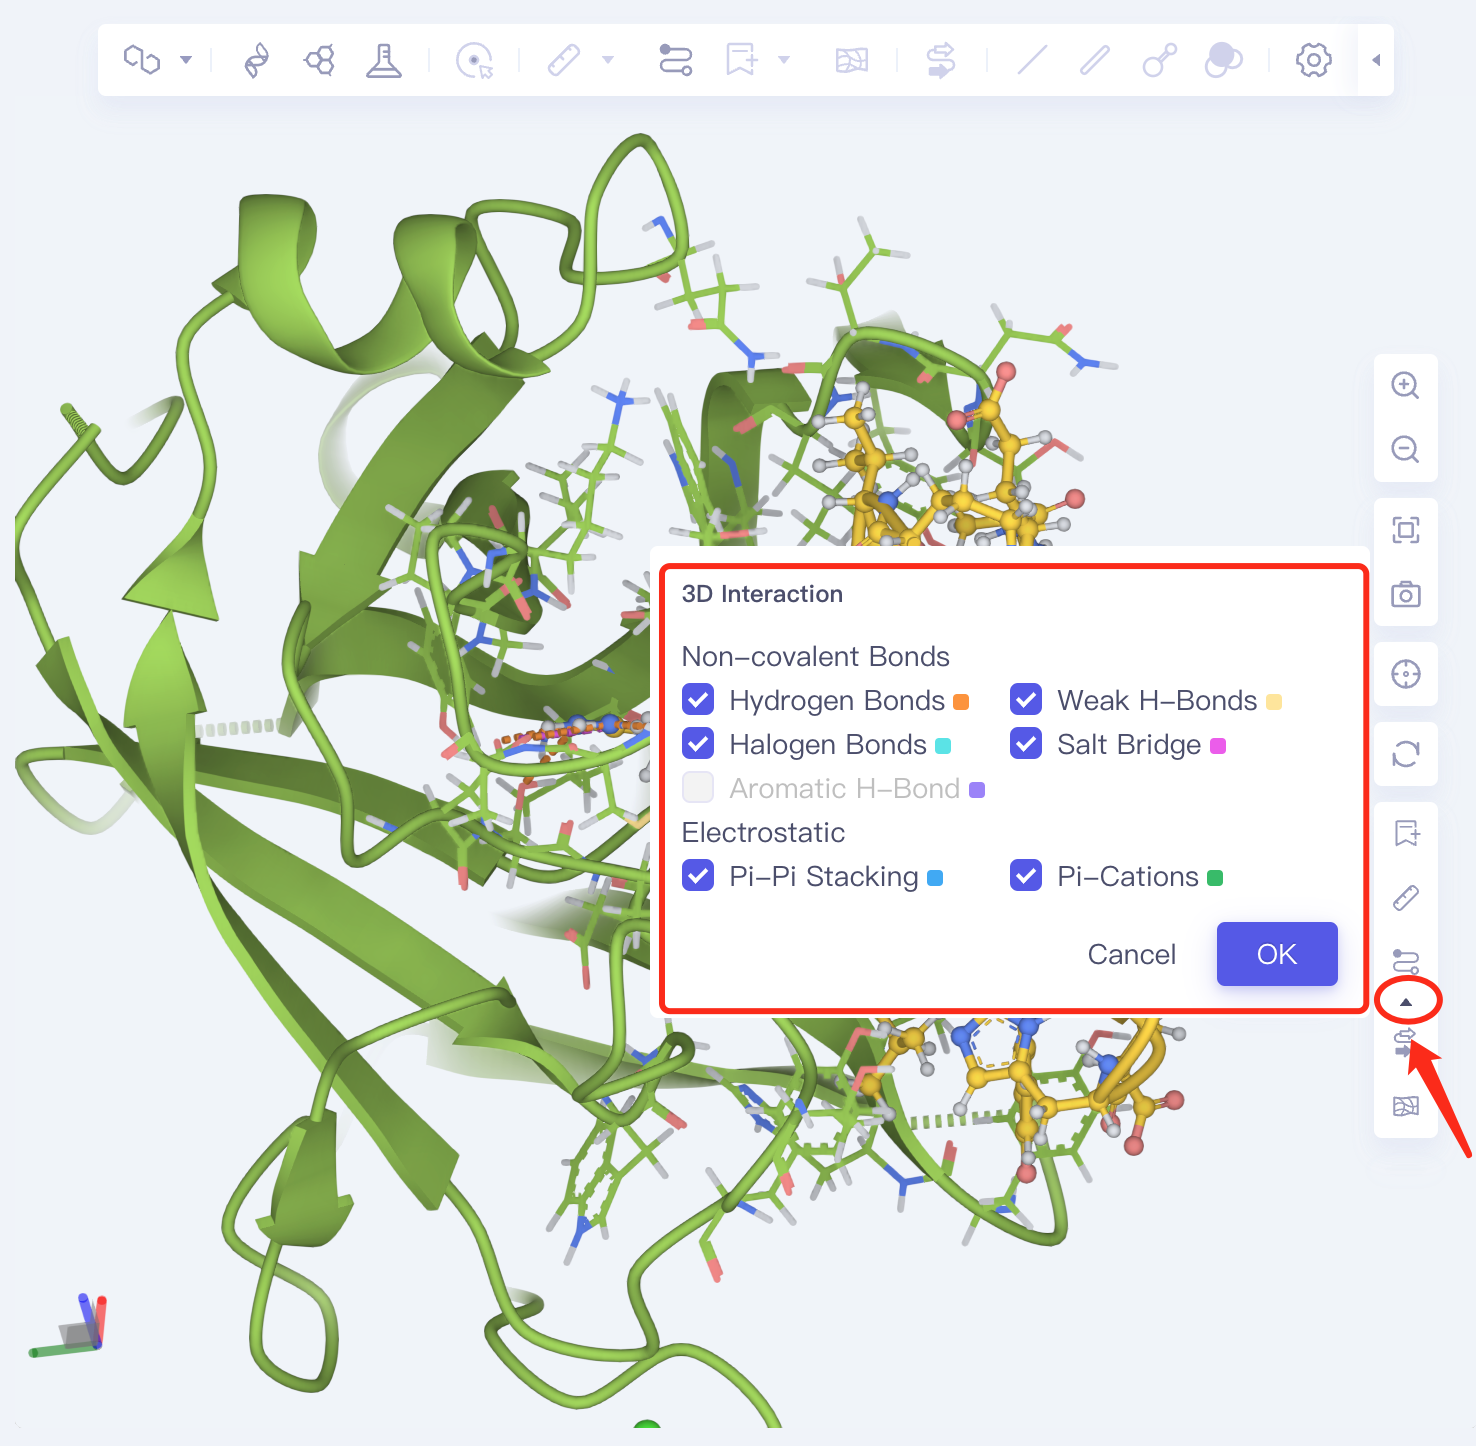
- The amino acid residues of the ligand-receptor interaction interface are presented in the form of Line. The dotted line is the non-bonding interaction. Click the dotted line to show the specific description of the interaction in the lower left corner of 3D Workspace. Or click the arrow below Interaction in the lower right corner for a description of the non-bonding interaction type.
3.2.3 Description of table contents
-
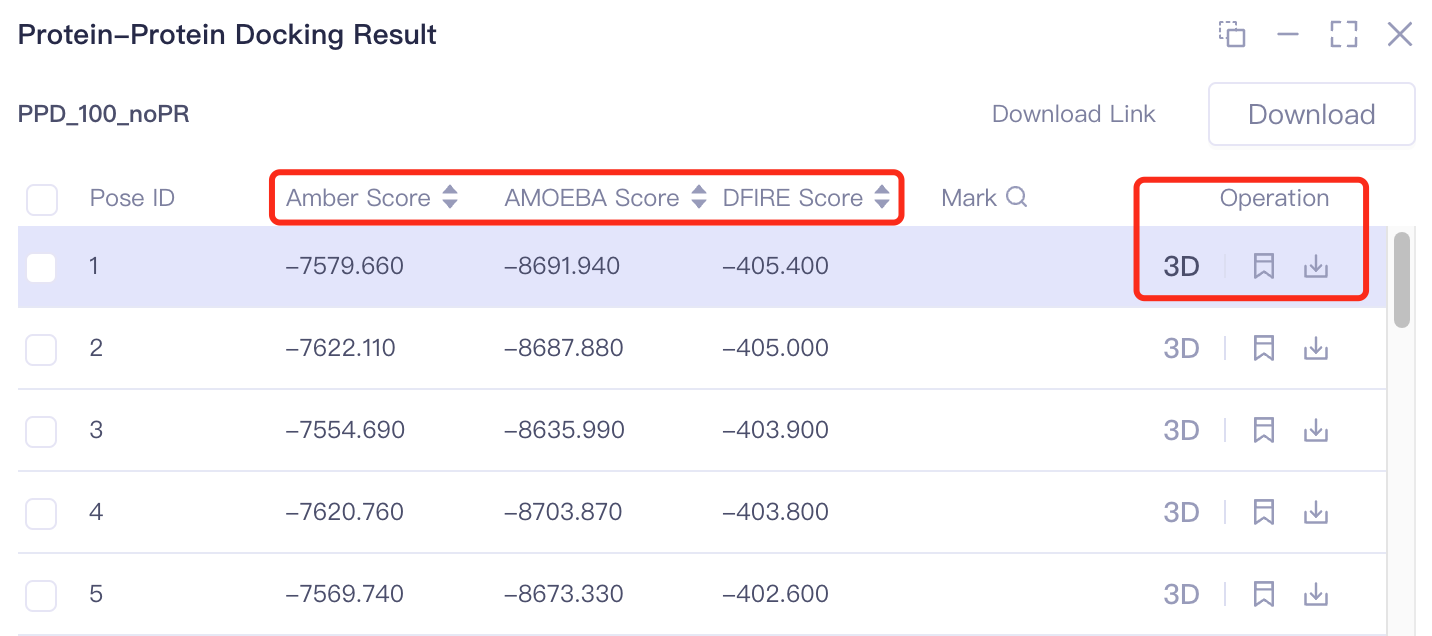
Pose ID: the serial number of the ligand-receptor binding mode is recorded;
-
Amber Score, AMOEBA Score and DFIRE Score: for the score of ligand-protein docking, click to sort from high to low or from low to high;
-
Operation includes 3 operation options:
-
3D: Display the ligand in 3D Works pace.
-
Mark: For some special data lines, you can click the mark to make manual remarks. After the remarks are made, they will be displayed in the mark column, and you can search by remarks.
-
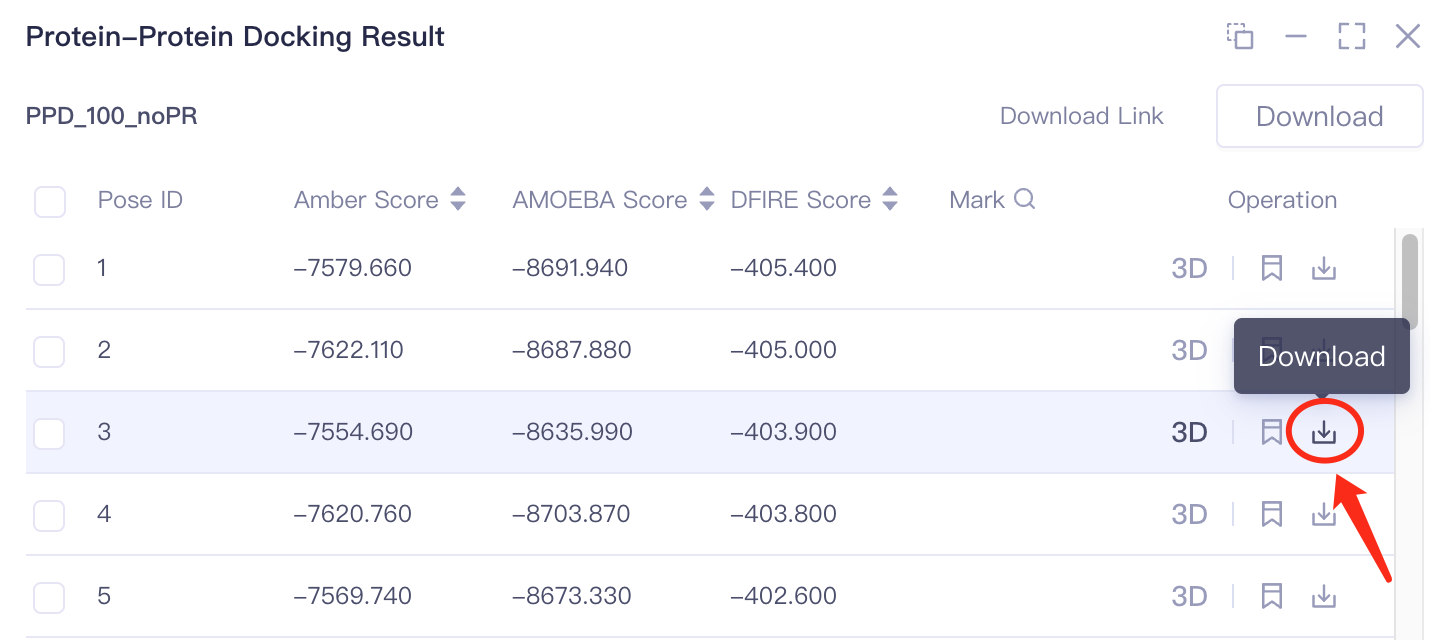
Download: The docked molecule is downloaded and can be stored in.pdb and.csv formats.
3.2.4 Results Download
- There are three ways to download
- Mode 1 Single result download: Download in Operation can download the result of a single pose;
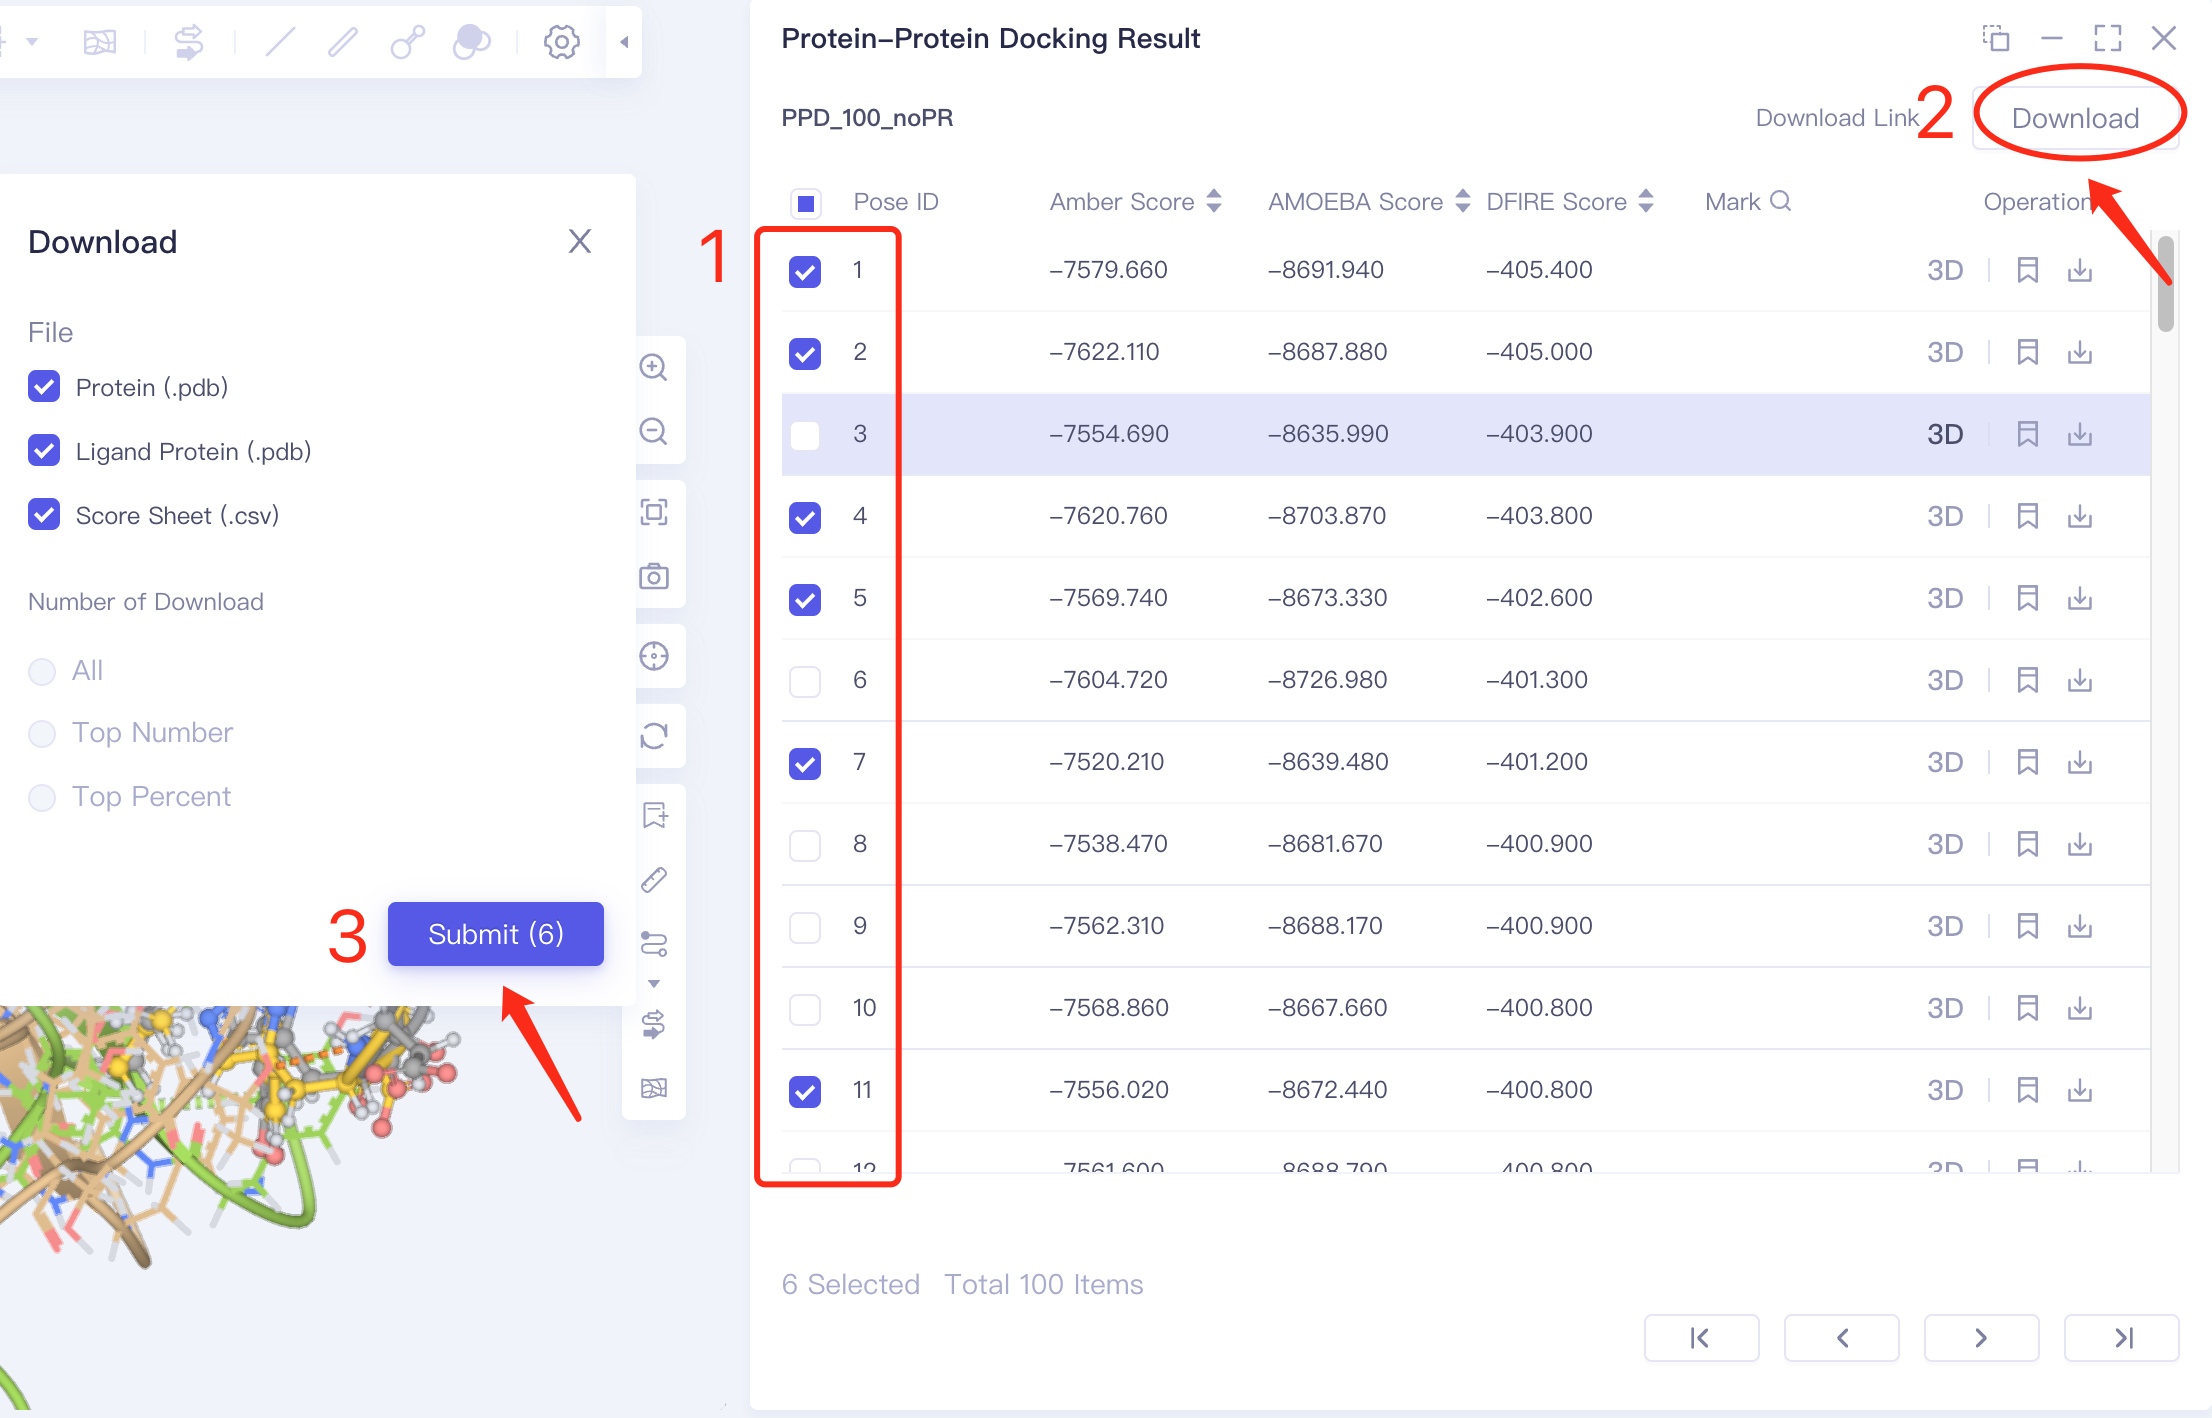
- Method 2: Specify multiple results to download: select multiple docking results in the check box → click Dowload in the upper right corner of the interface → click Submit to submit the task to download multiple results in batches.
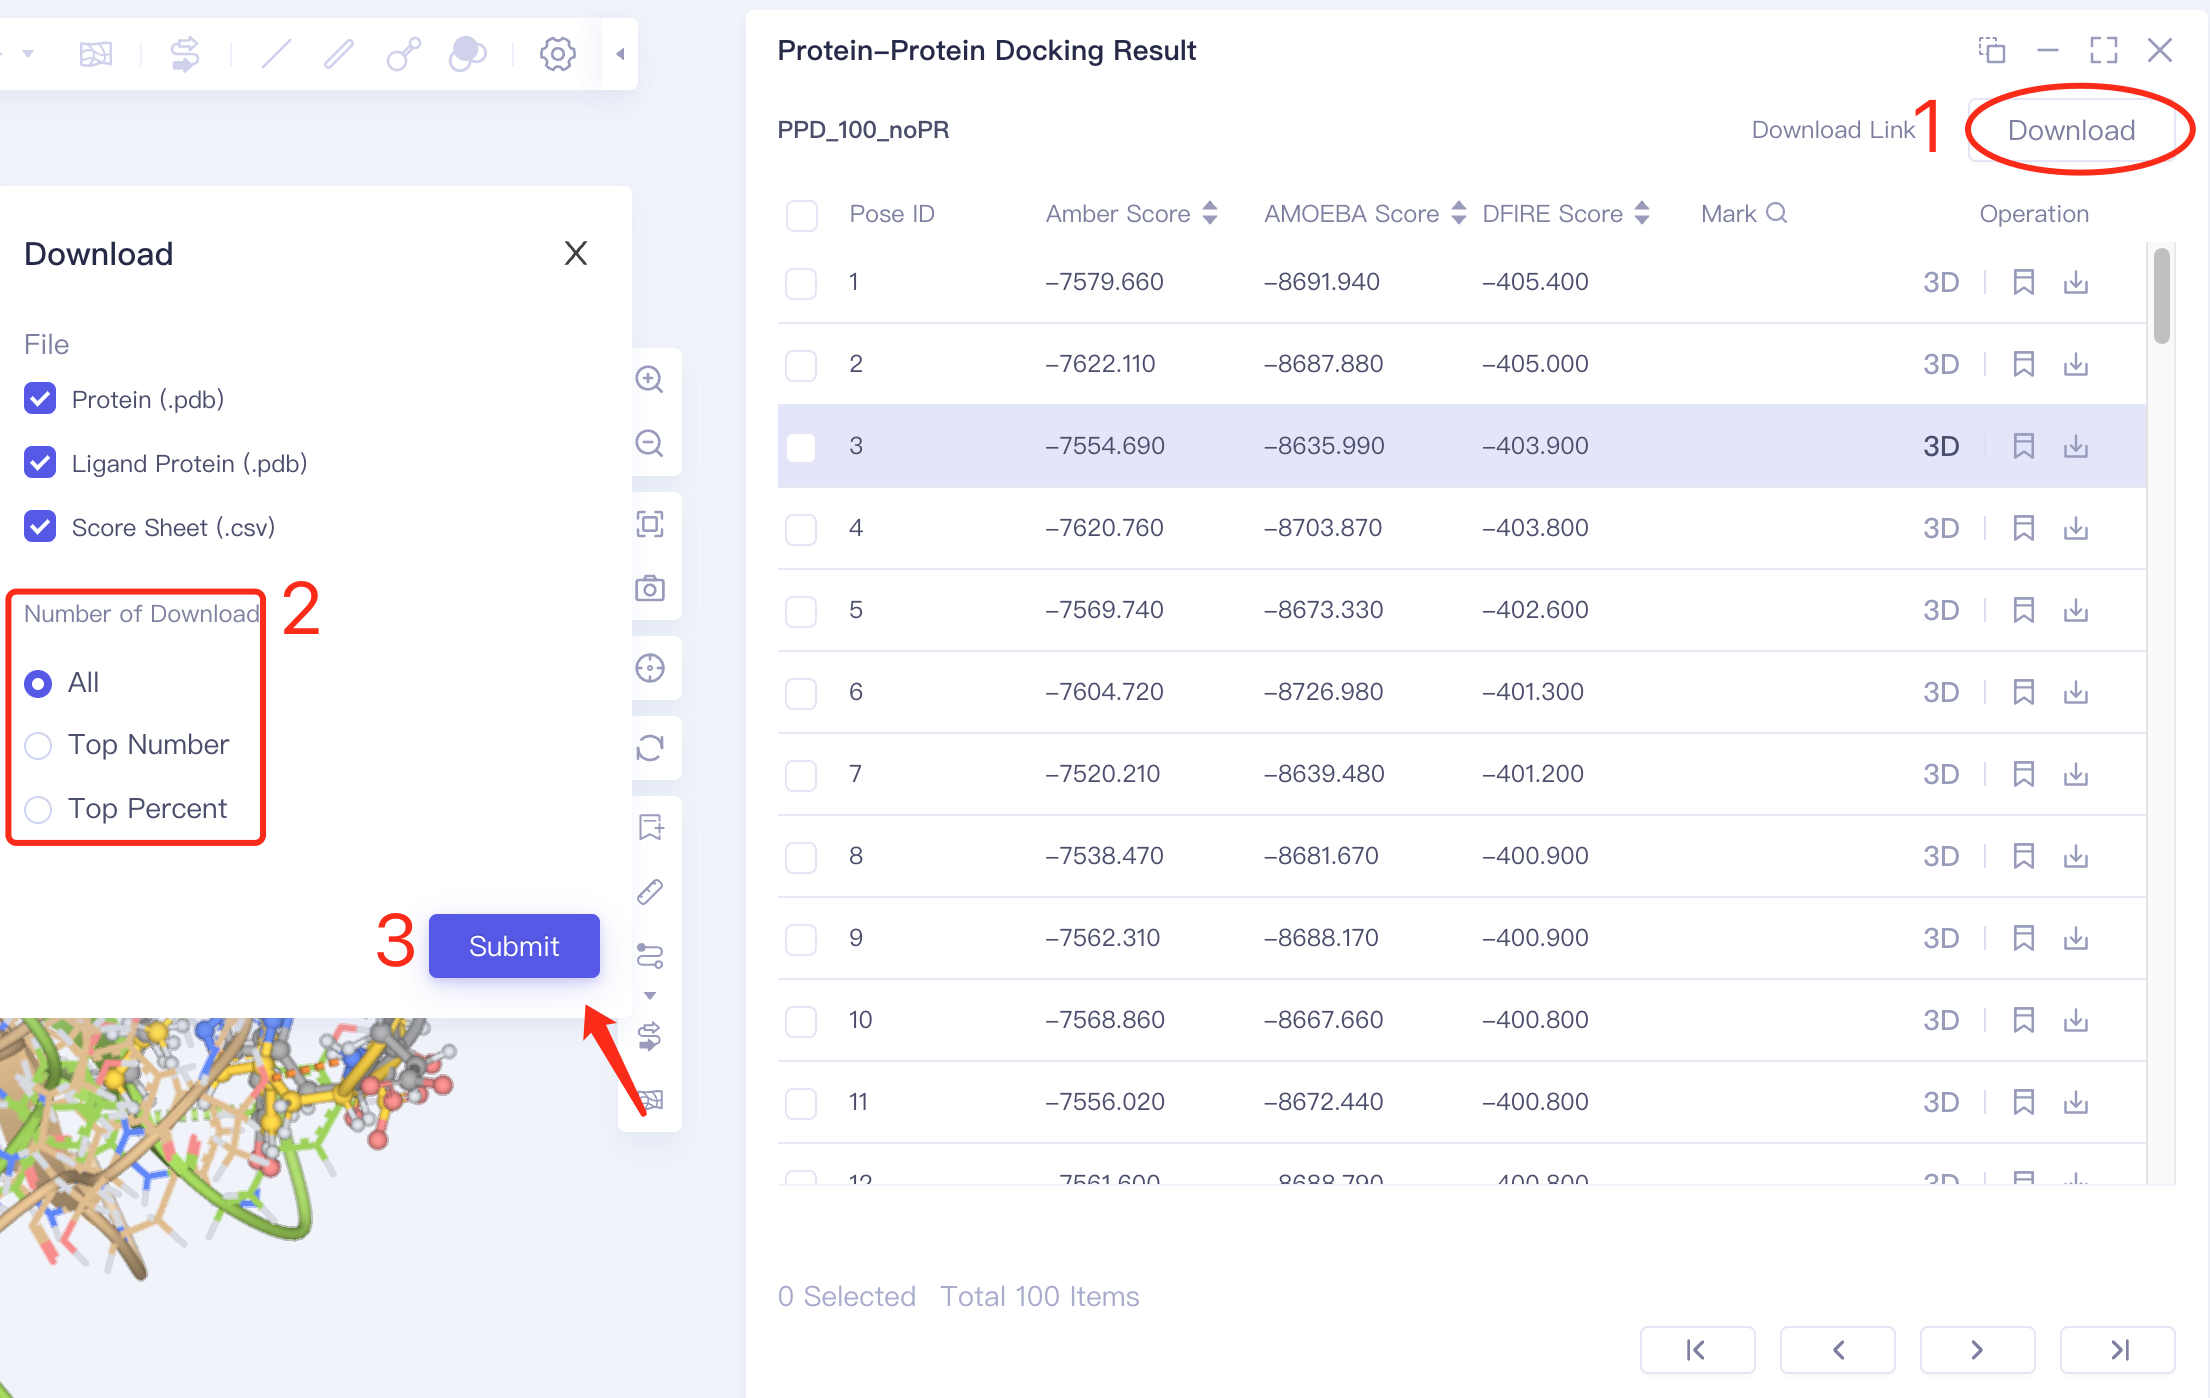
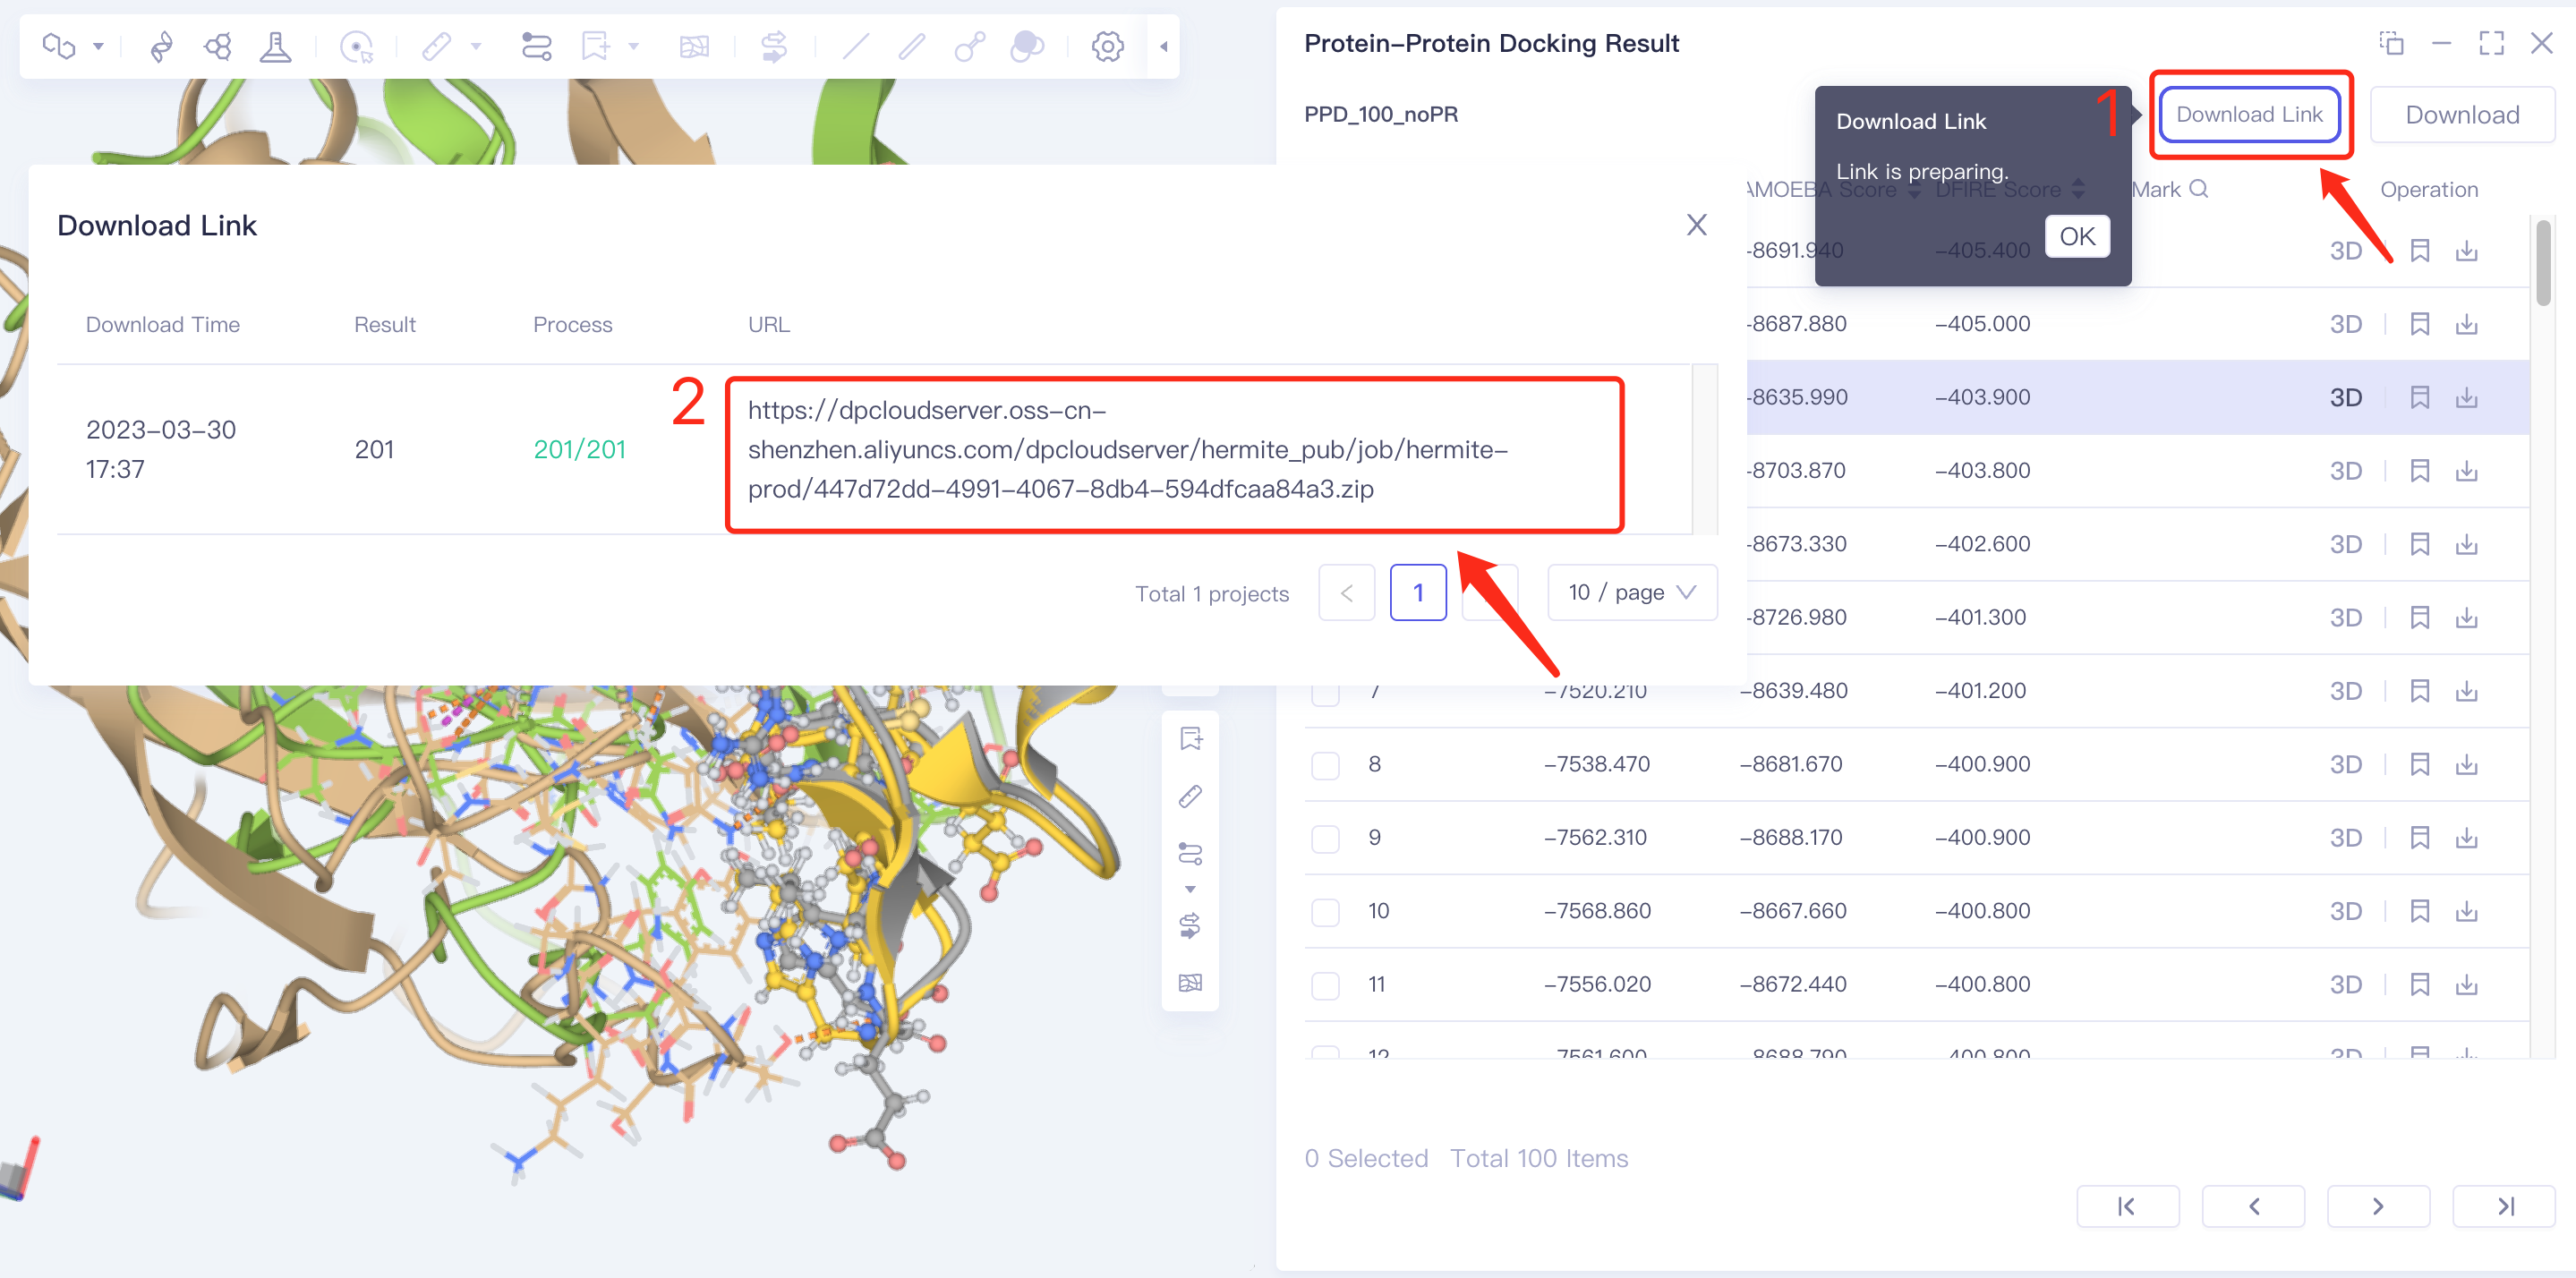
- Method 3 Batch download: click Download in the upper right corner → click Set the number of downloads in box 2 → click Submit to submit settings; then click Download Link in the upper right corner → click the link prepared by the program in the pop-up window to download in batches.
 |  |